Leg day for beginners often gets a bad rap—either it’s skipped entirely or tackled without a clear plan, especially by beginners. But here’s the truth: training your lower body is essential not just for aesthetic balance, but for total-body strength, stability, and long-term progress in the gym. If you’re new to leg day and unsure where to start, this guide breaks down the fundamentals of lower body training in a simple, beginner-friendly way. From muscle groups to essential exercises and recovery tips, you’ll learn how to build stronger legs with confidence and consistency.
Why Leg Day Matters for Beginners
Common Misconceptions About Leg Training
Many beginners shy away from leg day due to widespread myths and misconceptions that can stall progress before it even begins. One of the most common beliefs is that leg training is only necessary for athletes or bodybuilders. In reality, lower body strength is crucial for everyone—it enhances posture, mobility, balance, and even supports upper-body lifts like deadlifts and bench presses.
Another misconception is that cardio alone is enough to build strong legs. While activities like running or cycling improve endurance, they don’t provide the resistance needed to build muscle mass or functional strength in the legs. Weight-bearing exercises such as squats, lunges, and leg presses are essential for activating and developing muscles like the quads, hamstrings, and glutes.
Lastly, many believe leg workouts are too intense or complicated for beginners. The truth is, with proper guidance and a beginner-friendly routine, anyone can safely and effectively train their lower body. Using bodyweight movements, resistance machines, or light dumbbells can help build a solid foundation before progressing to more advanced techniques.
By debunking these myths early on, beginners can approach leg day with the right mindset—ready to commit, improve, and benefit from a well-rounded fitness program.
How Lower Body Workouts Improve Overall Strength and Balance
Training your lower body isn’t just about building bigger legs—it plays a vital role in enhancing your total-body strength and balance. The muscles in your legs and hips are among the largest and most powerful in the body, and they serve as the foundation for nearly every functional movement you perform daily, from walking and standing to lifting and jumping.
When you train major lower-body muscles like the quadriceps, hamstrings, glutes, and calves, you’re also engaging your core, which is responsible for stabilizing your entire body. Exercises like squats, lunges, and deadlifts force your core to activate, helping improve posture, coordination, and injury prevention.
Additionally, strong legs contribute significantly to upper-body performance. A stable and powerful base allows you to generate more force during compound lifts like overhead presses and cleans. In sports and everyday activities, good lower body strength improves agility, explosiveness, and endurance.
Balance is another major benefit of lower body training. Single-leg movements, such as step-ups or Bulgarian split squats, challenge your proprioception (your body’s ability to sense position), improving stability and reducing the risk of falls or sprains. Over time, this leads to better movement efficiency and physical control in both athletic and daily tasks.
In short, a strong lower body leads to a stronger, more balanced body overall—both in and out of the gym.
The long-term benefits of consistent leg day for beginners training
Committing to regular leg training goes far beyond short-term muscle gains—it lays the groundwork for lifelong strength, mobility, and health. The legs contain some of the largest muscle groups in the body, and consistently working them activates powerful hormonal responses that support muscle growth, fat loss, and improved metabolism across your entire body.
Over time, consistent lower-body workouts help increase bone density, which is essential for preventing age-related bone loss and reducing the risk of osteoporosis. They also enhance joint stability and flexibility, particularly in the hips, knees, and ankles, helping you maintain better movement mechanics and reduce the risk of injury—both in the gym and in daily life.
Another key long-term benefit is functional strength. Strong legs improve your ability to perform everyday tasks, such as climbing stairs, lifting groceries, or even playing with your kids. For athletes or active individuals, a strong lower body translates into better performance, faster sprint times, and more explosive power.
Mentally, consistent leg training builds discipline and resilience. Leg day is often viewed as the most demanding workout of the week, and staying committed to it can enhance your mental toughness, boost confidence, and foster a results-driven mindset.
In short, consistent leg training supports not only your physique but also your longevity, performance, and quality of life. It’s a long-term investment in a stronger, more capable you.
Key Lower Body Muscles and Exercises
Targeting major muscle groups: Quads, Hamstrings, Glutes, Calves
A well-rounded leg workout focuses on hitting all the major lower-body muscle groups: quadriceps, hamstrings, glutes, and calves. Each plays a distinct role in movement, strength, and balance, and understanding how to train them effectively is key to building strong, proportionate legs.
Quadriceps (Quads)
Located at the front of your thighs, the quads are responsible for knee extension and are heavily engaged during movements like squats, lunges, and leg presses. Strong quads support walking, running, jumping, and stabilizing the knee joint. Exercises such as bodyweight squats and leg extensions are ideal for beginners looking to activate this muscle group.
Hamstrings
Situated at the back of the thigh, the hamstrings work opposite the quads and are crucial for knee flexion and hip extension. They’re heavily used in activities like deadlifts, glute bridges, and leg curls. Strengthening your hamstrings not only improves athletic performance but also reduces injury risk by balancing out strong quads.
Glutes
The gluteal muscles—especially the gluteus maximus—are the powerhouse of the lower body. They assist with hip extension, posture, and overall power generation. Glute-focused exercises such as glute bridges, hip thrusts, and kickbacks help improve strength, shape, and function, and are especially important for those who sit for long periods.
Calves
The calves (gastrocnemius and soleus) are the smaller muscles at the back of your lower legs. They control ankle movement and are involved in walking, running, and jumping. Standing or seated calf raises are effective exercises to target and strengthen this often-overlooked area, enhancing lower-leg endurance and stability.
Beginner-Friendly Bodyweight Moves: Squats, Glute Bridges, Lunges
Bodyweight exercises are the perfect starting point for beginners beginning their leg training journey. These foundational movements not only help you build strength and mobility but also improve coordination and balance without the need for gym equipment. Below are three essential bodyweight exercises that target all major leg muscles:
1. Squats
Squats are one of the most effective lower body exercises, engaging the quads, hamstrings, glutes, and core. They mimic natural movement patterns like sitting and standing, making them highly functional. For beginners, bodyweight squats are ideal for learning proper form and building strength. Focus on keeping your chest up, knees in line with your toes, and lowering yourself to at least parallel to the ground.
Tip: Start with 3 sets of 10–12 reps, and as your strength improves, increase reps or try variations like wall squats or goblet squats.
2. Glute Bridges
This exercise targets the glutes and hamstrings, helping to activate the posterior chain—a muscle group often neglected in sedentary lifestyles. Glute bridges are done lying on your back with knees bent, pushing your hips upward. They’re excellent for developing glute strength and improving hip stability.
Tip: Hold each bridge at the top for 2–3 seconds for extra muscle activation. Add a resistance band above the knees for more challenge as you progress.
3. Lunges
Lunges work the quads, glutes, and calves while also challenging your balance and coordination. They help correct muscle imbalances between legs and are great for improving single-leg strength. Begin with stationary lunges, then progress to walking or reverse lunges once confident.
Tip: Keep your torso upright, step long enough that your knee stays above your ankle, and avoid letting the front knee go past your toes.
Incorporating these three movements into your routine can build a solid strength foundation while minimizing injury risk. They’re scalable, functional, and effective—perfect for anyone starting their leg day journey.
Machine-Based Support: Leg Press, Leg Curl, Glute Kickback Machines
For beginners who are new to strength training or those recovering from injuries, resistance machines offer a safe and supportive way to build lower-body strength. These machines guide your movement patterns, reduce the risk of poor form, and allow for controlled muscle activation. Here are three beginner-friendly machines to include in your leg training:
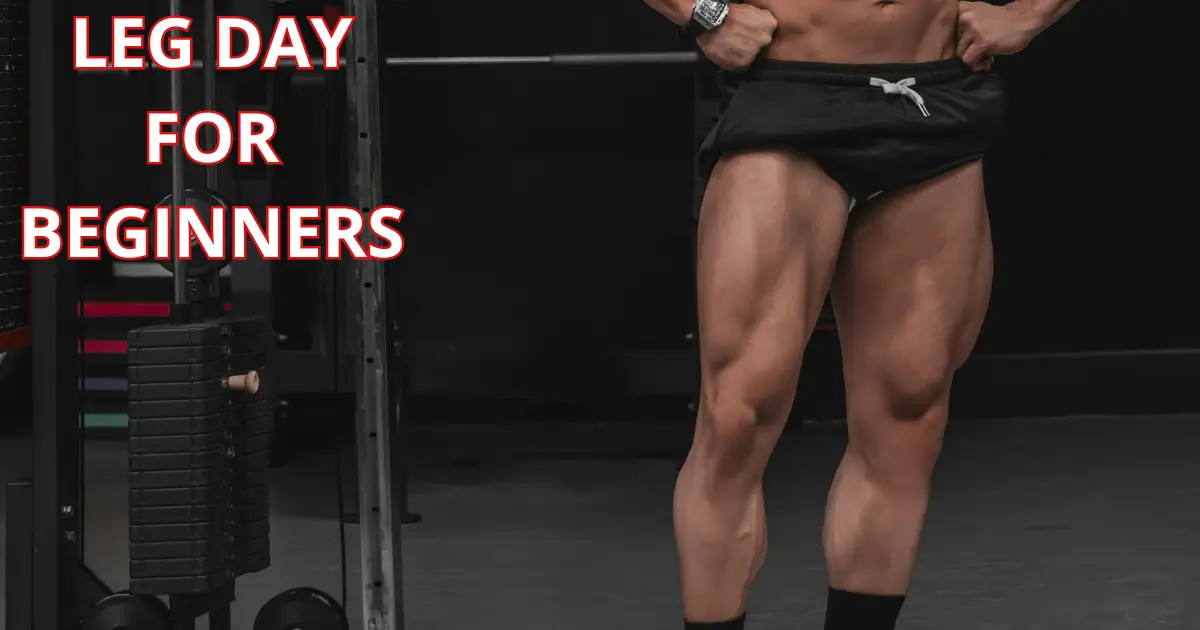
1. Leg Press Machine
The leg press targets the quads, hamstrings, and glutes with minimal strain on the lower back. Seated in a reclined position, you push a weighted platform with your feet, mimicking the squatting motion but with more stability and support.
Benefits:
- Ideal for beginners who struggle with squat form.
- Adjustable weight makes it easy to progress.
- Reduces spinal compression compared to barbell squats.
Tip: Avoid locking out your knees at the top of the movement and ensure your back stays flat against the pad throughout the lift.
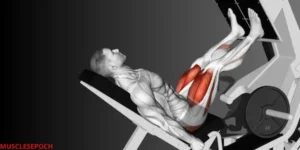
2. Leg Curl Machine
The leg curl machine isolates the hamstrings, the muscles at the back of your thighs, which are crucial for knee stability and overall leg balance. This exercise involves curling your legs toward your glutes against resistance, either lying down (prone) or seated, depending on the machine.
Benefits:
- Helps balance quad-dominant routines.
- Strengthens knee flexion and hip extension.
- Useful for injury prevention, especially in athletes.
Tip: Perform the movement slowly and under control to fully engage the hamstrings and avoid using momentum.
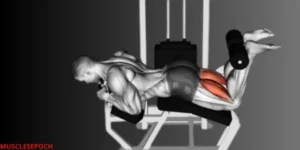
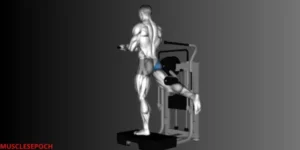
3. Glute Kickback Machine
This machine focuses on activating and strengthening the glutes, which play a major role in posture, hip stability, and power generation. The movement involves extending one leg backward in a controlled motion while bracing the core.
Benefits:
- Isolates the glutes more effectively than some compound lifts.
- Great for improving hip extension and glute engagement.
- Safe for beginners and easy to adjust resistance.
Tip: Keep the movement controlled and avoid overextending the leg or arching your lower back.
Incorporating machine-based leg exercises can help you build confidence, reinforce proper muscle activation, and provide a structured path to strength development. They serve as excellent tools, especially for those just beginning their fitness journey or looking for lower-impact training options.
Building an Effective Beginner Leg Day Routine
Sample workout plan (home and gym options)
For beginners, having a clear and structured workout plan can make all the difference in ensuring proper form, muscle engagement, and steady progress. Below is a beginner-friendly leg workout plan that includes both home and gym options, so you can work towards stronger legs regardless of your location or available equipment.
Home Workout Plan: Bodyweight Exercises
If you don’t have access to a gym, don’t worry! You can still build muscle and strength with bodyweight exercises that focus on functional movements. Here’s a simple leg day workout for at-home training:
1. Bodyweight Squats (3 sets of 12-15 reps)
Squats are a foundational exercise that targets the quads, hamstrings, glutes, and core. Keep your feet shoulder-width apart and squat as low as your mobility allows while maintaining a neutral spine.
2. Glute Bridges (3 sets of 15 reps)
Glute bridges strengthen the glutes, hamstrings, and core. Lie on your back with knees bent, and push your hips up towards the ceiling. Hold for 1-2 seconds at the top, then lower back down.
3. Walking Lunges (3 sets of 10-12 reps per leg)
Lunges are great for unilateral leg strength. Take a step forward, bending both knees to about 90 degrees, then push through the front heel to return to standing. Switch legs and repeat.
4. Wall Sit (3 sets of 30-45 seconds)
This isometric exercise works the quads, hamstrings, and glutes. Press your back against the wall and slide down until your knees form a 90-degree angle. Hold the position for time to really burn the legs.
5. Calf Raises (3 sets of 20 reps)
For calf development, simply raise your heels and balance on the balls of your feet. You can perform these while standing or holding onto a chair for stability.
Gym Workout Plan: Machine and Free Weights
At the gym, you have access to machines and free weights, which provide more resistance and variety to your leg day workout. Here’s a sample plan that incorporates both machine-based and free-weight exercises for a balanced approach:
1. Leg Press Machine (3 sets of 12 reps)
Sit on the machine, place your feet shoulder-width apart on the platform, and press the weight upward. Control the movement both when pressing up and lowering the weight.
2. Leg Curl Machine (3 sets of 12 reps)
Use the seated or lying leg curl machine to target the hamstrings. Adjust the machine to fit your body, and focus on contracting the hamstrings as you curl your legs toward your glutes.
3. Barbell Squats (3 sets of 8-10 reps)
For those comfortable with barbell exercises, squats are a great option. Start with lighter weight to focus on form. Keep your chest up, back straight, and lower until your thighs are parallel to the floor.
4. Dumbbell Lunges (3 sets of 10 reps per leg)
Holding a dumbbell in each hand, perform lunges in place or walking lunges. Make sure to step long enough so that your front knee stays directly above your ankle, and avoid letting the knee extend past your toes.
5. Glute Kickback Machine (3 sets of 12-15 reps per leg)
This machine isolates the glutes and is great for strengthening the posterior chain. Focus on controlled, slow movements to maximize glute activation as you push your leg backward.
6. Calf Raises (3 sets of 15-20 reps)
Use a standing calf raise machine or perform bodyweight calf raises while holding onto a stationary surface for balance. Focus on a full range of motion, pushing through the balls of your feet to work the calves.
Suggested Rest Periods:
For both home and gym workouts, aim for around 60-90 seconds of rest between sets to allow for optimal muscle recovery and endurance. If you’re using heavier weights or performing more intense exercises, you might need slightly longer rest periods.
By following a structured workout plan tailored to your fitness level and goals, whether you’re working out at home or in the gym, you can ensure steady progress and avoid overtraining. These sample routines provide variety and can be adjusted as your strength and experience grow.
Warming up and cooling down for injury prevention
Incorporating proper warm-up and cool-down routines into your leg day workouts is essential for preventing injuries, enhancing performance, and ensuring recovery. Whether you’re training with bodyweight exercises or using heavy machines and weights, taking the time to prepare your body before and after your workout will set you up for success in the long term. Let’s break down why both are important and how you can do them effectively.
Why Warm-Up?
The primary purpose of warming up is to prepare your body physically and mentally for the upcoming intensity of your workout. A good warm-up increases blood flow to the muscles, boosts your heart rate, and enhances flexibility. This helps to prevent strains and sprains by ensuring that the muscles and joints are properly lubricated and ready to handle the stress of exercise.
Benefits of Warming Up:
- Increases blood flow: Warming up ensures that your muscles receive the oxygen and nutrients they need to perform at their best.
- Improves joint mobility: It activates the muscles around your joints, improving the range of motion and reducing stiffness.
- Prevents injuries: A gradual increase in intensity helps prepare your muscles and connective tissues for the strain of your workout, reducing the risk of tearing or straining.
- Boosts mental focus: Warming up also helps you mentally prepare for the session ahead, allowing you to focus on form and technique.
How to Warm Up Properly:
A typical warm-up for leg day should last between 5-10 minutes and involve dynamic movements that increase your heart rate while also activating the muscles you’ll be working on. Here are a few effective warm-up exercises to do before you dive into your leg workout:
- Dynamic Stretches
Instead of static stretches (holding a stretch for 30 seconds), perform dynamic stretches that involve movement to activate the muscles. Some good examples include:- Leg swings (forward and sideways)
- Lunges with a twist
- High knees (marching in place, lifting your knees towards your chest)
- Walking toe touches (reaching your opposite hand to touch your toes as you walk forward)
- Light Cardio
Begin with 2-3 minutes of light cardio to get your blood flowing and warm up your muscles:- Stationary bike or treadmill walking
- Jump rope (great for increasing heart rate and engaging your calves)
- Bodyweight squats or lunges (perform these at a slow pace to get the muscles activated)
- Activation Drills
To target your leg muscles, consider performing a few lower-intensity, activation exercises:- Bodyweight squats: Start with 2 sets of 10 reps at a slow, controlled pace.
- Glute bridges: Perform 2 sets of 10 to activate your glutes and hamstrings.
- Lateral leg raises: Helps to activate the hip abductors, which play a significant role in overall lower body stability.
Why Cool Down?
Cooling down after your workout is just as important as warming up. After pushing your muscles to their limits, it’s crucial to allow them to gradually return to a state of rest. A proper cool-down reduces muscle stiffness, aids in the removal of metabolic waste (like lactic acid), and promotes recovery. Failing to cool down can lead to tightness, soreness (DOMS), and a longer recovery period.
Benefits of Cooling Down:
- Reduces muscle tightness: Cooling down helps prevent muscles from feeling tight or stiff after intense exercise.
- Promotes muscle recovery: Helps to remove metabolic waste that builds up during exercise, such as lactic acid, which can lead to soreness.
- Improves flexibility: Gentle stretching after exercise can help improve flexibility and range of motion over time.
- Reduces the risk of injury: Gradually bringing your heart rate and blood pressure back to baseline reduces the risk of dizziness, fainting, or muscle strain.
How to Cool Down Properly:
A cool-down should take 5-10 minutes and incorporate light cardio followed by stretching exercises. Here are some cool-down strategies to implement after your leg day workout:
- Low-Intensity Cardio
After your workout, perform 3-5 minutes of low-intensity cardio to help your body transition from intense exertion back to a resting state. You can do:- Walking on the treadmill
- Cycling at a slow pace
- Light jogging or marching in place
- Static Stretches
Focus on stretching the major muscle groups that were targeted during your leg day workout. Hold each stretch for 20-30 seconds without bouncing. Stretching helps increase flexibility and can reduce post-workout soreness:- Quad stretch: Stand on one leg, pull your opposite foot toward your glutes, and hold it there.
- Hamstring stretch: Sit on the floor with one leg extended out and the other leg bent. Reach for your toes on the extended leg.
- Hip flexor stretch: Lunge forward with one leg, keeping your back leg straight to stretch the hip flexors.
- Calf stretch: Stand with one foot forward and the other leg straight behind you. Push your heel to the floor to stretch the calves.
- Foam Rolling (Optional)
Using a foam roller can help release muscle tension and reduce the buildup of lactic acid in the muscles. Focus on areas that feel particularly tight or sore, such as the quads, hamstrings, calves, and glutes.
leg day for beginners:How and when to add resistance (progressive overload)
Progressive overload is one of the most critical principles for continuous progress in your strength and muscle-building journey. This concept involves gradually increasing the stress placed on your muscles during each workout, which forces them to adapt and grow stronger over time. Without progressive overload, your body will plateau, and you may stop seeing results. But how and when should you add resistance to your leg workouts?
Understanding Progressive Overload:
The main idea behind progressive overload is to challenge your muscles beyond their current capacity, allowing them to recover and adapt to the increased demands. As a result, your muscles grow in size and strength. This principle can be applied in various ways—such as increasing the weight, the reps, the sets, or the intensity of your exercises.
When done correctly, progressive overload helps you break through strength plateaus, avoid workout monotony, and achieve long-term gains in strength and muscle mass. But it’s crucial to understand how and when to safely implement these increases to prevent injury and ensure steady progress.
How to Apply Progressive Overload in Leg Day Workouts:
- Increasing the Weight:
The most straightforward and common way to add resistance is by increasing the weight you are lifting. Whether you’re performing squats, leg presses, or lunges, gradually increasing the load forces your muscles to work harder, resulting in growth and strength improvements.- Example: If you can perform 10 reps of squats with 50 kg, aim to add 2.5–5 kg to the bar once you can do 10 reps comfortably without breaking form. Always prioritize good form when adding weight.
- Increasing Reps and Sets:
If adding weight is not an option or you want to focus on increasing endurance, increasing the number of repetitions (reps) or sets can also stimulate muscle growth. For example, if you are consistently completing 3 sets of 8 reps on squats, try adding an extra set or going for 10–12 reps per set.- Example: Instead of doing 3 sets of 8 reps on leg curls, increase the reps to 12 or 15 while keeping the same weight to improve muscle endurance and increase time under tension.
- Increasing Time Under Tension (TUT):
Another method of progressive overload involves manipulating the time under tension during your exercises. Slowing down your repetitions (eccentric or concentric phase) can help to increase muscle activation without needing to add extra weight.- Example: Slow down the lowering phase of squats or leg presses by taking 3-4 seconds to lower the weight, and then explosively press back up. This increases the time your muscles are under tension, stimulating growth and increasing the challenge without adding weight.
- Decreasing Rest Time Between Sets:
By reducing the rest time between sets, you increase the intensity of your workout. This method forces your muscles to work harder by improving their endurance and helping to break through plateaus.- Example: If you usually rest 90 seconds between sets, reduce the rest time to 60 seconds to increase the cardiovascular intensity and challenge your leg muscles further.
When to Add Resistance (Progressive Overload):
Knowing when to add resistance is just as important as how to add it. Here are some signs that it’s time to implement progressive overload into your leg workouts:
- When You Can Complete Your Current Reps with Ease:
One of the clearest indicators that it’s time to add resistance is when you can complete your current rep range with minimal difficulty. For example, if you’re lifting a weight for 8–10 reps, and it feels too easy, it’s time to increase the load.- Guideline: Once you can complete all sets of an exercise with perfect form and within your target rep range, it’s a signal to increase the resistance to continue progressing.
- When You’ve Reached Your Target Rep Range:
If you consistently hit the high end of your target rep range (e.g., 12 reps instead of 8), this indicates that your muscles have adapted, and it’s time to increase the resistance. For instance, if you’ve been performing leg extensions with 30 kg for 10 reps, and you can now perform 15 reps with the same weight, adding weight will help keep your progress moving forward.- Guideline: Start by adding small increments (2.5 kg or 5 kg) to avoid overloading your muscles too quickly.
- When You’re Not Feeling Challenged:
If you feel like your workout is no longer challenging, and you’re finishing sets without much effort, it’s time to step up the intensity. Your muscles need sufficient stimulus to grow, and when the challenge diminishes, growth stagnates.- Guideline: Constantly assess your workout routine and adjust your sets, reps, weight, or rest time if you’re no longer feeling challenged or fatigued by the end of your workout.
- When You’ve Been Sticking to the Same Routine for Several Weeks:
If you’ve been doing the same exercises, reps, and sets for several weeks without any changes, it’s easy to plateau. To continue progressing, regularly change up your routine and add resistance or variations. Progressive overload can involve changing exercises, altering tempo, or increasing training frequency.- Guideline: After 4–6 weeks of consistent training, consider adding variation to your workout, either by increasing resistance or modifying the structure of your exercises.
Tips for Safe and Effective Progressive Overload:
- Focus on Form First:
Never compromise proper form when adding resistance. Using poor form to lift heavier weights can lead to injury and setbacks. Always prioritize form over the amount of weight you’re lifting. - Small Increments Matter:
Adding weight gradually (in small increments) is much safer than attempting to lift significantly heavier loads in one go. Small increases in resistance will help you manage the added stress on your muscles without overloading them. - Listen to Your Body:
Pay attention to your body’s signals. If you’re feeling excessive strain, joint discomfort, or experiencing soreness that lasts longer than usual, it may be a sign you’ve added resistance too quickly. Gradually progress to avoid injury. - Allow for Recovery:
Progressive overload only works if your muscles have time to recover and grow. Ensure you’re giving your muscles adequate rest between workouts to rebuild stronger.
Recovery and Progress Tracking
Tips for reducing soreness (DOMS) and promoting recovery
Delayed Onset Muscle Soreness (DOMS) is a common experience—especially for beginners or those trying a new exercise routine like leg day. It typically appears 12 to 48 hours after a workout and results from microscopic muscle tears that occur during intense or unfamiliar movements. While DOMS is a natural part of muscle adaptation and growth, it can be uncomfortable and may discourage consistent training. The good news? With the right strategies, you can minimize soreness and support faster, more effective recovery.
1. Prioritize a Proper Warm-Up and Cooldown
A structured warm-up before your leg workout and a cooldown afterward are essential for reducing the severity of DOMS.
- Warm-Up: Increases blood flow, raises muscle temperature, and preps your joints for movement. This reduces the chance of injury and primes your muscles for work.
- Example: 5–10 minutes of light cardio (e.g., brisk walking or cycling) followed by dynamic stretches like leg swings, hip circles, or bodyweight squats.
- Cooldown: Gradually brings your heart rate down and flushes out lactic acid build-up.
- Example: Gentle stretching targeting the quads, hamstrings, glutes, and calves. Foam rolling also helps release tight spots and reduce muscle tension.
2. Stay Hydrated and Refuel with Nutrients
Hydration and post-workout nutrition play a big role in how well your muscles recover.
- Hydration: Water supports circulation, nutrient transport, and waste removal. Dehydration can worsen muscle cramps and prolong soreness.
- Tip: Drink water consistently throughout the day and add electrolytes if needed after intense sweating.
- Post-Workout Nutrition: Replenish your body with a balanced meal or shake containing protein and carbohydrates within 30–60 minutes after training.
- Example: A whey protein shake with a banana, or grilled chicken with rice and vegetables. Protein aids in muscle repair, while carbs restore glycogen stores.
3. Use Active Recovery Techniques
Rest doesn’t always mean being completely still. Low-intensity movement can improve blood flow and reduce stiffness.
- Active Recovery Days: Include light activities like walking, swimming, cycling, or yoga on your rest days.
- Benefit: These activities promote circulation, which speeds up the delivery of nutrients to muscles and removes metabolic waste.
- Stretching and Mobility Work: Incorporate static stretches or mobility drills specific to the lower body. These help prevent tightness and improve range of motion.
4. Get Plenty of Sleep
Sleep is the foundation of recovery. It’s during deep sleep that your body releases growth hormone, repairs muscle tissue, and consolidates physical gains.
- Aim for 7–9 Hours: Quality sleep boosts overall recovery, muscle growth, and immune function.
- Tip: Stick to a consistent bedtime, reduce screen time before bed, and create a restful environment.
5. Try Recovery Tools and Therapies
Modern recovery methods and tools can speed up the healing process and relieve discomfort from DOMS.
- Foam Rolling: Self-myofascial release using a foam roller can help reduce muscle tightness, improve circulation, and relieve soreness.
- Massage Guns or Therapy Balls: Target specific sore spots or muscle knots with controlled pressure.
- Contrast Baths: Alternating between hot and cold water (or showers) may help flush out toxins and decrease inflammation.
- Compression Gear: Wearing compression leggings post-workout may reduce swelling and improve muscle recovery.
6. Ease Into New Workouts
Jumping into an advanced routine too quickly is a recipe for excessive soreness. Gradually increasing intensity and volume allows your body to adapt.
- Start Slow: Begin with lower weights or fewer sets and reps if you’re new to leg training. As your muscles adapt, you can increase difficulty over time.
- Follow a Plan: A structured training plan helps balance intensity and recovery, preventing overtraining and burnout.
7. leg day for beginners:Listen to Your Body
While some muscle soreness is normal, severe pain or prolonged stiffness may be a sign of overtraining or injury.
- Distinguish Pain from DOMS: DOMS is typically dull, sore, and spread across the muscle. Sharp or stabbing pain may indicate strain or injury—don’t ignore it.
- Take Rest Days When Needed: Rest allows muscles to rebuild stronger. Skipping rest can lead to fatigue and hinder your results.
Importance of sleep, hydration, and nutrition for muscle growth
Building muscle isn’t just about lifting heavy weights—it’s about supporting your body’s ability to recover, repair, and grow. While intense training stimulates muscle breakdown and adaptation, true growth happens outside the gym. That’s where sleep, hydration, and nutrition play a critical role. These three pillars of recovery provide the foundation for optimal performance, improved strength, and visible results over time.
1. Sleep: The Silent Muscle Builder
Sleep is the most underrated tool in muscle development. During deep sleep—particularly in non-REM stages—your body undergoes powerful restorative processes that directly contribute to muscle repair.
- Hormonal Regulation: Growth hormone, a key player in muscle growth and fat loss, is released in the highest quantities during sleep.
- Tissue Repair: Muscles damaged from lifting are rebuilt during rest. Insufficient sleep hinders this recovery, leading to stalled progress.
- Cognitive Function: A well-rested brain improves focus, coordination, and workout intensity, all of which are vital for consistent gains.
Aim for: 7–9 hours of high-quality sleep per night. Prioritize a consistent sleep routine, reduce blue light exposure before bed, and create a quiet, dark environment for optimal recovery.
2. Hydration: Fueling Performance and Recovery
Water is essential for nearly every physiological process in the body, especially those related to muscle function and recovery.
- Muscle Function: Muscles are about 75% water. Dehydration can cause cramps, fatigue, and poor contraction efficiency during workouts.
- Nutrient Delivery: Water helps transport essential nutrients like amino acids, vitamins, and minerals to your muscles where they’re needed most.
- Waste Removal: Proper hydration aids in flushing out metabolic waste products like lactic acid, reducing post-workout soreness and inflammation.
Tip: Drink at least 2.5–3 liters of water daily, more if you’re training hard or sweating heavily. Include electrolytes during long or intense sessions.
3. Nutrition: The Building Blocks of Muscle
Training breaks down muscle fibers, but nutrition provides the fuel and materials to rebuild them stronger. Without the right nutrients, even the best workout plan will fall short.
- Protein: Essential for muscle repair. Aim for 1.6–2.2g of protein per kilogram of body weight daily. High-quality sources include lean meats, eggs, dairy, legumes, and protein powders.
- Carbohydrates: Replenish glycogen stores and provide the energy needed for performance and recovery. Opt for complex carbs like oats, sweet potatoes, rice, and whole grains.
- Fats: Support hormone production (especially testosterone), which is vital for muscle growth. Include healthy fats like avocados, olive oil, nuts, and fatty fish.
Timing Matters:
- Pre-Workout: Fuel with a balanced meal 1–2 hours before training.
- Post-Workout: Refuel within 30–60 minutes with a protein-carb combo to kickstart recovery.
How to track progress and avoid common beginner mistakes
When you’re just starting your leg training journey, it’s easy to focus solely on the workouts and forget that progress tracking is just as important. Monitoring your progress not only keeps you motivated but also ensures you’re moving in the right direction. At the same time, steering clear of common beginner errors can help you train safely and effectively, maximizing your results over time.
1. Track Your Workouts Consistently
The most effective way to measure your progress is by keeping a log of your workouts. This helps you understand what’s working, identify plateaus, and make informed adjustments.
- Use a workout journal or app to record the exercises you do, the weights used, sets, and reps.
- Take progress photos every few weeks to visually track changes in muscle tone and size.
- Set realistic, short-term goals (like increasing reps, improving form, or adding resistance) to keep you focused.
Tracking also makes it easier to apply progressive overload, the principle of gradually increasing resistance or difficulty to build muscle over time.
2. Avoid Common Beginner Mistakes
Starting strong is great—but avoiding early missteps is key to staying injury-free and building lasting habits. Here are some of the most frequent mistakes beginners make:
- Neglecting Form: Chasing heavy weights too soon often leads to poor form. Prioritize proper technique, even if that means starting with lighter resistance or just your bodyweight.
- Skipping Warm-ups: Failing to warm up increases your risk of injury. Always start with dynamic stretches or light cardio to get your blood flowing and joints lubricated.
- Inconsistent Training: Sporadic workouts won’t deliver results. Aim for a consistent routine—2 to 3 leg-focused sessions per week for beginners is a great start.
- Overtraining: More isn’t always better. Muscles grow when they’re allowed to rest and recover. Don’t train the same muscle group on back-to-back days.
3. Listen to Your Body and Adjust as Needed
Progress isn’t always linear, and beginners often expect fast results. Instead of getting discouraged, focus on consistency and listen to your body:
- Fatigue and soreness are normal, but sharp pain is a red flag—never push through it.
- Adjust your plan if you’re not recovering well, feeling excessively tired, or losing motivation. Sometimes less is more.
- Celebrate small wins—improved balance, deeper squats, or completing more reps are all signs of growth.
Starting your leg day journey doesn’t have to be overwhelming. With a basic understanding of key muscle groups, beginner-friendly movements, and a focus on proper form and recovery, you’re already on the right path. Consistency, patience, and progression are your best allies. Stick with it, listen to your body, and celebrate the small wins along the way—because stronger legs lead to a stronger you.