If you’re serious about building stronger, well-defined hamstrings, incorporating a hamstring workout machine into your routine is a smart move. These machines are designed to isolate and target the hamstring muscles effectively, helping you maximize muscle growth while minimizing injury risk. Whether you’re a beginner or an experienced lifter, understanding how to properly use the hamstring workout machine can take your leg training to the next level. In this post, we’ll walk you through everything you need to know — from setting up the machine correctly to performing the best exercises for optimal results. Get ready to unlock the full potential of your hamstring workouts!
Understanding the Hamstring Workout Machine
What Is a Hamstring Workout Machine?
A hamstring workout machine is a piece of gym equipment specifically designed to target and strengthen the hamstring muscles, which are located at the back of your thighs. These muscles play a crucial role in leg movement, stability, and athletic performance, and strengthening them helps reduce the risk of injury—especially in activities involving sprinting, jumping, or sudden direction changes.
There are several types of hamstring workout machines, each offering a unique angle or form of resistance to effectively isolate the hamstrings:
- Seated Leg Curl Machine: This machine allows you to sit upright with your legs extended. As you curl the pad toward your body by bending your knees, it activates the hamstrings. It’s beginner-friendly and offers great support for the lower back.
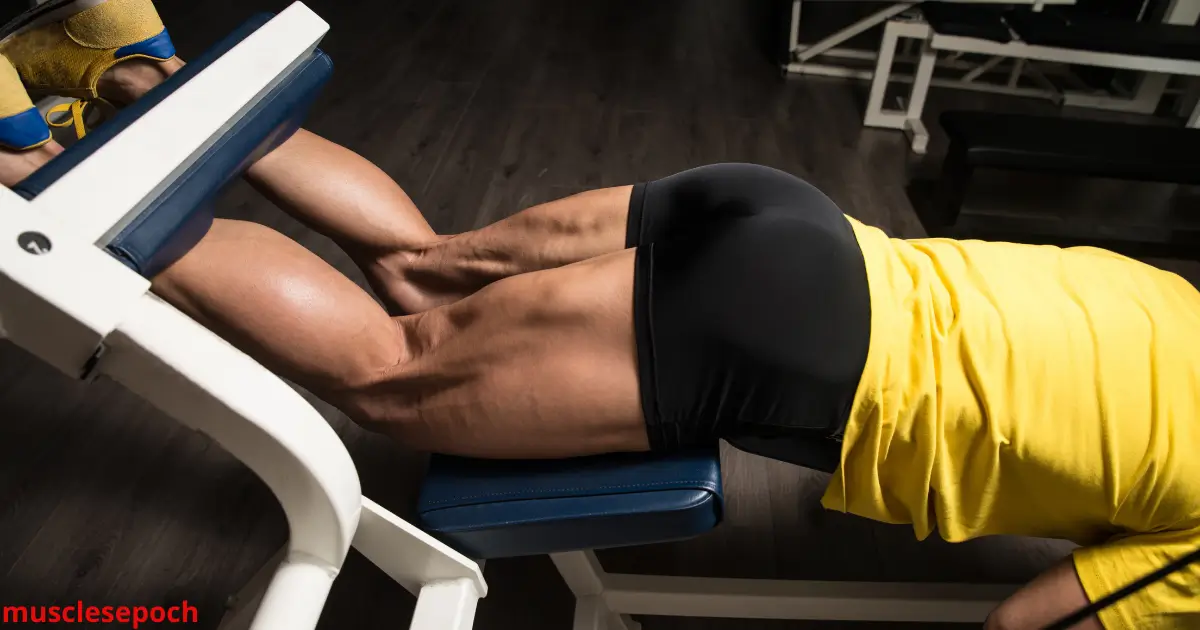
- Lying Leg Curl Machine: Here, you lie face-down and lift a padded bar with your heels toward your glutes. This variation provides an intense stretch and contraction, making it highly effective for hamstring development.
- Standing Leg Curl Machine: Typically used one leg at a time, this version mimics a natural kicking motion. It also engages stabilizing muscles, improving balance and control.
- Cable Hamstring Curl Setup: A more advanced option that involves attaching an ankle strap to a low pulley cable machine. It provides a different resistance curve and allows for more freedom of movement.
These machines help maintain consistent tension throughout the movement, which is key for hypertrophy (muscle growth) and improved muscle control. They’re commonly used in both beginner and advanced workout routines and can be adjusted in terms of resistance, range of motion, and tempo to fit individual fitness levels.
Benefits of Using a Hamstring Workout Machine
ncorporating a hamstring workout machine into your training routine offers a wide range of benefits, particularly when it comes to targeted muscle development, injury prevention, and functional strength. Here’s a deeper look at why these machines are an excellent addition to leg day:
1. Isolated Muscle Targeting
Hamstring machines are designed to isolate the hamstrings—specifically the biceps femoris, semitendinosus, and semimembranosus muscles. This isolation allows you to focus directly on strengthening this critical muscle group without excessive assistance from other muscles like the glutes or calves. As a result, your hamstrings are fully engaged throughout the movement, promoting balanced leg development.
2. Controlled Range of Motion
Unlike free-weight exercises, hamstring machines guide you through a fixed and safe range of motion. This reduces the risk of improper form and helps you concentrate on contracting the muscles effectively. It’s especially beneficial for beginners who are still learning proper biomechanics and for those recovering from injury who need stability and support.
3. Reduced Risk of Injury
Strong hamstrings play a major role in protecting the knees, hips, and lower back. Weak or imbalanced hamstrings are a common cause of knee injuries, hamstring strains, and posture issues. Regular use of a hamstring machine can help correct muscle imbalances and reduce injury risks in sports, running, or daily activities.
4. Improved Athletic Performance
Stronger hamstrings enhance performance in sports that involve running, sprinting, jumping, and sudden directional changes. Exercises performed on hamstring machines build explosive strength and muscular endurance, which translate into better speed, agility, and stability on the field or court.
5. Progressive Overload Made Simple
Most hamstring machines allow you to adjust resistance easily using a weight stack or digital console. This makes it easier to implement progressive overload, the key principle for building muscle over time. You can gradually increase the challenge without compromising form or safety.
6. Beginner-Friendly and Accessible
Hamstring workout machines are accessible for all fitness levels. With clear instructions, comfortable seating or padding, and controlled movement, they provide a low-risk introduction to strength training for beginners while still challenging enough for advanced users.
Using a hamstring workout machine is not just about growing bigger muscles—it’s about building a functional, injury-resistant lower body foundation that supports your entire training journey.
Key Muscles Worked During Hamstring Machine Exercises
Hamstring machine exercises are highly effective for targeting and strengthening the muscles along the back of the thigh, but their benefits go beyond just the hamstrings. Depending on the type of machine and movement pattern, several muscles and stabilizers are engaged to support proper motion, control, and strength development.
Below is a breakdown of the primary and secondary muscles worked during hamstring machine workouts:
1. Primary Muscle Group: Hamstrings
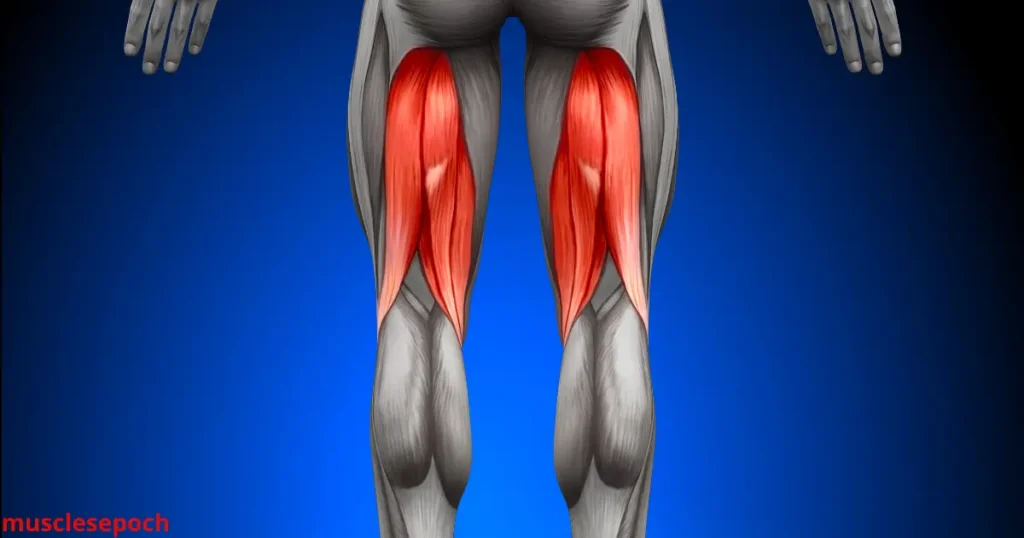
The hamstrings are a group of three muscles located on the back of the thigh:
- Biceps Femoris (long head and short head): This is the largest of the hamstring muscles. It runs from the pelvis and femur down to the tibia and fibula, helping with knee flexion and hip extension.
- Semitendinosus: Positioned more medially (toward the inside of the thigh), this muscle aids in bending the knee and extending the hip.
- Semimembranosus: Also located medially, this muscle works alongside the semitendinosus to provide knee flexion, hip extension, and stabilization.
When using machines like the seated leg curl, lying leg curl, or standing leg curl, these three muscles are the main focus, responsible for bending the knee against resistance.
2. Secondary Muscles and Stabilizers
While the hamstrings are the stars of the show, several supporting muscles assist and stabilize during machine-based hamstring exercises:
- Gluteus Maximus: This powerful hip extensor activates slightly during certain hamstring movements, particularly when the hip joint is engaged (e.g., in lying leg curls or when controlling movement speed).
- Calf Muscles (Gastrocnemius): As a two-joint muscle that crosses both the knee and ankle, the gastrocnemius works in tandem with the hamstrings during knee flexion, especially in standing or lying curl variations.
- Adductors: The inner thigh muscles help stabilize the legs and pelvis, ensuring proper alignment during machine exercises.
- Erector Spinae (Lower Back): During lying leg curls or exercises requiring core stabilization, the lower back muscles may be activated to maintain posture and protect the spine.
3. Core Engagement
Although minimal, the abdominal and core stabilizers come into play—especially in standing hamstring curl variations or when using cable hamstring curls. These muscles help maintain balance, control pelvic tilt, and prevent compensatory movements.
Why It Matters
Understanding which muscles are involved in hamstring machine exercises allows you to:
- Train more mindfully, focusing on contracting the right muscles.
- Correct imbalances between the hamstrings and quadriceps.
- Prevent injuries by strengthening supporting muscle groups.
- Program smarter workouts by combining machine and bodyweight movements.
Step-by-Step Guide to Using the Hamstring Workout Machine
Proper Setup and Adjustments
Getting the setup and machine adjustments right is crucial for maximizing the effectiveness of your hamstring workouts and preventing unnecessary strain or injury. Whether you’re using a seated, lying, or standing hamstring curl machine, understanding how to position your body correctly ensures you’re targeting the right muscles with proper alignment and support.
Here’s how to properly set up and adjust hamstring workout machines:
1. Adjust the Seat or Pad Position
Each hamstring machine allows for pad or seat adjustments. Set these according to your height and leg length:
- Seated Leg Curl Machine:
- Adjust the backrest so your knees align directly with the pivot point of the machine (usually marked with a red dot or line).
- Your thighs should be flat on the seat, and the lower pad should rest just above your ankles.
- Make sure the thigh pad is snug to keep your legs in place as you curl.
- Lying Leg Curl Machine:
- Position yourself so that your knees are just off the edge of the bench.
- The lower pad should sit comfortably on your lower calves or just above the heels.
- Adjust the roller arm so your knees can fully bend without locking your hips.
- Standing Leg Curl Machine:
- Adjust the foot platform and roller height so your working leg’s knee is in line with the machine’s pivot point.
- The pad should rest just behind the ankle or lower calf.
- Use handles or grips to stabilize your upper body.
2. Check for Proper Range of Motion
Once in position, test the range of motion before adding significant resistance:
- You should be able to fully extend and contract your leg comfortably without straining your joints.
- Your movement should be smooth, and the weight should not slam down at the end of each rep.
- Avoid overextending or hyper-flexing the knees or hips.
3. Select the Right Resistance
Start light, especially if you’re a beginner or unfamiliar with the machine:
- Choose a weight that allows 10–15 controlled reps while maintaining good form.
- Increase resistance gradually as you gain strength and confidence.
- Avoid using momentum or swinging your legs—slow and controlled is key for hamstring activation.
4. Body Position and Form Cues
Keep these tips in mind during each set:
- Maintain a neutral spine—no arching or rounding of the back.
- Grip handles or side bars to prevent your torso from shifting.
- Focus on contracting the hamstrings during the lift and resisting the weight during the eccentric (lowering) phase.
Why Proper Setup Matters
Correct setup and alignment not only improve exercise effectiveness but also reduce the risk of:
- Knee strain or discomfort
- Lower back compensation
- Muscle imbalances from poor activation
Taking a few minutes to properly adjust the machine can significantly improve your training results while keeping you safe.
Correct Form and Technique for Maximum Growth
Executing hamstring exercises with proper form and technique is critical not just for injury prevention but for unlocking the full muscle-building potential of each repetition. Whether you’re training for aesthetics, strength, or athletic performance, how you perform each rep directly impacts muscle activation, time under tension, and ultimately, muscle growth.
Let’s break down the key form principles to maximize your hamstring gains on any machine:
1. Mind-Muscle Connection
Before even beginning your reps, establish a mind-muscle connection. Focus on contracting your hamstrings intentionally during both the lifting (concentric) and lowering (eccentric) phases.
- Think about pulling through the back of your thigh, not your calves or glutes.
- Slow the tempo slightly to enhance engagement, especially on the lowering phase.
2. Controlled Tempo
A slow and controlled rep pace is essential for muscle development:
- Concentric phase (curling the weight): ~1–2 seconds
- Pause at the top: ~1 second for a strong contraction
- Eccentric phase (lowering the weight): ~2–3 seconds
This tempo increases time under tension (TUT), which is a proven method for stimulating hypertrophy.
3. Avoid Momentum
Do not use momentum to swing the weight up. Doing so shifts focus away from the hamstrings and onto surrounding joints and muscles, increasing your injury risk and reducing the quality of the rep.
- Keep your body stationary, especially your hips and spine.
- Move the weight with muscle control, not body movement.
4. Full Range of Motion
Ensure you’re moving through the full range of motion without locking out your knees or shortening the curl:
- Start with your leg fully extended (but not hyperextended).
- Curl the weight as far as your flexibility allows while maintaining proper alignment.
- Don’t stop short of full contraction unless advised for injury-related reasons.
5. Stabilize Your Core and Hips
Engage your core and glutes during machine work to maintain a neutral pelvis and avoid excess strain on your lower back. This is especially important during:
- Lying leg curls: Avoid lifting your hips off the pad.
- Standing leg curls: Keep hips square and avoid tilting the pelvis.
- Seated leg curls: Press your lower back into the pad and keep your abs tight.
6. Breathing Technique
Breathing properly supports performance and helps stabilize your core:
- Inhale during the eccentric (lowering) phase.
- Exhale as you lift or curl the weight toward contraction.
Avoid holding your breath—doing so increases intra-abdominal pressure, which can lead to dizziness or poor posture.
Why This Matters for Growth
Consistently using correct form ensures:
- Maximum hamstring activation
- Reduced compensation from other muscles
- Improved neuromuscular coordination
- Lower injury risk and joint stress
By practicing proper form every rep, you turn a basic hamstring movement into a powerful growth stimulus that pays off in strength, size, and performance.
Common Mistakes to Avoid
Even with access to quality hamstring machines, many lifters fall short of achieving full results due to simple yet impactful errors in technique, setup, or programming. These mistakes can hinder muscle activation, lead to imbalances, or even cause injury over time. Being aware of them is key to getting the most out of your hamstring workouts—especially for beginners.
Below are some of the most common mistakes to watch for and how to correct them:
1. Using Too Much Weight
Mistake: Loading the machine with more weight than you can control.
Why it’s a problem: When the load is too heavy, form breaks down. Instead of isolating the hamstrings, other muscle groups like the lower back or calves may compensate, reducing effectiveness and increasing injury risk.
Fix: Start with a manageable weight that allows for 12–15 smooth, controlled reps. Increase gradually only when your form remains solid throughout every rep.
2. Shortening the Range of Motion
Mistake: Not fully extending or curling the leg during the exercise.
Why it’s a problem: A reduced range of motion limits the amount of stretch and contraction in the hamstring, decreasing overall muscle activation and growth potential.
Fix: Perform each rep through the full range of motion—fully extend at the bottom (without locking out) and curl until you achieve peak contraction at the top.
3. Lifting Hips Off the Pad (Lying Leg Curl)
Mistake: Arching the back or raising the hips off the bench during lying leg curls.
Why it’s a problem: This shifts tension away from the hamstrings and places unnecessary strain on the lower back.
Fix: Focus on keeping your pelvis glued to the pad and your abs engaged. This helps maintain proper alignment and ensures the hamstrings do the work.
4. Using Momentum or Jerky Movements
Mistake: Swinging the weight or moving too quickly through the reps.
Why it’s a problem: Momentum reduces time under tension and bypasses muscle control, leading to poor results and a higher risk of joint stress.
Fix: Slow down. Use a controlled tempo, especially on the eccentric (lowering) phase. This maximizes muscle engagement and minimizes injury risk.
5. Incorrect Machine Setup
Mistake: Misaligning the seat, pads, or pivot point of the machine with your body.
Why it’s a problem: Poor setup can lead to inefficient movement mechanics and increased joint strain, especially in the knees.
Fix: Adjust the machine so that:
- The pad sits just above your ankles.
- The pivot point aligns with your knee joint.
- The thigh or torso support keeps you securely in position.
6. Neglecting Breathing Technique
Mistake: Holding your breath or breathing erratically during sets.
Why it’s a problem: Improper breathing can reduce your core stability and energy, making each rep feel harder and less controlled.
Fix: Use this pattern:
- Inhale as you lower the weight.
- Exhale as you lift or curl the weight.
7. Ignoring Muscle Imbalances
Mistake: Training both legs together while ignoring potential left/right imbalances.
Why it’s a problem: Uneven hamstring development can lead to joint issues and increased injury risk during running or squatting.
Fix: Occasionally incorporate unilateral (single-leg) machine variations like standing leg curls or cable hamstring curls to address imbalances.
Avoiding these mistakes will help you:
- Get better results in less time
- Stay injury-free
- Build balanced, strong hamstrings with improved functional performance
Effective Hamstring Workout Machine Exercises
Seated Hamstring Curl
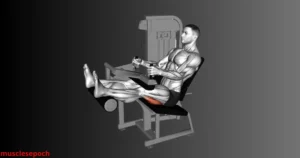
The seated hamstring curl is one of the most beginner-friendly and effective machine exercises for isolating and strengthening the hamstrings, particularly the biceps femoris, semitendinosus, and semimembranosus. Unlike its lying or standing counterparts, the seated variation places the hips in a more stable position and allows for a greater range of motion, making it ideal for both hypertrophy and rehabilitation.
Let’s break down how to perform it properly, the muscles involved, and why it should be a staple in your lower body training routine.
How to Perform the Seated Hamstring Curl
- Adjust the machine:
- Set the backrest so that your knees line up directly with the machine’s pivot point.
- Position the leg pad just above your ankles (lower calf).
- Adjust the thigh restraint so it holds your legs snugly in place to prevent upward movement during the curl.
- Get into position:
- Sit with your back flat against the pad.
- Engage your core and grip the side handles for stability.
- Execute the movement:
- Exhale and curl your legs downward, bringing your heels toward the back of your thighs.
- Hold the contraction for 1–2 seconds at the bottom.
- Inhale and slowly return to the starting position in a controlled manner.
- Repeat for desired reps, typically 10–15 for hypertrophy or 12–20 for endurance and rehab-focused training.
Muscles Worked
- Primary:
- Biceps femoris (long and short head)
- Semitendinosus
- Semimembranosus
- Secondary/Support Muscles:
- Gastrocnemius (calf)
- Gluteus maximus (slightly)
- Core stabilizers (especially during heavy sets)
Because you’re seated with the hip flexed, the hamstrings are lengthened, making this variation particularly effective for hitting the full muscle belly.
Benefits of the Seated Hamstring Curl
- Full hamstring activation due to a greater stretch and full range of motion
- Lower back support makes it safer and more accessible for beginners
- Reduced risk of form breakdown compared to standing or lying variations
- Perfect for progressive overload and tracking strength gains
- Improves joint health and knee stability when done with proper form
This exercise is also widely used in physical therapy settings to rehabilitate hamstring strains, ACL injuries, and post-surgery leg strengthening.
Tips to Maximize Results
- Use a controlled tempo (2 seconds up, 3 seconds down) to increase time under tension.
- Avoid locking out your knees at the top of the movement.
- Don’t lift your thighs off the pad—keep your hips grounded to maintain tension on the hamstrings.
- Focus on feeling the contraction in the back of your thighs, not your calves.
Final Thoughts
The seated hamstring curl machine is a safe, controlled, and highly effective tool for developing posterior chain strength, correcting muscle imbalances, and enhancing athletic performance. Whether you’re a beginner just starting your leg training or an experienced lifter recovering from injury, this machine deserves a regular place in your routine.
Lying Hamstring Curl
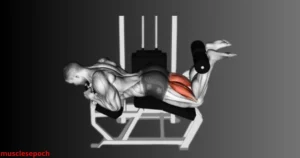
The lying hamstring curl is a classic isolation exercise that targets the posterior thigh muscles, particularly the hamstrings. Performed on a prone (face-down) machine, it allows for a deep contraction and excellent mind-muscle connection. It’s widely used in both strength training and rehabilitation settings due to its focus on controlled leg flexion and minimal involvement of other muscle groups.
Let’s dive into how to execute it correctly, which muscles it targets, and how to make the most of this highly effective leg movement.
How to Perform the Lying Hamstring Curl
- Set up the machine:
- Adjust the ankle pad so it sits just above your heels or on the lower part of your calves.
- Align your knees with the machine’s pivot point (usually marked).
- Lie face down on the bench with your hips flat and grip the side handles to stabilize yourself.
- Starting position:
- Keep your legs fully extended but avoid hyperextending your knees.
- Your toes should point straight and your body should remain relaxed but firm.
- Perform the curl:
- Exhale and curl your heels upward toward your glutes in a smooth, controlled motion.
- Squeeze the hamstrings at the top of the movement and hold for 1–2 seconds.
- Inhale and lower the weight back to the starting position slowly, maintaining full control.
- Repeat for your target number of reps—typically 10–15 for hypertrophy or 12–20 for muscular endurance.
Muscles Worked
- Primary Target:
- Biceps femoris (long and short head)
- Semitendinosus
- Semimembranosus
- Secondary:
- Gastrocnemius (calf muscle)
- Gluteus maximus (to a minor extent)
- Core stabilizers (engaged during heavier sets)
The lying position shortens the hip angle, focusing even more directly on the knee flexion function of the hamstrings.
Benefits of the Lying Hamstring Curl
- Direct hamstring isolation, with minimal assistance from other muscle groups
- Encourages a strong contraction at the top of the movement
- Helps correct posterior chain imbalances
- Improves knee joint stability and reduces injury risk, especially for athletes
- Enhances performance in movements like sprinting, jumping, and squatting
It’s also beneficial for rehab and injury prevention, particularly in sports that involve explosive leg movements.
Common Mistakes to Avoid
- Lifting hips off the pad:
- This reduces tension on the hamstrings and shifts stress to the lower back. Keep your hips firmly pressed into the bench throughout the movement.
- Using too much weight:
- Excessive load encourages poor form and reduces range of motion. Start light and build gradually.
- Jerky or fast reps:
- Using momentum defeats the purpose of isolation work. Perform each rep slowly to increase time under tension and maximize gains.
- Not fully extending the legs:
- Shortening the range of motion leaves out part of the stretch phase, reducing the effectiveness of the exercise.
Pro Tips for Maximum Growth
- Use a 2–3 second eccentric (lowering) phase to maximize hypertrophy.
- Point your toes slightly inward or outward on different sets to target different parts of the hamstring.
- Include single-leg variations or slow negatives to further challenge the muscles and improve symmetry.
Final Thoughts
The lying hamstring curl is a foundational exercise for building strong, well-defined legs. Its ability to isolate the hamstrings with minimal strain on the lower back makes it a go-to move for both beginners and seasoned lifters. By practicing proper form and gradually increasing resistance, you’ll develop a more balanced, powerful posterior chain.
Single-Leg Hamstring Curl
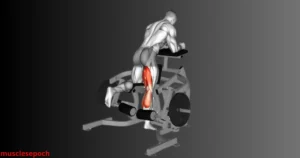
The single-leg hamstring curl is a powerful unilateral variation of the traditional hamstring curl, designed to target each leg individually. This movement helps correct muscular imbalances, improve leg symmetry, and develop balanced strength—critical for injury prevention and optimal athletic performance.
Performing hamstring curls one leg at a time not only increases muscle activation but also improves mind-muscle connection, helping you focus on the contraction and stretch of the working leg without compensation from the dominant side.
How to Perform the Single-Leg Hamstring Curl
There are several ways to perform this movement, but the two most common variations include machine-based and stability ball or resistance band-based options. Here’s a basic guide for the machine version:
- Adjust the machine for single-leg use. Some machines have specific settings or pads for isolating one leg at a time.
- Position your body the same as in a standard lying hamstring curl:
- Lie face down with your hips pressed into the bench.
- Align the working leg with the machine’s pivot point.
- The pad should rest just above your ankle or lower calf.
- Stabilize yourself by gripping the handles.
- Execute the movement:
- Exhale and curl your heel toward your glute, squeezing the hamstring at the top.
- Pause briefly, then inhale and lower the leg slowly back to the starting position.
- Repeat for desired reps, then switch legs.
If using a resistance band or stability ball, the same principles apply, though you’ll lie on your back and use the band or ball to resist the curl.
Muscles Worked
- Primary:
- Biceps femoris (long and short head)
- Semitendinosus
- Semimembranosus
- Secondary:
- Gluteus maximus
- Gastrocnemius
- Core muscles (for stability and control)
Because each leg works independently, stabilizer muscles are more actively engaged, especially in freeform or ball variations.
Benefits of the Single-Leg Hamstring Curl
- Corrects strength imbalances between the left and right leg
- Enhances neuromuscular control and coordination
- Improves hamstring flexibility and mobility
- Reduces the risk of injury by promoting even development
- Useful for rehabilitation post-injury, particularly after hamstring strains or ACL recovery
- Builds symmetry, which improves performance in bilateral lifts (e.g., deadlifts, squats)
Athletes in sports involving sprinting, cutting, and jumping particularly benefit from this type of isolated, single-limb training.
Common Mistakes to Avoid
- Rushing the movement – Single-leg work requires more control. Perform reps slowly to maximize engagement.
- Letting the hips lift off the bench – This reduces isolation and puts strain on the lower back.
- Favoring the dominant leg – Always train your weaker leg first when performing single-leg curls to ensure balanced effort.
Tips for Success
- Start with bodyweight or light resistance to focus on form before increasing intensity.
- Perform higher reps (12–15) to build endurance and control before shifting to heavier loads.
- If your gym doesn’t have a single-leg hamstring curl machine, try a lying or seated banded single-leg curl on a bench or stability ball.
Final Thoughts
The single-leg hamstring curl is a valuable exercise for anyone seeking stronger, more balanced legs. Whether you’re a beginner looking to build a solid foundation or an experienced lifter correcting imbalances, this move deserves a place in your training routine. Consistent use will lead to better muscle symmetry, injury prevention, and improved performance in both strength and athletic disciplines.
Maximizing Muscle Growth with Your Hamstring Workout Machine
Recommended Sets, Reps, and Rest Periods
Designing an effective hamstring workout isn’t just about choosing the right exercises—it also depends heavily on how you structure your sets, reps, and rest periods. These variables play a major role in determining whether you’re building strength, increasing muscle size (hypertrophy), or improving muscular endurance.
Let’s break down the ideal training protocols based on your fitness goal, experience level, and the nature of hamstring isolation exercises.
For Beginners
Goal: Develop foundational strength, proper technique, and muscle activation.
- Sets: 2–3 per exercise
- Reps: 12–15
- Rest: 60–90 seconds between sets
Beginners benefit from higher reps and moderate weight, allowing time to master proper form and build a mind-muscle connection without overloading the joints or risking injury.
For Hypertrophy (Muscle Growth)
Goal: Increase muscle size and definition in the hamstrings.
- Sets: 3–4 per exercise
- Reps: 8–12
- Rest: 45–75 seconds between sets
This rep range strikes a balance between muscle tension and fatigue, which is ideal for hypertrophy. Aim for slow, controlled reps, especially during the eccentric (lowering) phase of each curl to maximize time under tension.
For Strength Gains
Goal: Build raw hamstring strength, particularly for athletes or powerlifters.
- Sets: 4–5 per exercise
- Reps: 4–6
- Rest: 2–3 minutes between sets
While isolation exercises like hamstring curls aren’t typically used for maximal strength, training in the lower rep range with heavier weights can still yield strength benefits—particularly when paired with compound movements like Romanian deadlifts.
For Muscular Endurance
Goal: Improve muscle stamina, joint stability, and resistance to fatigue.
- Sets: 2–3 per exercise
- Reps: 15–20+
- Rest: 30–60 seconds between sets
This is ideal for athletes, runners, or rehab clients looking to build hamstring resilience. Use light weights or resistance bands and focus on tempo and control rather than speed.
Additional Tips
- Progressive overload: Gradually increase weight, reps, or sets over time to continue making gains.
- Supersets or drop sets: Add these for advanced lifters to increase volume and intensity.
- Track your recovery: Hamstrings are prone to strain, so allow 48–72 hours of rest between sessions targeting the same muscle group.
- Train with intent: Always prioritize form over weight to avoid injury and ensure consistent progress.
Final Thoughts
Understanding how to program your sets, reps, and rest periods based on your goals is crucial for seeing long-term success. Whether you’re just getting started or aiming to break through a plateau, adjusting these variables can elevate the effectiveness of your hamstring training. Always listen to your body, prioritize technique, and ensure adequate recovery for safe and sustainable gains.
Incorporating Progressive Overload
Progressive overload is the cornerstone of effective strength training and muscle growth. Without continually challenging your muscles, progress will plateau, and gains in size, strength, or endurance will stagnate. When it comes to hamstring workouts using machines, understanding and applying progressive overload properly ensures that your muscles keep adapting and growing stronger over time.
What Is Progressive Overload?
Progressive overload means gradually increasing the demands placed on your muscles during exercise. This can be achieved by:
- Increasing the weight or resistance used
- Increasing the number of repetitions or sets
- Decreasing rest time between sets
- Improving exercise technique or range of motion
- Increasing the time under tension (slower, more controlled reps)
Each of these methods makes your muscles work harder than before, stimulating adaptation.
Why Progressive Overload Matters for Hamstring Training
The hamstrings are a powerful muscle group but can be stubborn to develop without consistent, escalating challenge. Machines like the hamstring curl allow for controlled and safe progression, making them perfect for applying progressive overload. Regularly increasing the workload on your hamstrings prevents plateaus, promotes balanced growth, and enhances muscle endurance and strength.
How to Apply Progressive Overload Effectively
- Increase Weight Gradually:
Add small increments of weight as you become comfortable with your current load. Most gyms have weight increments of 2.5 to 5 pounds (1 to 2 kg), which is perfect for steady progression without risking injury. - Add More Reps or Sets:
If increasing weight isn’t feasible, try doing an extra 1–3 reps per set or add another set to your routine. This volume increase enhances muscle fatigue and growth stimulus. - Improve Exercise Quality:
Focus on improving form, range of motion, and tempo. For example, slowing down the eccentric (lowering) phase of the hamstring curl increases time under tension, which is a form of overload. - Reduce Rest Periods:
Shortening rest times between sets increases workout intensity and muscular endurance, forcing your hamstrings to adapt to greater stress. - Mix Up Variations:
Incorporate different hamstring curl variations—such as seated, lying, or single-leg curls—to challenge muscles from various angles and avoid adaptation.
Signs You’re Ready to Progress
- You can easily complete all your prescribed reps and sets with good form.
- The exercise no longer feels challenging by the end of your session.
- You feel ready and motivated to take on a greater challenge without compromising safety.
Cautions When Progressing
- Avoid jumping weight too quickly; prioritize joint safety and muscle integrity.
- Keep proper form a top priority to prevent injury.
- Allow adequate recovery between workouts, especially as intensity increases.
Final Thoughts
Incorporating progressive overload into your hamstring workouts is essential for continued muscle growth, strength gains, and improved performance. By thoughtfully increasing the demands on your muscles, you ensure that your training remains effective, efficient, and safe. Consistency combined with progression is the key to unlocking your full potential.
Combining Hamstring Machine Workouts with Other Leg Exercises
While hamstring machine exercises like the lying or seated hamstring curl are fantastic for isolating and strengthening the hamstrings, relying solely on these movements can limit overall leg development. To build balanced, powerful legs and optimize athletic performance, it’s important to combine hamstring machine workouts with other complementary leg exercises.
Why Combine Exercises?
The hamstring curl machine targets knee flexion but doesn’t fully engage the hamstrings’ role in hip extension or recruit other important muscles like the glutes, quadriceps, and calves. Combining machine work with compound and functional leg exercises ensures:
- Balanced muscle development across the entire lower body
- Improved joint stability and mobility
- Enhanced functional strength transferable to real-life movements and sports
- Reduced risk of muscle imbalances and injury
Key Leg Exercises to Pair with Hamstring Curls
- Romanian Deadlifts (RDLs):
This hip-hinge movement targets the hamstrings, glutes, and lower back, emphasizing hip extension rather than knee flexion. It complements hamstring curls by strengthening the hamstrings in their lengthened position, improving flexibility and power. - Squats:
Squats are a compound exercise that primarily targets the quadriceps, glutes, and hamstrings. Including squats in your routine helps develop overall leg strength and coordination. - Lunges:
Forward, reverse, or walking lunges improve unilateral leg strength, balance, and hip mobility. They engage the hamstrings dynamically and promote muscle symmetry. - Glute Bridges and Hip Thrusts:
These exercises isolate the glutes and recruit the hamstrings as synergists, strengthening the posterior chain and enhancing hip extension strength. - Calf Raises:
Strong calves support ankle stability and overall leg power, rounding out your lower body training program.
Sample Training Approach
For balanced leg training, consider structuring your workouts to include:
- 1–2 hamstring machine exercises (e.g., lying or seated curls) for focused hamstring isolation
- 2–3 compound leg exercises (e.g., squats, lunges, RDLs) to target multiple muscle groups and movement patterns
- 1–2 accessory exercises (e.g., glute bridges, calf raises) to support overall leg strength and stability
Tips for Optimal Results
- Prioritize compound lifts earlier in your workout when energy levels are highest.
- Use the hamstring machine exercises as accessory work to finish off your leg session.
- Pay attention to volume and intensity to avoid overtraining.
- Ensure adequate warm-up and mobility work to protect your joints and muscles.
- Rotate exercises regularly to avoid plateaus and keep your workouts engaging.
Final Thoughts
Integrating hamstring machine workouts with a variety of other leg exercises is key to building strong, balanced, and injury-resistant legs. This holistic approach enhances not just isolated muscle strength but also overall functional capacity—helping you move better, lift heavier, and perform at your best whether in the gym or on the field.
Conclusion
Using a hamstring workout machine with proper technique and consistency is a powerful way to build muscle, improve leg strength, and enhance overall athletic performance. By following the setup tips, mastering correct form, and incorporating progressive overload, you’ll see noticeable gains in your hamstrings faster and safer. Remember to combine these machine exercises with a balanced leg workout routine to ensure well-rounded muscle development. Start applying these strategies today, and watch your hamstring growth soar!