
Want to build bigger, stronger arms but tired of doing the same old bicep curls? The spider biceps curl might be just what your routine needs—especially if you’re a beginner.
This unique curl variation is designed to isolate the biceps like few other exercises can. By supporting your chest on an incline bench and letting your arms hang freely, the spider curl forces your biceps to do all the work—no cheating, no momentum, just pure muscle activation.
In this beginner’s guide, we’ll break down exactly how to do the spider biceps curl, why it’s such an effective movement for growing your arms, and how to avoid common mistakes. Whether you’re working out at home or in the gym, this simple exercise can take your arm gains to the next level.
What Is the Spider Biceps Curl and Why Beginners Should Use It
What Makes the Spider Curl Unique
The spider biceps curl stands out from traditional bicep exercises because of its strict isolation, angle of execution, and elimination of momentum. These features make it an excellent choice for beginners looking to maximize bicep activation with proper form.
1. Strict Isolation of the Biceps
In most curl variations—like standing dumbbell curls—it’s easy to cheat by using your shoulders or swinging your body. With the spider curl, your chest is pressed against an incline bench, and your arms hang straight down. This position removes support from other muscle groups, forcing your biceps to do nearly all the work. The result? Better isolation and a stronger mind-muscle connection.
2. Unmatched Peak Contraction
Because your arms are fully extended in front of your body and gravity is working directly against your biceps, the peak contraction at the top of the curl is intense. This positioning keeps constant tension on your biceps throughout the movement—especially at the top of the rep—where other curls tend to lose resistance. This leads to greater muscle fiber recruitment and growth potential.
3. Minimal Momentum or Cheating
Many beginners struggle with swinging weights or using momentum during bicep exercises. The spider curl virtually eliminates this problem. Since you’re braced against the bench and your upper body can’t move, you’re forced to slow down and control each rep. This teaches proper form and encourages progressive overload using lighter weights—perfect for safe and effective muscle building.
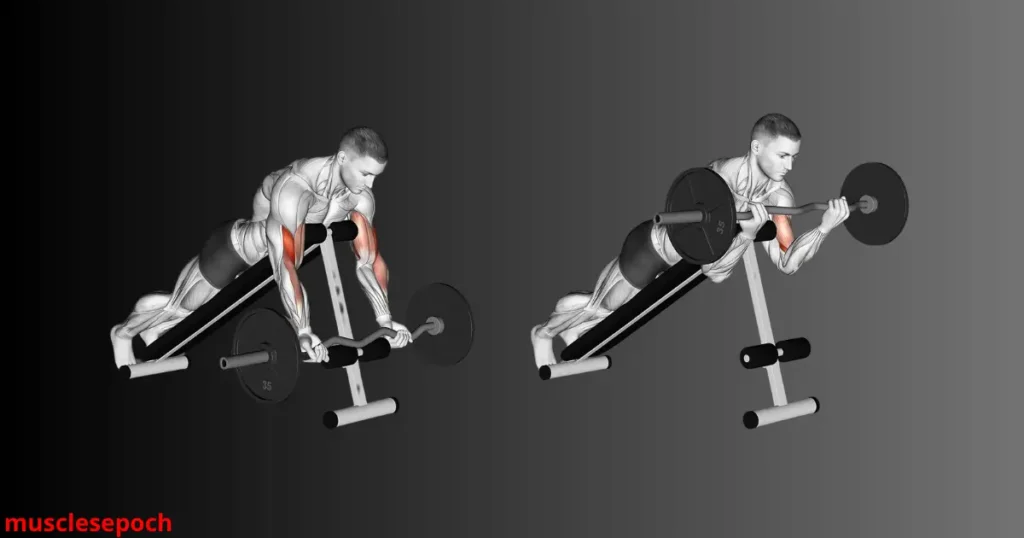
Muscles Worked During the Spider Biceps Curl
The spider biceps curl is a highly targeted isolation movement that primarily works the biceps, but it also engages a few important supporting muscles in the arm and forearm. Understanding which muscles are activated can help beginners focus their form and make the most of every rep.
1. Biceps Brachii (Primary Muscle Worked)
The main muscle activated during the spider curl is the biceps brachii—the large, two-headed muscle on the front of your upper arm. It’s responsible for elbow flexion (curling the arm) and contributes to forearm rotation (supination).
In the spider curl, the angle and setup place maximum tension directly on the biceps, especially during the peak contraction at the top of the movement. This leads to increased muscle fiber activation, which is essential for biceps growth and strength development.
2. Brachialis (Secondary Support Muscle)
Beneath the biceps lies a lesser-known but crucial muscle: the brachialis. While it doesn’t add much to arm width visually, it plays a huge role in pushing the biceps outward, giving your arms a thicker and more muscular appearance.
The spider curl activates the brachialis as a secondary mover, especially when your grip stays neutral or slightly rotated. Strengthening this muscle helps round out your overall arm development.
3. Brachioradialis (Forearm Involvement)
The brachioradialis, located in the forearm, is also recruited during the spider curl. While its involvement is less than in hammer-style curls, it still plays a stabilizing role as you lift and lower the weight.
Engaging the brachioradialis improves grip strength and forearm endurance, which are beneficial for beginners progressing to heavier weights or compound lifts like pull-ups and rows.
Summary for Beginners:
- Main Target: Biceps brachii (biggest impact on size and strength)
- Key Supporters: Brachialis (adds arm thickness), Brachioradialis (aids control and stability)
- Why it matters: Understanding what’s working helps you engage those muscles better and avoid “just going through the motions.”
Why It’s Great for Beginners
The spider biceps curl is an ideal exercise for beginners because it naturally encourages good form, promotes muscle isolation, and helps build a strong foundation for future strength training. Here’s why it stands out as a beginner-friendly choice:
1. Forces Proper Technique from the Start
One of the biggest challenges beginners face is learning how to lift with correct form. The spider biceps curl helps solve this problem by placing your upper body against an incline bench. This stabilized position eliminates body movement, so you can’t swing or cheat the weight up.
As a result, you’re forced to perform each rep with proper technique—focusing on slow, controlled movements. This helps beginners build good habits early, reducing the risk of injury and improving long-term results.
2. Enhances Mind-Muscle Connection
Because the spider curl isolates the biceps so effectively, it allows beginners to really feel the muscle working through the entire range of motion. Developing this mind-muscle connection is key to growing muscle and training more effectively.
For beginners who struggle to “feel” their biceps during other curl variations, the spider curl offers instant feedback—you’ll know exactly when your biceps are engaged and when they’re not.
3. Low Risk, High Reward
Unlike heavy compound lifts that require coordination of multiple joints and muscle groups, the spider curl is a simple and controlled single-joint movement. It can be done with light dumbbells or even resistance bands, making it a safe option for new lifters.
Despite being simple, it delivers serious results. Its unique angle places constant tension on the biceps, which promotes growth even with lighter weights—perfect for beginners still developing strength.
Summary for Beginners:
- Teaches strict form naturally
- Builds mind-muscle awareness early on
- Offers a safe, effective path to stronger arms
How to Do the Spider Biceps Curl with Proper Form
Setup and Positioning
Getting the setup right is essential for making the spider biceps curl effective and safe—especially for beginners. A proper setup ensures you isolate the biceps correctly, avoid strain on the shoulders or back, and feel the full benefit of the exercise. Here’s how to do it step by step:
1. Choose the Right Equipment
To perform the spider curl, you’ll need an incline bench and a pair of dumbbells or an EZ bar. The incline bench should be set at about a 45–60° angle. This angle allows your upper body to rest comfortably while keeping your arms hanging straight down.
Equipment options:
- Dumbbells: Best for beginners because they allow natural wrist movement
- EZ Bar: More wrist-friendly than a straight bar, good for slight progression
- Resistance Bands (at home): Can be used if anchored securely from a high point
2. Position Your Body on the Bench
Once your bench is set up:
- Lie face-down on the incline bench with your chest fully supported against the pad.
- Your feet should be planted firmly on the floor or on the bench support (whichever keeps you stable).
- Let your arms hang freely straight down toward the floor, shoulders relaxed.
This position keeps your torso from moving and completely removes any assistance from your hips, shoulders, or back—which is key to isolating your biceps.
3. Grip and Arm Alignment
- Use a supinated grip (palms facing forward) when holding dumbbells or an EZ bar.
- Keep your elbows pointing straight down—not flaring out.
- Your arms should remain vertical throughout the exercise, with the shoulders not shifting or helping.
Beginner tip: If you’re using dumbbells, start with light weights to master the feel of the motion. You should feel a stretch at the bottom and a squeeze at the top—not discomfort in your shoulders or wrists.
Quick Checklist for Perfect Setup:
- [✓] Bench set to 45–60° incline
- [✓] Chest flat on the bench pad
- [✓] Arms hanging straight down
- [✓] Feet planted and body stable
- [✓] Elbows pointing straight to the floor
Curling Movement Step-by-Step
Once you’re properly positioned on the incline bench, it’s time to perform the spider biceps curl with precision. This part of the movement is all about control, contraction, and consistency. Follow these step-by-step instructions to make sure every rep builds strength and size safely.
Step 1: Start from the Full Hang Position
Begin with your arms fully extended toward the floor.
- Your elbows should be pointed straight down and stay fixed in this position throughout the movement.
- Make sure your wrists are in line with your forearms and your grip is secure (palms facing forward in a supinated grip).
- Your shoulders should stay relaxed and retracted (not shrugging).
Tip for beginners: Pause in this starting position for a moment to stabilize your body and feel the stretch in your biceps.
Step 2: Curl the Weight Up Slowly
With your upper arms locked in place, begin curling the weight by contracting your biceps.
- Move only your forearms—your upper arms should stay still.
- Keep the motion slow and controlled. Don’t rush or use momentum.
- Exhale as you lift the weight toward your shoulders.
As you near the top of the curl, squeeze your biceps tightly. You should feel a strong peak contraction at the top of the movement.
Goal: Bring the dumbbells or bar up until your forearms are nearly perpendicular to the floor and your biceps are fully contracted.
Step 3: Pause Briefly at the Top
Once you reach the top of the curl, pause for 1–2 seconds to maximize muscle engagement.
- Focus on that mind-muscle connection—feel the biceps working hard to hold the weight.
- Keep your wrists stable and avoid any rolling or bending.
This pause adds intensity to the exercise and reinforces control, especially helpful for beginners learning strict form.
Step 4: Lower the Weight Under Control
Begin to lower the weight slowly, reversing the curling motion.
- Inhale as you lower the dumbbells or bar in a controlled manner, taking 2–3 seconds.
- Resist the urge to let the weight drop—eccentric (lowering) control builds more muscle.
- Stop once your arms are fully extended again and feel a light stretch.
That’s one full rep! Repeat for your desired number of repetitions.
Beginner Recap:
- Curl up slowly, using only the biceps
- Pause and squeeze at the top for 1–2 seconds
- Lower slowly to complete the full rep with control
Form Tips for Maximum Results
To get the most out of the spider biceps curl, good form is essential—especially for beginners who are still developing strength, coordination, and technique. Proper form not only helps you build muscle faster but also prevents strain and reduces injury risk.
Here are key form tips to help you perform spider curls with maximum efficiency and safety:
1. Keep Your Elbows Fixed and Pointed Down
One of the biggest mistakes beginners make is letting the elbows drift during the movement. For best results:
- Keep your elbows locked in one position throughout the entire rep.
- Your elbows should point straight down toward the floor—don’t let them move forward or flare out.
- Stable elbows ensure the biceps stay fully engaged and do all the work.
Think of your upper arms as “nailed in place” while your forearms do the lifting.
2. Focus on Slow, Controlled Reps
Speed kills results—especially with spider curls. Avoid rushing through your reps or using momentum.
- Lift slowly, taking 1–2 seconds to curl the weight.
- Squeeze and pause at the top for 1–2 seconds.
- Lower even slower, taking 2–3 seconds to bring the weight down.
- This slow tempo keeps constant tension on the biceps, which is key for muscle growth.
Use a timer or count in your head to keep your tempo consistent.
3. Don’t Overload with Too Much Weight
Spider curls are about strict form and bicep isolation—not moving heavy loads. Using too much weight can:
- Compromise your form
- Engage your shoulders or back
- Reduce your range of motion
- Increase injury risk
Instead, start with light to moderate weights that allow you to complete each rep with perfect technique.
Tip: If you can’t control the lowering phase or feel your body shifting, drop the weight.
4. Keep Your Wrists Neutral and Aligned
Wrist position matters more than you think, especially for beginners. Poor wrist alignment can lead to discomfort or strain.
- Your wrists should stay neutral (in line with your forearms) throughout the lift.
- Avoid letting them bend backward or roll inward—this reduces stability and bicep activation.
- A neutral grip helps maintain control and ensures maximum force is directed to your biceps.
5. Breathe Properly
Breathing supports your performance and helps keep you calm and stable:
- Exhale as you lift the weight (concentric phase)
- Inhale as you lower it (eccentric phase)
This rhythm helps maintain core tightness and keeps your reps consistent.
Summary for Best Results:
- Lock in your elbows and slow down your reps
- Use a weight you can control, not just lift
- Focus on feeling the biceps work, not just moving the weight
Common Mistakes Beginners Make (and How to Fix Them)
Using Too Much Weight
One of the most common mistakes beginners make when performing the spider biceps curl is trying to lift weights that are too heavy. While it might be tempting to grab heavier dumbbells or bars to “feel the burn” or impress others, using excessive weight can actually limit your progress and increase your injury risk. Here’s why keeping the weight appropriate is crucial:
1. Compromised Form and Technique
When the weight is too heavy, maintaining proper form becomes challenging. You may start:
- Swinging your body or using momentum to lift the weight
- Raising your elbows or shifting your shoulders to assist the movement
- Shortening your range of motion, not fully extending or contracting the biceps
These shortcuts reduce the exercise’s effectiveness because the biceps aren’t fully isolated anymore. Instead of building muscle, you’re just moving weight inefficiently.
2. Reduced Muscle Activation
The spider curl’s primary goal is to place constant tension on the biceps throughout the movement. When the weight is too heavy, your body compensates by recruiting other muscles—like the shoulders, traps, or lower back—to help lift.
This compensation decreases the activation of the biceps, limiting muscle growth and strength gains. Using lighter weight lets you focus on the mind-muscle connection, feeling each rep deeply in your biceps.
3. Increased Risk of Injury
Heavy weights increase strain on your joints and connective tissues. For beginners especially, this can lead to:
- Tendon strain or inflammation around the elbows or wrists
- Muscle strains from poor control or jerky movements
- Lower back discomfort from compensating with body sway
Spider curls performed with strict form help protect these areas. If the weight is too heavy, you lose control and expose yourself to injury.
4. Less Efficient Muscle Growth
Muscle growth happens when you maintain time under tension and perform exercises with controlled movement. Using too much weight often causes you to rush reps or break form, reducing the time your biceps spend under tension.
Light to moderate weights allow you to slow down and maximize every rep’s effectiveness, promoting better hypertrophy (muscle growth) over time.
Tips to Avoid Using Too Much Weight:
- Start with a weight that allows 8–12 clean, controlled reps.
- If you can’t complete a full set with proper form, reduce the weight.
- Focus on quality over quantity—perfect reps beat heavy sloppy ones every time.
- Gradually increase the weight only when you can maintain good form comfortably.
Remember:
Progress in spider biceps curls is about mastering control and form first. The right weight is the one that challenges your muscles without sacrificing technique or safety.
Swinging or Using Momentum
One of the most frequent errors beginners make during the spider biceps curl is swinging the weights or relying on momentum to lift the load. While it might feel easier to “cheat” by using body movement, this habit significantly reduces the exercise’s effectiveness and can increase injury risk. Here’s why avoiding swinging and momentum is critical for your progress:
1. Reduces Muscle Engagement
The spider curl’s main purpose is to isolate the biceps and maximize tension throughout the movement. When you swing your body or jerk the weights upward, much of the force comes from your hips, shoulders, or back, rather than your biceps.
This means your biceps aren’t working as hard as they should, reducing muscle activation and slowing down gains in strength and size.
2. Compromises Form and Technique
Swinging often causes your elbows to move out of place, your upper arms to shift, or your wrists to bend awkwardly. This disrupts the controlled, strict form needed for spider curls.
Poor form not only makes the exercise less effective but also increases the chance of muscle imbalances and injuries over time.
3. Increases Injury Risk
Using momentum to lift heavy weights causes jerky, uncontrolled movements that put extra strain on your joints, tendons, and ligaments—especially in the elbows and wrists. This can lead to:
- Tendonitis or inflammation
- Muscle strains
- Joint discomfort or injury
Since spider curls are designed to be slow and controlled, swinging defeats this purpose and raises unnecessary injury risk.
4. Limits Long-Term Progress
While swinging might allow you to lift heavier weights momentarily, it prevents progressive overload in a safe, sustainable way. Beginners who rely on momentum often plateau quickly because they’re not training the muscles effectively.
Strict, controlled reps build a stronger foundation, allowing you to gradually increase weight and volume safely for better long-term muscle growth.
Tips to Avoid Swinging or Using Momentum:
- Focus on keeping your chest firmly against the bench and your body still throughout the movement.
- Use a lighter weight that allows you to perform slow, controlled reps without feeling the need to swing.
- Engage your core to stabilize your torso and prevent body sway.
- Concentrate on the mind-muscle connection—feel your biceps working every rep.
- Consider using a mirror or filming yourself to check your form and eliminate momentum.
Remember:
Strict form and control might feel slower or lighter at first, but they’re the keys to maximizing your spider biceps curl results and staying injury-free.
Incomplete Range of Motion
One common mistake beginners often make during the spider biceps curl is performing the exercise with an incomplete range of motion (ROM). This means not fully extending the arms at the bottom or not curling the weights all the way up at the top. While it might feel easier or quicker, cutting the movement short can seriously limit your muscle growth and strength gains. Here’s why full range of motion matters:
1. Limits Muscle Activation
The biceps work hardest when moving through their full length — from a fully stretched position (arms extended) to a fully contracted position (arms curled). When you don’t fully extend your arms at the bottom, you miss out on the stretching phase, which is crucial for activating muscle fibers and stimulating growth.
Similarly, if you don’t curl the weights all the way up, you’re missing the peak contraction — the point where your biceps are most engaged and under maximum tension.
2. Reduces Strength and Flexibility Gains
Performing partial reps with a shortened range of motion can cause muscle imbalances and limit the development of joint strength and flexibility. Full ROM movements help maintain healthy joints and ensure balanced muscle growth, which lowers injury risk as you progress.
3. Prevents Optimal Muscle Growth
Muscle hypertrophy (growth) depends heavily on the time under tension — how long your muscle is working during each rep. Using a complete range of motion maximizes this time, giving your biceps the stimulus needed to grow.
Shortened reps reduce time under tension, meaning your muscles receive less stimulus, which slows progress.
4. Encourages Bad Habits
Getting into the habit of partial reps can make it harder to perform other exercises correctly. Over time, this can lead to poor lifting habits and less effective workouts overall.
Tips for Full Range of Motion:
- At the bottom, let your arms hang fully extended to feel a gentle stretch in the biceps.
- At the top, curl the weights up until your biceps are fully contracted and forearms are nearly vertical.
- Perform each rep slowly and deliberately, focusing on the full motion rather than speed.
- Use lighter weights if you find it hard to maintain full ROM with heavier loads.
- Consider filming yourself or working with a trainer to check your form.
Remember:
Quality beats quantity. Performing fewer reps with perfect, full range of motion is far more effective for building strong, well-developed biceps than doing many partial or rushed reps.
Spider Biceps Curl Variations and Progressions
EZ Bar Spider Curls
The EZ bar spider curl is a popular variation of the traditional spider biceps curl that uses an EZ curl bar instead of dumbbells. This modification offers unique benefits, especially for beginners who want to protect their wrists and elbows while still effectively targeting the biceps.
1. What Is an EZ Bar?
An EZ curl bar is a specially shaped barbell with angled grips. Unlike a straight barbell, the curved design allows your wrists to rest in a more natural, semi-supinated position during curls. This reduces strain on the wrists and forearms, making it easier to perform curls comfortably and safely.
2. Benefits of Using the EZ Bar for Spider Curls
- Wrist Comfort: The angled grips reduce wrist hyperextension and discomfort, which is common with straight bars, especially for beginners or those with joint sensitivity.
- Better Grip Control: The EZ bar’s ergonomic design provides a secure grip that helps maintain strict form during the curl.
- Effective Biceps Activation: Like the dumbbell spider curl, the EZ bar spider curl isolates the biceps well due to the chest-supported incline position. The unique grip slightly shifts the emphasis, often engaging the brachialis muscle a bit more, contributing to thicker arms.
- Balanced Load Distribution: The barbell setup allows you to load both arms evenly, which can be helpful for maintaining symmetry as you develop strength.
3. How to Perform EZ Bar Spider Curls
- Set an incline bench at about a 45–60° angle and lie face down with your chest supported.
- Hold the EZ curl bar with the angled grips, palms facing upward (supinated grip).
- Let your arms hang straight down, elbows fixed in position.
- Curl the bar slowly towards your shoulders, squeezing your biceps at the top.
- Pause briefly, then lower the bar under control back to the starting position.
- Keep your torso stable against the bench to prevent momentum.
4. Who Should Use EZ Bar Spider Curls?
- Beginners who experience wrist discomfort with dumbbells or straight bars.
- Lifters looking to vary their arm workouts with different grip angles.
- Anyone aiming to reduce joint strain while maintaining excellent biceps isolation.
Pro Tip:
Start with light weights to master the movement and grip. Focus on slow, controlled reps and a full range of motion to maximize bicep engagement without risking injury.
Dumbbell Spider Curls
The dumbbell spider curl is a classic and highly effective variation of the spider biceps curl that uses dumbbells instead of bars. This variation offers several unique advantages, making it a top choice for beginners and experienced lifters alike.
1. Why Use Dumbbells for Spider Curls?
Dumbbells allow each arm to move independently, which can help correct muscle imbalances between your left and right biceps. Because each arm works on its own, dumbbell spider curls promote balanced strength and size development.
Additionally, dumbbells give you the freedom to use a natural wrist position that feels most comfortable for you, reducing strain and making the exercise easier on the joints—important for beginners.
2. Benefits of Dumbbell Spider Curls
- Improved Muscle Symmetry: Since each arm lifts separately, dumbbell curls can highlight and correct any strength or size differences between arms.
- Greater Range of Motion: Dumbbells often allow a slightly wider range of motion compared to bars, helping to fully stretch and contract the biceps.
- Better Wrist and Forearm Comfort: You can subtly adjust your wrist angle to avoid discomfort or pain.
- Versatility: Dumbbells are widely available and easy to use at home or in the gym, making them accessible for most beginners.
3. How to Perform Dumbbell Spider Curls
- Set an incline bench at about a 45–60° angle and lie face down with your chest supported.
- Hold a dumbbell in each hand with a supinated grip (palms facing forward).
- Let your arms hang straight down, keeping your elbows fixed and pointed downward.
- Slowly curl the dumbbells upward by bending your elbows, focusing on squeezing the biceps at the top of the movement.
- Pause briefly, then lower the dumbbells in a controlled manner back to the starting position.
- Keep your torso stable against the bench to avoid swinging or using momentum.
4. Who Should Choose Dumbbell Spider Curls?
- Beginners wanting to focus on form and muscle balance.
- Anyone dealing with wrist or forearm discomfort using bars.
- Lifters who want to target each bicep independently for better control and symmetry.
- Home gym users or those with limited equipment options.
Pro Tip:
Start with lighter dumbbells to perfect your form. Concentrate on slow, controlled movements with a full range of motion to maximize biceps activation and reduce injury risk.
Resistance Band Spider Curls (Home Option)
If you don’t have access to dumbbells or an EZ bar, the resistance band spider curl is an excellent alternative—especially for beginners training at home. Resistance bands provide variable resistance and allow you to mimic the spider curl movement with minimal equipment, making it both convenient and effective.
1. Why Use Resistance Bands?
Resistance bands are versatile, portable, and affordable tools that offer constant tension throughout the entire range of motion. Unlike free weights, bands provide progressive resistance—the harder you stretch them, the more resistance you feel. This helps maintain tension on your biceps during both the concentric (lifting) and eccentric (lowering) phases.
2. Benefits of Resistance Band Spider Curls
- Perfect for Home Workouts: No heavy equipment needed—just a sturdy anchor point and a resistance band.
- Variable Resistance: Bands increase tension as you curl, which can enhance muscle activation at the peak of the movement.
- Joint-Friendly: Bands reduce joint stress and allow smooth, controlled motion, making them ideal for beginners or those with sensitive elbows and wrists.
- Portable and Convenient: Easy to carry and use anywhere, helping you stay consistent with your arm training.
3. How to Perform Resistance Band Spider Curls
- Anchor your resistance band securely at chest height on a sturdy object like a door frame, pull-up bar, or heavy furniture.
- Set up an incline bench facing away from the anchor so you can lie face down with your chest supported.
- Hold the handles of the resistance band with a supinated grip (palms facing up) and let your arms hang straight down.
- Keep your elbows fixed and pointed down, and curl your hands toward your shoulders by bending at the elbows.
- Squeeze your biceps at the top, pause for a second, then lower your hands slowly, maintaining control.
- Ensure your torso stays stable on the bench throughout the movement to prevent swinging.
4. Who Should Use Resistance Band Spider Curls?
- Beginners working out at home without access to free weights.
- Anyone recovering from injury or with joint sensitivity seeking low-impact resistance training.
- Travelers or those with limited space who want an effective biceps exercise on the go.
- Lifters looking to add variety to their arm training routine.
Pro Tip:
Start with a light or medium resistance band to master your form. Gradually increase the band’s resistance or do more reps to keep challenging your biceps as you get stronger.
Conclusion:
The spider biceps curl is one of the most effective exercises for isolating your biceps and maximizing muscle growth—especially for beginners who are still building foundational strength and technique.
By focusing on strict form, using a controlled range of motion, and avoiding common errors, you’ll not only grow your biceps faster but also learn how to train smarter.
Start light, be consistent, and watch your arms transform. Add the spider biceps curl into your weekly arm routine, and you’ll soon see the benefits in both strength and size.