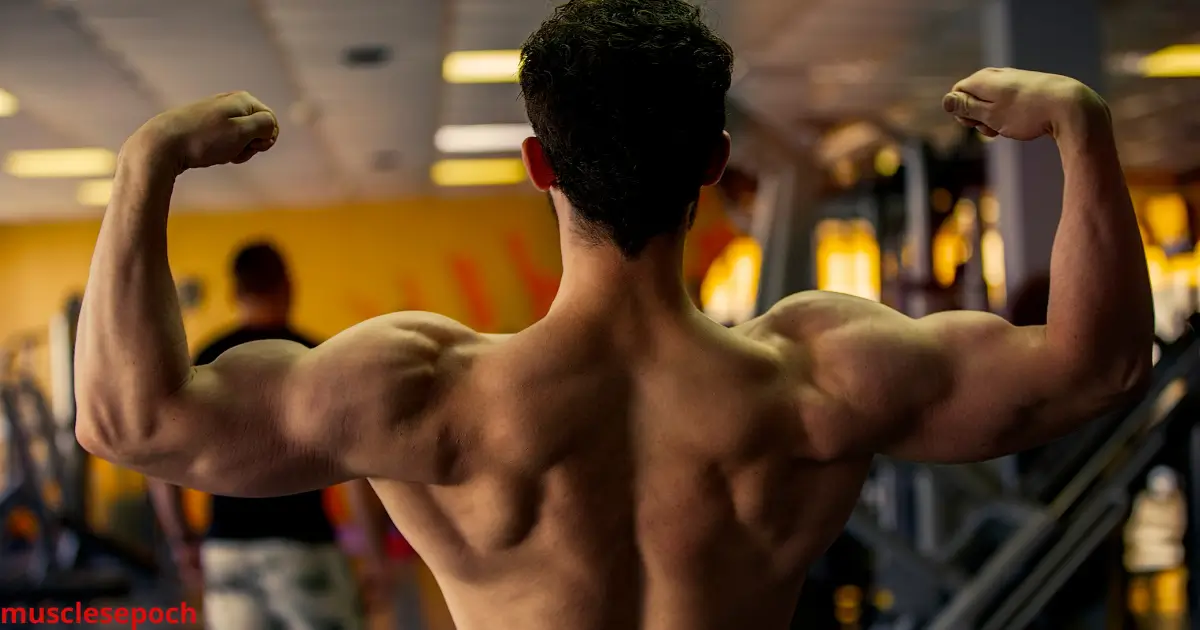
Are you new to strength training and wondering where to start? A back and bicep workout is one of the most beginner-friendly and effective routines for building upper body strength. These muscle groups naturally work together during “pulling” exercises, making them perfect to train in the same session.
In this guide, you’ll learn why training your back and biceps together makes sense, get a simple and easy-to-follow workout plan, and discover the best beginner exercises—whether you’re working out at the gym or at home. Let’s get you on the path to strength, confidence, and muscle growth—without feeling overwhelmed.
Why Train Back and Biceps Together?
The Benefits of Pairing Back and Biceps
When you’re just starting out, knowing how to structure your workouts can feel confusing. One of the smartest and most efficient combinations is training your back and biceps together—and here’s why it works so well:
1. Natural Muscle Synergy
Your back and biceps are both heavily involved in pulling movements. For example, when you perform a lat pulldown or row, your back muscles do most of the work, but your biceps assist with each pull. By training them in the same session, you’re taking advantage of how these muscles naturally work together. This not only saves time but also boosts your overall workout performance.
2. Time Efficiency and Workout Flow
Pairing back and biceps makes your workout more efficient and focused. You won’t need to jump between unrelated exercises or equipment. After warming up with compound back exercises like rows or pulldowns, your biceps are already pre-activated, so they need less work to get a solid pump. This means fewer exercises, less fatigue, and better results in less time.
3. Balanced Upper Body Development
Many beginners focus too much on “mirror muscles” like chest and arms, and end up neglecting their back. This can lead to muscle imbalances and poor posture. A back and bicep routine helps you build a balanced, strong-looking upper body—the kind that supports good posture, prevents injury, and makes your physique look more athletic from all angles.
Key Muscle Groups Worked
Understanding which muscles you’re training helps you stay motivated and focused during your workouts. When you follow a back and bicep routine, you’re targeting two major areas of the upper body that play key roles in strength, posture, and appearance.
1. Back Muscles
Your back is made up of several large and important muscle groups that affect everything from how you stand to how much weight you can lift.
- Latissimus Dorsi (Lats): These are the wide, wing-like muscles on the sides of your back. They help you pull your arms down and back, giving you that desirable “V-taper” look.
- Trapezius (Traps): Running from your neck to your mid-back, the traps support shoulder movement and posture. Strong traps also protect your neck and upper spine.
- Rhomboids: Located between your shoulder blades, rhomboids pull your scapula (shoulder blades) together. They help with back thickness and posture stability.
- Erector Spinae: These are the muscles that run along your spine. They help with spinal support, posture, and core strength.
Together, these back muscles help you with pulling, lifting, posture, and injury prevention.
2. Bicep Muscles
While the biceps are smaller than back muscles, they are highly visible and play a crucial role in arm strength.
- Biceps Brachii: This is the most well-known part of the biceps—the “flexing” muscle on the front of your upper arm. It helps you bend your elbow and rotate your forearm.
- Brachialis: Located underneath the biceps brachii, this muscle also helps bend the elbow and adds thickness to the upper arm when developed.
- Brachioradialis: This muscle runs from the lower part of your upper arm into your forearm. It activates during pulling movements and helps with grip strength.
Strong biceps don’t just look good—they support nearly all pulling exercises and help reduce the risk of elbow and forearm strain during workouts.
Why It Matters
Training these muscles together not only builds strength and muscle tone, but also improves your functional fitness—meaning you’ll get better at everyday tasks like lifting groceries, pulling open doors, or carrying bags. Plus, developing these areas helps support a balanced, injury-resistant body right from the start.
Common Beginner Mistakes to Avoid
Starting a new workout routine is exciting, but it’s easy to make mistakes that slow down your progress or even lead to injury. Here are some of the most common beginner mistakes when doing back and bicep workouts—and how to avoid them for faster, safer results.
1. Overtraining the Biceps, Undertraining the Back
Many beginners focus too much on biceps because they’re visible and easy to flex—but this often leads to neglecting the back muscles. Over time, this can cause muscle imbalances, poor posture, and a lack of overall strength.
What to do instead:
Make your back exercises the priority in your workout. Start with compound pulling movements like lat pulldowns, rows, or pull-ups. These engage the back and indirectly work the biceps, giving you more efficient training.
2. Using Momentum Instead of Proper Form
It’s tempting to swing the weights or use your whole body just to lift heavier—but this takes tension off the target muscles and increases the risk of injury, especially in the lower back and shoulders.
What to do instead:
Use controlled, slow movements with a full range of motion. Focus on form, not weight. If you can’t lift the weight without swinging, it’s too heavy. Stick to a weight that allows you to lift smoothly and deliberately.
3. Skipping Warm-Ups and Cooldowns
Many beginners jump straight into lifting or skip cooldowns altogether. This can lead to tight muscles, poor performance, and a higher risk of strains.
What to do instead:
- Begin each workout with a 5–10 minute warm-up (like light cardio and dynamic stretches).
- Include mobility work for the shoulders and arms.
- End with a cooldown: static stretches targeting your back, arms, and shoulders to promote flexibility and recovery.
Quick Recap:
Avoid these beginner traps by focusing on:
- Balanced training (not just biceps)
- Good form over heavy weight
- Consistent warm-ups and cooldowns
Avoiding these mistakes early on will help you build muscle faster, stay injury-free, and feel more confident in every session.
Back and Bicep Workout Plan for Beginners
Workout Frequency and Split
One of the most important decisions for beginners is how often to train and how to organize your workouts. Without a clear structure, it’s easy to overdo it or undertrain, which can stall your progress. Let’s break down the best frequency and split options for a beginner-friendly back and bicep routine.
1. How Often Should Beginners Train Back and Biceps?
For most beginners, training back and biceps 1 to 2 times per week is ideal. This gives your muscles enough stimulus to grow while allowing proper recovery between sessions.
- Once per week is great if you’re doing a full-body or general upper/lower body program.
- Twice per week (with at least 48 hours of rest in between) is more effective if you’re looking to build strength and size a little faster.
Remember: Your muscles grow when you’re resting, not during the workout—so rest days are just as important as training days.
2. Choosing a Beginner-Friendly Workout Split
A “workout split” refers to how you divide your training across the week. Here are two easy options for beginners that include back and bicep training:
Option A: Full-Body Split (3 Days/Week)
- Example Schedule: Monday – Wednesday – Friday
- You train all major muscle groups in each session, including back and biceps.
- Great for building a strong foundation and improving overall fitness.
Option B: Upper-Lower Split (4 Days/Week)
- Example Schedule:
- Monday: Upper Body (includes back and biceps)
- Tuesday: Lower Body
- Thursday: Upper Body
- Friday: Lower Body
- This allows you to train each muscle group twice per week with more focus per session.
Choose the split that fits your schedule and energy level. Consistency matters more than perfection.
3. Rest and Recovery Tips
No matter which split you choose, rest and recovery are key for muscle growth and injury prevention.
- Aim for 7–9 hours of sleep per night.
- Include active recovery (like walking or light stretching) on rest days.
- Stay hydrated and eat enough protein-rich foods to support muscle repair.
Quick Tip:
If you’re feeling sore, tired, or unmotivated, that’s a sign your body needs rest. Listening to your body is a big part of smart training—especially when you’re just starting out.
Easy Back and Bicep Workout Routine (Sample Plan)
If you’re new to the gym or just starting your fitness journey, it’s important to follow a simple, structured routine that targets both your back and biceps effectively—without being overwhelming. This beginner back and bicep workout is designed to be approachable, time-efficient, and results-driven.
Overview of the Routine:
- Workout Duration: 30–45 minutes
- Number of Exercises: 5–6 total
- Sets & Reps: 3 sets per exercise, 8–12 reps each
- Rest Between Sets: 60–90 seconds
This routine begins with compound movements (which work multiple muscles at once), then finishes with isolation exercises that directly target your biceps.
Sample Back and Bicep Workout (Gym Version)
- Lat Pulldown (or Assisted Pull-Up)
- Target: Lats, biceps
- Why: Builds width and strengthens the upper back
- How: Use a wide grip, pull bar to chest, squeeze shoulder blades
- Seated Cable Row
- Target: Middle back, rhomboids, biceps
- Why: Improves posture and mid-back development
- How: Sit tall, pull handles toward your torso, keep elbows close
- Dumbbell One-Arm Row (Each Side)
- Target: Lats, rear delts, biceps
- Why: Great for correcting muscle imbalances
- How: Place one knee and hand on a bench, pull dumbbell to your hip
- Barbell or EZ Bar Curl
- Target: Biceps brachii
- Why: Builds overall bicep size and strength
- How: Keep elbows at your sides, curl slowly, avoid swinging
- Hammer Curl (Dumbbells)
- Target: Brachialis and brachioradialis (adds arm thickness)
- Why: Strengthens elbow joint and forearms
- How: Palms facing in, curl dumbbells up simultaneously or alternating
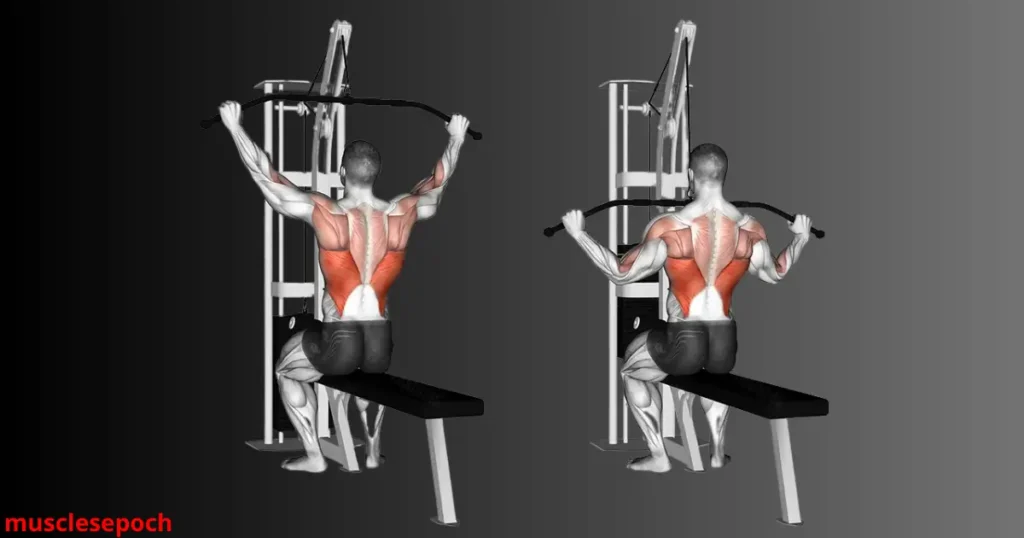
- Face Pull (Optional Finisher)
- Target: Upper traps, rear delts, rhomboids
- Why: Improves posture and shoulder health
- How: Use rope attachment on a cable machine, pull toward face
Home Version (Bodyweight/Minimal Equipment)
- Resistance Band Lat Pulldown
- Bent-Over Backpack Row or Dumbbell Row
- Inverted Rows (under a sturdy table or with TRX)
- Resistance Band Bicep Curls
- Towel or Dumbbell Hammer Curls
- Reverse Snow Angels (Bodyweight) for upper back
Final Tips:
- Choose weights that challenge you, but still allow proper form.
- Track your reps and sets each week to measure progress.
- Start slow—2–3 times a week is enough to begin seeing results.
Warm-Up and Cooldown Tips
Warming up and cooling down are two of the most overlooked—but most important—parts of any workout, especially for beginners. They help prevent injuries, improve performance, and speed up recovery. Here’s how to do both properly before and after your back and bicep workout.
Warm-Up: Prepare Your Muscles and Joints
The goal of a warm-up is to increase your heart rate, activate your muscles, and loosen your joints before you lift weights. A good warm-up doesn’t have to be long—just 5 to 10 minutes is enough to get your body ready to train.
Step-by-Step Warm-Up Routine:
- Light Cardio (3–5 minutes)
- Options: Brisk walking, jumping jacks, or cycling
- Purpose: Increases body temperature and blood flow to muscles
- Dynamic Stretches (2–3 minutes)
- Arm Circles: 20 forward, 20 backward
- Torso Twists: 15 reps per side
- Shoulder Rolls: 15 forward, 15 backward
- Band Pull-Aparts: Activates the rear delts and upper back
- Warm-Up Sets (Before Heavy Lifts)
- Use lighter weights to perform 1–2 sets of your first back exercise
- Helps your nervous system adjust and improves form
- Example: 1 set of lat pulldowns with 50% of your working weight
Cooldown: Recover and Reduce Soreness
After your workout, don’t just grab your bag and leave. A cooldown allows your body to transition back to a resting state, lowers your heart rate gradually, and reduces post-workout stiffness and soreness.
Step-by-Step Cooldown Routine:
- Light Stretching (5–7 minutes total)
Focus on the muscles you just trained—your back, biceps, and shoulders.- Child’s Pose (Back Stretch): Hold for 30 seconds
- Seated Forward Bend (Hamstrings & Spine): Hold for 30 seconds
- Cross-Body Shoulder Stretch: 30 seconds per arm
- Overhead Triceps/Bicep Stretch: 30 seconds per arm
- Deep Breathing
- Inhale through the nose for 4 seconds, hold for 4 seconds, exhale for 6 seconds
- Do this for 2–3 rounds to bring your nervous system into a relaxed state
Why Warm-Ups and Cooldowns Matter:
- Reduce Injury Risk: Cold muscles are more prone to tears and strains
- Improve Range of Motion: Stretching increases flexibility over time
- Boost Muscle Recovery: Helps flush out lactic acid and decrease soreness
- Mentally Prepare and Reset: A proper warm-up focuses your mind; a cooldown lets you decompress
Quick Tip:
If you’re in a rush, never skip both—even just 2 minutes of light cardio before and a quick stretch after is better than nothing.
Best Back and Bicep Exercises for Beginners
Beginner Back Exercises
Starting with the right exercises is key to building a strong and healthy back, especially for beginners. These exercises focus on developing your major back muscles safely and effectively, using movements that are easy to learn and perform with good form.
1. Lat Pulldown
- What it does: Targets your latissimus dorsi (the large muscles on the sides of your back) and also engages your biceps.
- Why it’s great for beginners: It mimics the pull-up movement but with adjustable resistance, making it easier to control.
- How to do it:
Sit at the lat pulldown machine, grip the bar slightly wider than shoulder-width, pull the bar down towards your chest while squeezing your shoulder blades together, then slowly release it back up. - Tips: Avoid leaning back excessively; keep your core tight and focus on pulling with your back muscles, not just your arms.
2. Dumbbell Row
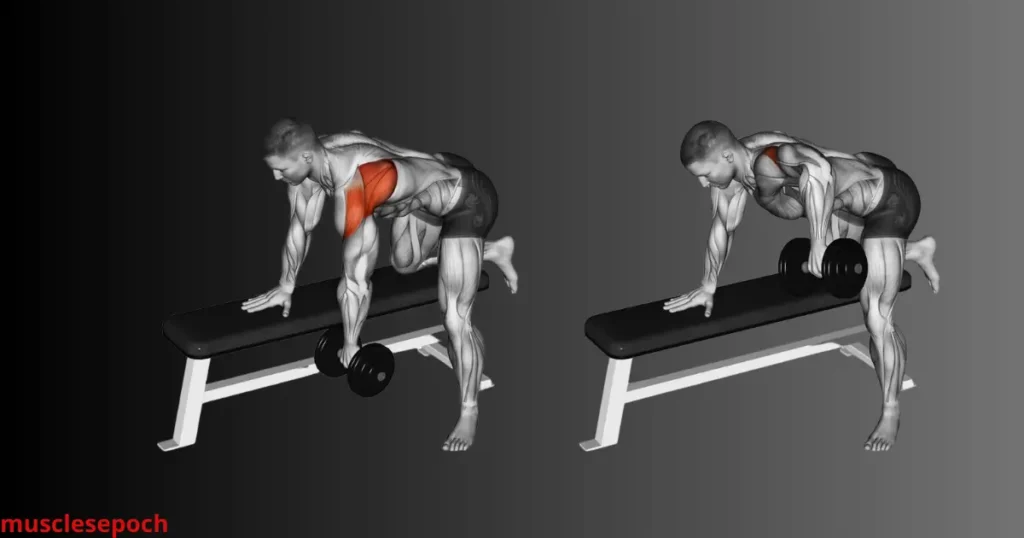
- What it does: Strengthens your lats, rhomboids (muscles between your shoulder blades), and rear delts.
- Why it’s great for beginners: It helps build strength and correct muscle imbalances by working each side independently.
- How to do it:
Place one knee and hand on a bench for support. With your other hand, hold a dumbbell and pull it towards your hip, keeping your back flat and core engaged. Lower the dumbbell slowly. - Tips: Avoid twisting your torso; focus on pulling through your back muscles.
3. Resistance Band Face Pulls
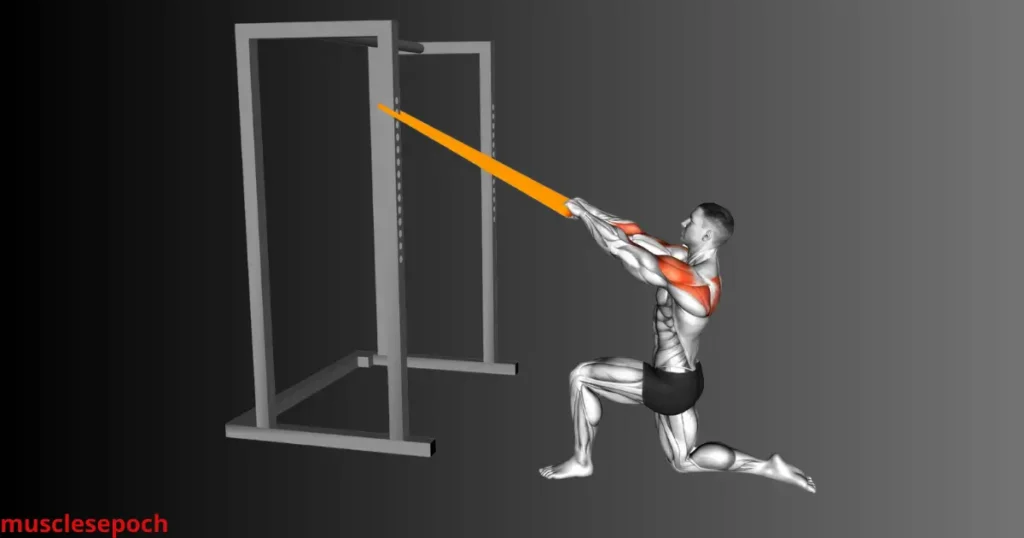
- What it does: Targets your upper back, rear delts, and traps, which are important for posture and shoulder health.
- Why it’s great for beginners: It uses light resistance and is easy to perform anywhere, helping to strengthen muscles that are often neglected.
- How to do it:
Attach a resistance band to a sturdy anchor at shoulder height. Grab the ends with both hands and pull towards your face, keeping elbows high and squeezing your shoulder blades together. - Tips: Keep the movement controlled and avoid shrugging your shoulders; focus on squeezing your upper back.
Why These Exercises Matter for Beginners
- They build foundational strength for more advanced lifts.
- They improve posture, which can reduce back pain and discomfort.
- They engage multiple muscles, promoting balanced upper-body development.
- They teach proper movement patterns that protect your spine and joints.
Beginner Bicep Exercises
Building strong, defined biceps is a common goal for many beginners, and starting with the right exercises is essential. These movements focus on developing your biceps safely and effectively, using simple techniques that promote muscle growth and help prevent injury.
1. Barbell or Dumbbell Bicep Curls
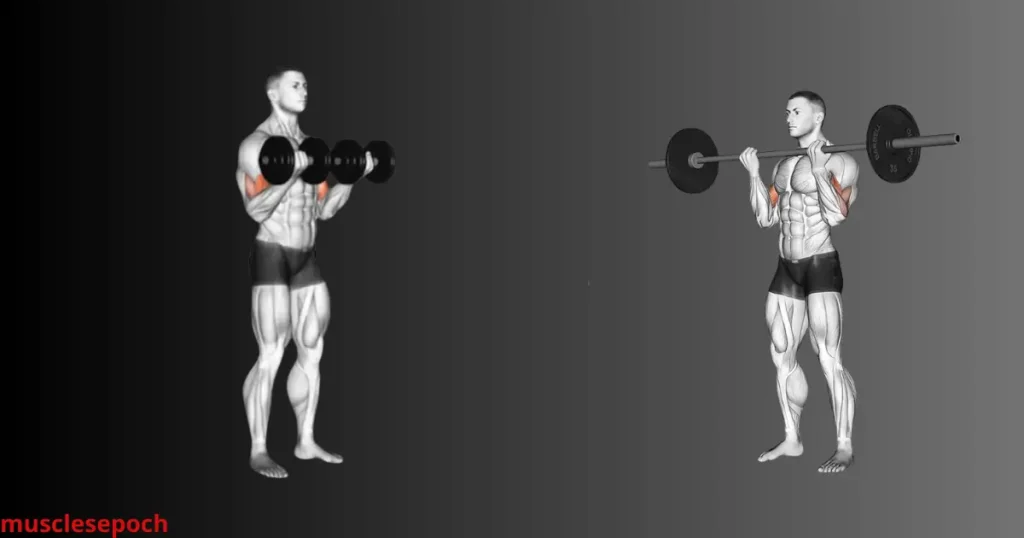
- What it does: Targets the biceps brachii—the main muscle responsible for the “peak” of your upper arm.
- Why it’s great for beginners: It’s a straightforward exercise that builds overall bicep strength and size.
- How to do it:
Stand with your feet shoulder-width apart, hold the barbell or dumbbells with an underhand grip. Keep your elbows close to your sides and curl the weight up toward your shoulders. Lower slowly to maximize muscle engagement. - Tips: Avoid swinging your body or using momentum; focus on controlled, steady movements.
2. Hammer Curls
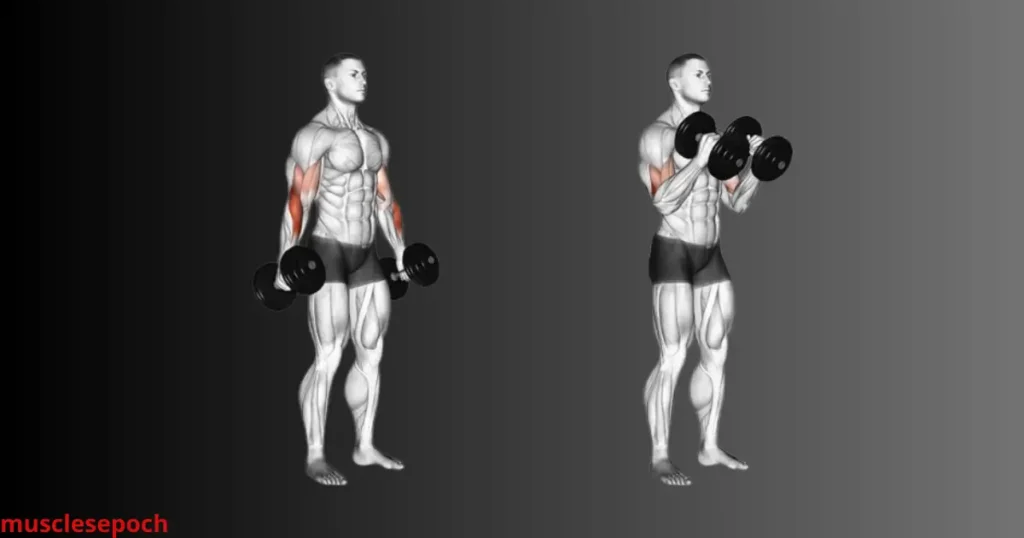
- What it does: Works the brachialis and brachioradialis muscles, which add thickness to your arms and improve forearm strength.
- Why it’s great for beginners: This neutral grip curl is easier on the wrists and builds balanced arm strength.
- How to do it:
Hold dumbbells with your palms facing your torso. Curl the weights while keeping your palms facing inward, then slowly lower them. - Tips: Keep your elbows locked at your sides and avoid rocking your body.
3. Resistance Band Bicep Curls
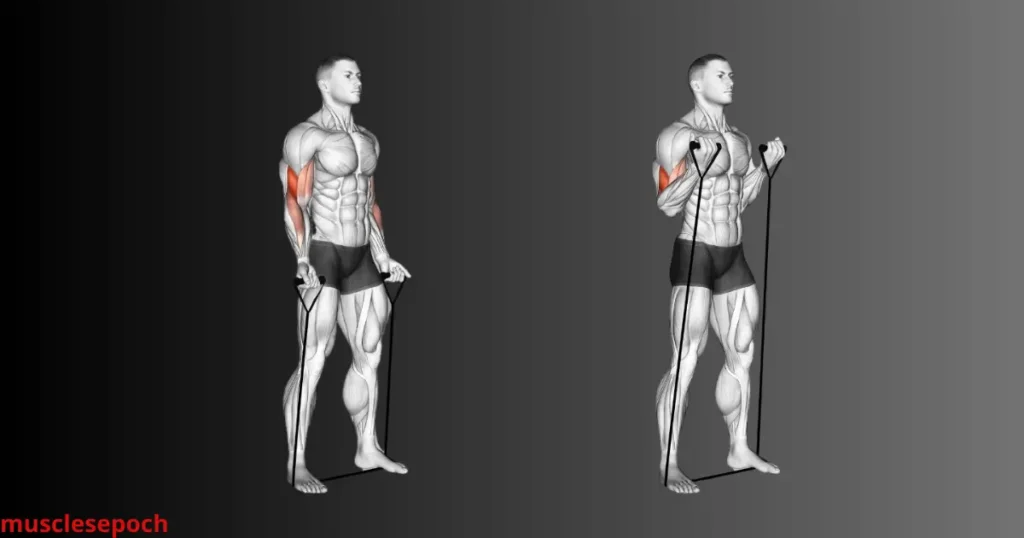
- What it does: Targets the biceps using resistance bands instead of weights, which is perfect for home workouts or beginners without gym access.
- Why it’s great for beginners: The resistance bands provide smooth tension, which reduces joint stress.
- How to do it:
Stand on the center of the band, hold the handles with palms facing up, and curl your hands toward your shoulders, squeezing your biceps at the top. - Tips: Control the movement on the way down to maximize muscle engagement.
Why These Exercises Are Great for Beginners
- They teach proper form and technique to avoid injury.
- They allow you to progressively increase resistance safely.
- They build the foundational strength needed for more advanced arm training.
- They improve grip and forearm strength, important for overall fitness.
Equipment Options for Home and Gym
When starting a back and bicep workout routine, the equipment you use can make a big difference in convenience, effectiveness, and motivation. Whether you prefer working out at home or hitting the gym, here are some beginner-friendly equipment options to help you get the most out of your workouts.
Gym Equipment for Back and Biceps
Gyms typically offer a wide variety of machines and free weights designed to target your back and biceps effectively:
- Lat Pulldown Machine
- Perfect for beginners to develop back strength, especially the lats.
- Adjustable weight stacks allow you to progress gradually.
- Provides guided motion to help maintain proper form.
- Cable Machines with Handles or Rope Attachments
- Versatile for exercises like seated rows, face pulls, and cable curls.
- Constant tension throughout the movement improves muscle engagement.
- Free Weights: Dumbbells and Barbells
- Dumbbells allow unilateral training, helping correct muscle imbalances.
- Barbells are great for bicep curls and rows, enabling heavier lifts as you progress.
- Free weights also engage stabilizing muscles, improving overall functional strength.
- Smith Machine or Assisted Pull-up Machine
- Useful for beginners who want to build strength for pull-ups safely.
- Provides controlled assistance and support for bodyweight exercises.
Home Equipment Options
You don’t need a gym membership to build strong back and biceps. Many effective tools are affordable and space-friendly:
- Resistance Bands
- Highly versatile and portable for exercises like lat pulldowns, rows, and bicep curls.
- Different resistance levels allow progression as you get stronger.
- Easy on the joints and great for controlled movements.
- Adjustable Dumbbells or Fixed-Weight Dumbbells
- Ideal for curls, rows, and hammer curls at home.
- Adjustable sets save space and money by combining multiple weights in one.
- Pull-up Bar (Doorway or Freestanding)
- Excellent for bodyweight back exercises like pull-ups and chin-ups.
- Can be used with resistance bands for assisted pull-ups when starting out.
- Sturdy Chair or Bench
- Useful for support during exercises like dumbbell rows or tricep dips.
- Doesn’t take up much space and doubles as general workout equipment.
Tips for Choosing Equipment:
- Start Simple: If you’re new, resistance bands and light dumbbells offer a gentle introduction.
- Focus on Quality: Invest in sturdy, durable equipment that can support your progress.
- Consider Space: Choose equipment that fits your available space and lifestyle.
- Mix It Up: Using a combination of free weights, machines, and bands keeps workouts interesting and effective.
Final Thought:
Whether at home or in the gym, having the right equipment tailored to your needs will help you stay consistent, challenge your muscles, and achieve your fitness goals faster.
Tips to Maximize Strength and Muscle Growth
Focus on Form Over Weight
When starting any new workout routine—especially for beginners targeting the back and biceps—it’s crucial to prioritize proper form over lifting heavy weights. Mastering your technique first sets the foundation for safe and effective training, ensuring long-term progress without injury.
Why Form Matters More Than Weight
- Prevents Injuries: Incorrect form places unnecessary strain on joints, tendons, and muscles, increasing your risk of strains, sprains, or more serious injuries.
- Maximizes Muscle Engagement: Proper technique ensures the target muscles, like your lats and biceps, are doing the majority of the work, leading to better strength and growth.
- Builds Good Habits: Developing correct movement patterns early means you’ll maintain healthy mechanics as you progress to heavier lifts.
- Improves Efficiency: Lifting with good form helps you use energy effectively, enabling you to complete more reps with better control.
Common Form Mistakes to Avoid
- Swinging or Using Momentum: Jerking the weight up reduces muscle activation and shifts effort away from the intended muscles.
- Elbows Flaring Out: Especially in curls or rows, this reduces back and bicep engagement and increases shoulder strain.
- Rounded Back During Rows: This places dangerous stress on your spine instead of working your back muscles properly.
- Partial Range of Motion: Not fully extending or contracting the muscles limits muscle development and flexibility gains.
Tips to Maintain Proper Form
- Start with Light Weights: Use a manageable load to practice technique without fatigue.
- Move Slowly and Controlled: Focus on the eccentric (lowering) phase as much as the concentric (lifting) phase.
- Engage Your Core: A tight core supports your spine and helps maintain proper posture throughout exercises.
- Keep Elbows Close: This focuses work on your back and biceps, reducing shoulder strain.
- Use Mirrors or Record Yourself: Visual feedback can help correct posture and movement errors.
Pro Tip:
If you struggle to maintain form at a certain weight, reduce the load until you can perform the exercise correctly. Progressively increase weight only when your form is flawless.
Prioritizing form over weight not only protects your body but also sets you up for steady, sustainable muscle growth and strength gains. This approach is the smartest way to train—especially if you’re just beginning your fitness journey.
Progressive Overload Made Simple
To build strength and muscle over time, your body needs a clear reason to adapt and grow. That’s where progressive overload comes in. It’s a core principle in fitness that involves gradually increasing the demand placed on your muscles. And don’t worry—it doesn’t mean lifting super heavy weights from day one. In fact, progressive overload is both simple and beginner-friendly when done right.
What Is Progressive Overload?
Progressive overload is the gradual increase in stress placed on your muscles during training. This forces your body to adapt by becoming stronger, more muscular, and more efficient.
You can apply progressive overload in several ways:
- Increasing weight
- Increasing reps or sets
- Improving form or range of motion
- Reducing rest time between sets
- Slowing down the tempo of each rep
Simple Ways Beginners Can Apply It
- Add Reps Before Adding Weight
Start by increasing reps within a safe range (e.g., from 8 to 12). Once you can perform the upper limit with good form, you can then increase the weight slightly. - Use a Workout Log or App
Keep track of your sets, reps, and weights. This gives you a clear view of your progress and motivates you to beat your last performance. - Focus on Form Quality
Before increasing weight, make sure every rep is smooth and controlled. Better form equals better muscle activation and fewer injuries. - Change One Variable at a Time
Don’t overwhelm yourself by changing weight, reps, and rest all at once. Pick one progression method per week, and focus on mastering it.
Warning Signs You’re Progressing Too Fast
- Compromised Form: If you’re swinging, rushing, or losing posture, the weight may be too heavy.
- Persistent Joint Pain: Sharp or lasting pain is a sign to reduce the load and reassess technique.
- Fatigue Too Early: If you’re gassed halfway through your workout, you may need to ease up slightly.
Final Thought:
You don’t need to add weight every session. Small, consistent improvements in performance, control, or endurance over weeks and months are what drive lasting results. Think of progressive overload like climbing a staircase—one small step at a time, not a leap.
Nutrition and Recovery Basics
Building a stronger back and bigger biceps doesn’t just depend on your workouts—it’s equally about what you eat and how well you recover. As a beginner, understanding the basics of nutrition and recovery will help you make faster progress, reduce soreness, and avoid burnout.
Nutrition: Fuel for Muscle Growth
What you eat before and after your workouts can dramatically impact your performance and results. Here are the essentials:
1. Protein: The Building Block
- Muscles need protein to repair and grow after resistance training.
- Aim for 0.7–1 gram of protein per pound of body weight daily.
- Good sources: chicken, eggs, fish, Greek yogurt, lentils, and whey protein.
2. Carbohydrates: Energy for Training
- Carbs provide the energy your body needs to lift weights and recover.
- Eat complex carbs like oats, brown rice, sweet potatoes, and fruit.
- A small carb-rich snack 30–60 minutes before your workout can boost your performance.
3. Healthy Fats: Support Hormones and Recovery
- Don’t avoid fats—they support hormone production and help absorb nutrients.
- Include sources like avocados, nuts, olive oil, and fatty fish.
4. Hydration: Often Overlooked
- Drink at least 8–10 glasses of water a day.
- Proper hydration keeps your muscles functioning and reduces the risk of cramps and fatigue.
Recovery: When the Real Growth Happens
Recovery is more than just resting—it’s a vital phase where your muscles repair and grow stronger. Here’s how to support it:
1. Sleep: Your Natural Anabolic Window
- Aim for 7–9 hours of quality sleep per night.
- Growth hormone is released during deep sleep, aiding muscle repair and fat loss.
- Poor sleep can decrease strength, increase cravings, and raise your injury risk.
2. Rest Days: Essential for Beginners
- Beginners should train back and biceps 1–2 times per week, leaving at least 48 hours between sessions.
- Rest doesn’t mean doing nothing—light activity like walking or stretching helps recovery.
3. Stretching and Foam Rolling
- Light stretching after workouts prevents tightness and improves flexibility.
- Foam rolling helps release muscle tension and improves circulation to aid healing.
Quick Nutrition & Recovery Tips for Beginners:
- Post-Workout Snack Example: Protein shake + banana within 30 minutes of training.
- Meal Timing: Focus on balanced meals every 3–4 hours.
- Don’t Skip Rest Days: Muscles grow during recovery, not during the workout itself.
- Avoid Overtraining: If you’re constantly sore, tired, or not progressing, you may need more recovery.
Final Thought:
Your body is like a machine—it needs the right fuel and downtime to function at its best. A solid workout means nothing without smart nutrition and proper recovery to back it up.
Conclusion
Starting your fitness journey doesn’t have to be complicated. With this beginner-friendly back and bicep workout, you now have a clear plan to build strength, improve your posture, and begin developing that classic V-shaped physique.
Stick to proper form, be consistent, and trust the process. Over time, your back will get stronger, your biceps will grow, and your confidence will skyrocket. Ready to take that first step? Grab your weights—or even just a resistance band—and let’s go!