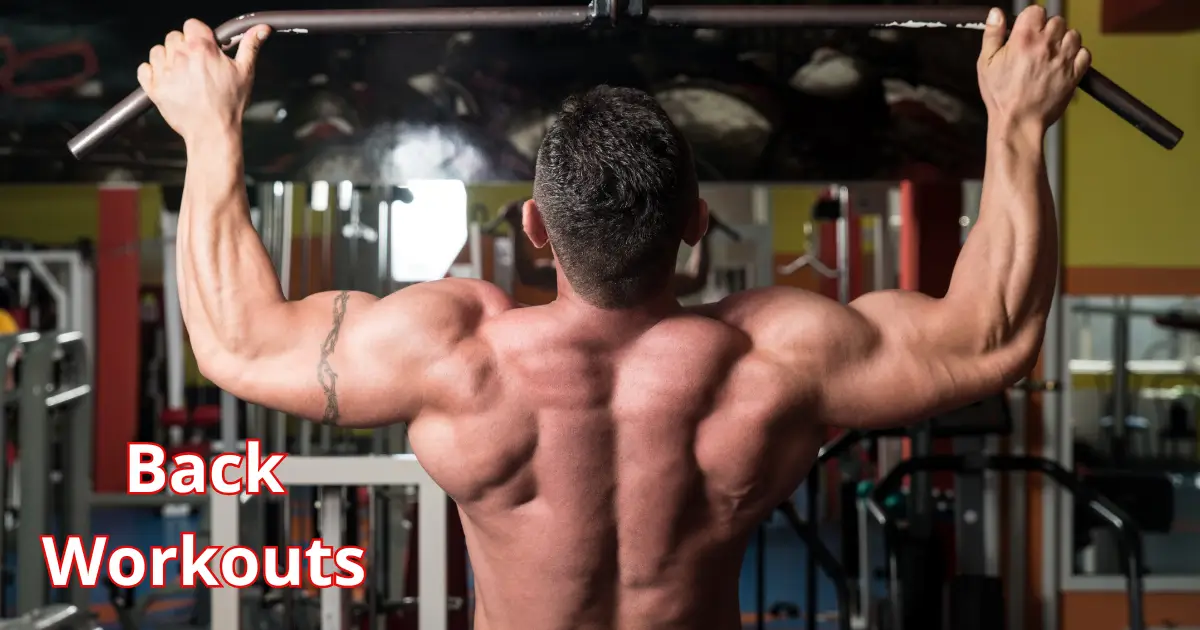
A strong, well-developed back isn’t just about aesthetics it’s the foundation of good posture, balanced strength, and injury prevention. Whether you’re new to fitness or an experienced lifter, using back workout machines can offer a safer, more controlled way to build muscle and improve form. These machines isolate key muscles like the lats, traps, and rhomboids, helping you maximize results while minimizing risk. In this guide, we’ll break down the best back workout machines, how to use them properly, and tips to help you build a stronger, more muscular back with confidence.
Why Use Machines for Back Workouts?
Benefits of machine-based training for beginners
Machine-based training offers a range of advantages, particularly for those who are new to strength training or looking to improve their technique in a safe and structured environment. Here are some of the key benefits for beginners:
1. Improved Safety and Stability
Unlike free weights, machines guide your movement through a fixed path. This reduces the risk of injury caused by poor form or lack of balance. For beginners who may not yet have full control over their body mechanics, machines provide much-needed support and confidence, especially during heavier lifts.
2. Easier to Learn Proper Form
Most back workout machines—such as the lat pulldown, seated row, and assisted pull-up—are designed with ergonomics in mind. This makes it easier for beginners to understand the correct movement pattern without worrying about positioning weights or stabilizing themselves. Proper form is essential for both maximizing muscle engagement and avoiding strain on the joints.
3. Efficient Muscle Isolation
Back machines are excellent for targeting specific muscle groups like the lats, traps, rhomboids, and rear deltoids. This focused approach allows beginners to activate and strengthen their back muscles more effectively, which can be challenging to do with free weights if you’re still learning technique.
4. Confidence Building
Starting out in the gym can be intimidating, but machines make the environment feel more approachable. With clearly labeled instructions and guided movement, beginners are more likely to stick with their training, build confidence, and develop consistency—one of the most important factors in achieving long-term fitness goals.
Isolating Back Muscles for Better Results
When it comes to building a strong, well-defined back, isolating specific muscle groups is key to achieving balanced development and maximizing gains. Isolation refers to targeting a particular muscle or group of muscles with minimal involvement from surrounding muscles. Back workout machines excel in this area, helping you focus on precise muscle engagement without the need for stabilizing your entire body.
1. Focused Muscle Activation
Machines like the lat pulldown or seated cable row are designed to reduce the need for balance and core stabilization, allowing you to fully concentrate on contracting your back muscles. This targeted engagement enhances the mind-muscle connection, which has been shown to significantly improve muscle activation and growth over time.
2. Addressing Weak Points
Many lifters have muscular imbalances or underdeveloped areas in their back—such as weaker rhomboids, traps, or lats. Using isolation-focused machines like the reverse pec deck (for rear delts) or the straight-arm pulldown (for lats) can help correct these imbalances by emphasizing those areas without interference from stronger muscle groups like the arms or shoulders.
3. Safer Progressive Overload
With isolation machines, you can gradually increase resistance in a controlled manner. This supports progressive overload (a key driver of hypertrophy) without overcompensating with improper form or recruiting other muscle groups to “cheat” the lift. For beginners and intermediate lifters, this means more consistent progress with lower risk of injury.
4. Enhanced Muscle Definition
By specifically targeting different parts of the back—upper (trapezius), middle (rhomboids), and lower (lats)—isolation machines contribute to better overall shape and definition. Incorporating these machines into your back workout ensures you’re not just building mass, but also sculpting a symmetrical and aesthetically pleasing physique.
Machines vs. free weights: Which builds back strength better?
The debate between machines and free weights is a long-standing one in strength training—and for good reason. Both have their unique advantages when it comes to building a strong, muscular back. Understanding how they differ can help you make the most of your workouts and tailor your routine based on your goals, experience level, and training environment.
1. Stability and Isolation: The Machine Advantage
Back machines like the lat pulldown, seated row, or hammer strength high row provide a fixed movement path, offering excellent support and minimizing the need for stabilization. This allows beginners to learn proper form without worrying about balance, and enables all lifters to isolate specific muscles—especially the lats, traps, and rhomboids—more effectively.
Machines also reduce the involvement of assisting muscles (like biceps or lower back), which means the target back muscles get more focused tension, aiding hypertrophy (muscle growth).
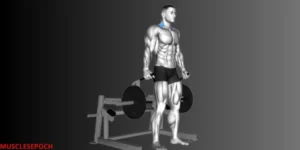
2. Engagement and Functional Strength: The Free Weights Edge
Free weights—such as barbell rows, dumbbell rows, and deadlifts—require greater coordination, balance, and control. They recruit stabilizing muscles and engage the core, promoting better neuromuscular coordination and overall functional strength. These compound movements often translate better to real-world strength and athletic performance.
They also allow for a more natural range of motion and can be more versatile in training programs, though they demand proper form to avoid injury—especially with heavier loads.
3. Which Is Better? It Depends on Your Goal
- For muscle isolation and safety (especially for beginners or those recovering from injury), machines are ideal.
- For building raw strength, core stability, and functional movement, free weights are superior.
- For complete back development, combining both is often the most effective approach. Start with heavy compound lifts using free weights, then use machines to isolate and finish off specific back muscles.
Pro Tip: Don’t choose between them—rotate both into your back workout to reap the full spectrum of benefits.
Top Back Workout Machines You Should Be Using
Lat Pulldown Machine – A classic for lat development
The lat pulldown machine is a staple in virtually every gym—and for good reason. It’s one of the most effective and accessible machines for building the latissimus dorsi, the broad muscles that give your back its V-shaped appearance. Whether you’re a beginner learning proper pulling mechanics or an advanced lifter looking to fine-tune your back development, the lat pulldown remains a go-to exercise.
1. Why It’s So Effective
The primary function of the lat pulldown machine is to mimic a pull-up motion in a more controlled and adjustable way. It targets the lats directly by allowing you to pull a weighted bar down toward your chest or behind your head (though the front version is safer and more recommended). By adjusting the weight stack, you can gradually increase resistance without sacrificing form.
2. Variations to Maximize Growth
- Wide-Grip Pulldown: Focuses more on the outer lats, enhancing width.
- Close-Grip Pulldown: Engages both the lats and middle back more deeply.
- Reverse-Grip (Underhand) Pulldown: Adds biceps involvement while still targeting the lats.
- Single-Arm Pulldown (on cables): Helps correct muscle imbalances and improve unilateral strength.
Rotating through different grip styles and angles can help activate various parts of the back and prevent plateaus.
3. Perfect for All Experience Levels
One of the reasons the lat pulldown is so widely used is its accessibility. Beginners benefit from its controlled movement and adjustable weight, which allows them to build strength and confidence before progressing to bodyweight pull-ups. Advanced lifters can use it for higher-rep hypertrophy work or as a warm-up/finisher for compound lifts like weighted pull-ups or rows.
Form Tip
Always sit upright with your chest lifted and shoulders pulled slightly back. Pull the bar down to your upper chest, not behind your neck, to reduce shoulder strain and prevent injury. Use a full range of motion—fully extending at the top and squeezing your lats at the bottom.
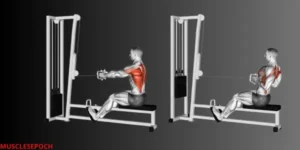
Seated Row Machine – Building mid-back and rhomboids
The seated row machine is one of the best tools for developing the middle back, especially the rhomboids, trapezius, and erector spinae. It offers a stable and controlled environment for strengthening the upper and middle portions of the posterior chain, which are essential for good posture, pulling strength, and balanced upper-body development.
1. What It Targets
Unlike vertical pulling movements like the lat pulldown, the seated row emphasizes horizontal pulling, which is crucial for developing thickness in the mid-back. Key muscles activated during seated rows include:
- Rhomboids (pull shoulder blades together)
- Middle and lower traps
- Lats (especially when using a wide grip)
- Rear deltoids
- Erector spinae (spinal stabilizers)
This combination of muscles works together to improve posture, support shoulder health, and increase back density.
2. Technique and Grip Variations
Form and grip are everything when using the seated row machine effectively:
- Neutral Grip (palms facing each other): More joint-friendly and excellent for mid-back development.
- Wide Grip: Emphasizes the upper traps and rear delts.
- Underhand Grip: Engages the lower lats and biceps more.
Form tip: Sit upright, keep your chest up, and avoid leaning too far back. Pull the handles toward your lower chest or upper abdomen while squeezing your shoulder blades together. Control the return to the start to maintain muscle tension.
3. Benefits for All Levels
The seated row machine is ideal for both beginners and experienced lifters. Beginners can focus on building proper scapular control and posture, which lays the foundation for safe lifting in compound movements. Intermediate to advanced lifters benefit from using it for:
- Hypertrophy (muscle building) sets
- Back-off sets after heavy barbell rows
- Injury prevention by strengthening postural muscles
Posture & Injury Prevention
Regularly including seated rows in your routine can help combat poor posture caused by sitting or excessive pressing. Strengthening the rhomboids and mid-back ensures your shoulders stay healthy and reduces the risk of shoulder impingements and upper back imbalances.
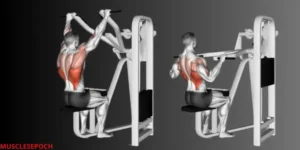
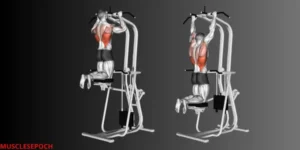
Assisted Pull-Up Machine – Scalable strength for all levels
The assisted pull-up machine is an exceptional tool for developing upper-body pulling strength, especially for those who are working their way up to unassisted bodyweight pull-ups. It allows users to perform the full range of motion of a traditional pull-up, but with adjustable assistance that helps reduce the amount of bodyweight lifted. This makes it ideal for beginners, intermediates, and even advanced lifters looking to focus on form or volume training.
1. Target Muscles and Movement Benefits
The assisted pull-up machine primarily targets:
- Latissimus dorsi (lats) – the largest muscles of the back
- Biceps brachii
- Trapezius (lower and middle fibers)
- Rhomboids
- Rear deltoids
- Core muscles (stabilizers during the lift)
By mimicking the natural movement of a pull-up, it builds real-world pulling strength and muscle definition, especially in the upper back and arms.
2. Scalable Resistance for All Levels
One of the biggest advantages of this machine is its scalability. Instead of requiring the strength to lift your entire bodyweight, you can:
- Adjust the counterweight to offset a portion of your body mass
- Progressively reduce assistance as your strength increases
- Perform more reps and sets with good form, reducing the risk of injury or overuse
For beginners, it allows confidence-building repetitions. For advanced users, it’s great for warm-ups, high-rep sets, or refining technique with strict control.
3. Tips for Form and Progression
To get the most from the assisted pull-up machine:
- Maintain a neutral spine and tight core throughout the movement
- Avoid swinging or using momentum
- Pull your chin over the bar by driving your elbows down and back
- Focus on a controlled eccentric phase (the lowering part), which is excellent for strength gains
As you get stronger, gradually decrease the assistance until you’re able to perform bodyweight pull-ups confidently.
Bonus Use Cases
- Use for negative reps: Assist yourself up and lower slowly under control.
- Try tempo pull-ups to increase time under tension.
- Use different grips (wide, neutral, underhand) to target various back and arm muscles.
The assisted pull-up machine bridges the gap between beginner and advanced levels of calisthenic strength. It offers a path to unassisted pull-ups while delivering solid hypertrophy and strength benefits along the way.
How to Use These Machines Effectively
Correct form and common mistakes to avoid
Using back workout machines effectively requires more than just hopping on and pulling or rowing — mastering proper form is essential to maximize gains and minimize the risk of injury. Whether you’re a beginner or experienced lifter, being mindful of technique ensures you’re targeting the intended muscles and building real strength.
1. Key Elements of Proper Form
When using any back machine (e.g., lat pulldown, seated row, assisted pull-up), keep the following fundamentals in mind:
- Neutral spine: Maintain a straight back with your chest up and core engaged. Avoid rounding or hyperextending the lower back.
- Controlled movement: Perform each rep in a slow, controlled motion — both on the lift and the return — to maximize time under tension.
- Full range of motion: Don’t shortchange your reps. Fully extend and contract the muscles without using momentum.
- Shoulder retraction: Pull your shoulder blades back and down before initiating the pull. This engages the back muscles rather than relying on your arms.
2. Common Mistakes to Watch Out For
Even seasoned gym-goers fall into these traps:
- Using momentum: Swinging your torso or jerking the weight reduces muscle engagement and increases injury risk.
- Overreliance on arms: Focusing too much on pulling with your biceps instead of initiating with your back reduces the effectiveness of the exercise.
- Shrugging shoulders: Lifting the shoulders during reps shifts tension away from the lats and into the traps.
- Incomplete range of motion: Not fully extending your arms at the bottom or not pulling all the way through limits muscular development.
- Too much weight: Using loads that are too heavy often sacrifices form and promotes bad habits like jerking or half-reps.
3. Pro Tips for Form Correction
- Start with light weight to learn correct movement patterns.
- Use mirrors or film yourself to observe form.
- Engage your core throughout to protect your spine.
- Perform a warm-up set to activate your back muscles and get blood flowing.
Proper form is the foundation of effective back training. By avoiding common mistakes and staying intentional with each rep, you’ll build strength more efficiently and protect yourself from setbacks.
Ideal reps, sets, and rest periods for muscle growth
To optimize muscle growth with back workout machines, it’s crucial to focus on more than just lifting weights — your approach to sets, reps, and rest periods directly impacts your results. The key to building a stronger back, and developing hypertrophy (muscle growth), lies in customizing these variables to your training goals.
1. Reps: The Magic Number for Muscle Growth
The number of repetitions (reps) you perform per set plays a significant role in stimulating muscle growth. For most individuals seeking hypertrophy, the ideal rep range is generally between 6-12 reps per set.
- Lower Reps (3-5 reps): Typically used for strength development, lower rep ranges with heavier weights can also help you develop a solid foundation for hypertrophy if paired with higher volume over time.
- Moderate Reps (6-12 reps): This range is optimal for muscle growth, as it allows you to lift moderate weights with sufficient time under tension, targeting both slow- and fast-twitch muscle fibers.
- Higher Reps (12-15 reps): This rep range is useful for building muscular endurance and improving muscle tone. It’s less focused on hypertrophy but can still contribute to overall back development if used strategically in a well-rounded program.
Pro Tip: Aim for the 6-12 rep range for the most effective muscle-building stimulus.
2. Sets: How Many Should You Do?
The number of sets you perform depends on your level of experience, volume goals, and how well you recover. For hypertrophy, it’s recommended to perform 3-5 sets per exercise.
- Beginners: If you’re just starting out, 3 sets per exercise may be enough to stimulate muscle growth. Focus on learning proper form and gradually increasing the intensity.
- Intermediate/Advanced Lifters: For experienced lifters, 4-5 sets per exercise help challenge the muscles and drive growth by increasing volume.
Pro Tip: Vary the number of sets throughout your training cycle. You might start with 3 sets and progressively add a set or two as your body adapts.
3. Rest Periods: Allowing Your Muscles to Recover
Rest periods play a key role in muscle recovery and performance. The duration between sets allows your muscles to regenerate and prepare for the next set, which ultimately influences strength and hypertrophy outcomes.
- Short Rest (30-60 seconds): This rest period is ideal for promoting muscular endurance and vascularity (the visible veins in the muscles). It’s not optimal for hypertrophy but can be useful for sculpting and toning the back muscles.
- Moderate Rest (60-90 seconds): This range is the sweet spot for muscle growth. It provides enough time for the muscles to recover while maintaining muscle tension and metabolic stress for optimal hypertrophy.
- Long Rest (2-3 minutes): Longer rest periods are typically used for strength training. If your goal is to lift heavier weights (e.g., low rep range), more rest allows the muscles to replenish energy stores, though it isn’t as effective for hypertrophy alone.
Pro Tip: For hypertrophy, aim for a 60-90 second rest period between sets to maximize muscle growth while ensuring enough recovery.
4. Putting It All Together
When structuring your back workout for muscle growth, here’s a quick reference guide:
- Reps: 6-12 for hypertrophy
- Sets: 3-5 sets per exercise
- Rest Periods: 60-90 seconds for optimal muscle growth
These parameters will keep your workouts focused on maximizing hypertrophy and ensuring your back muscles receive the right stimulus for growth.
Pro Tip: Track your progress over time and progressively increase the weight or reps as you become stronger — this is known as progressive overload, a critical factor in continuing to build muscle effectively.
By following these guidelines, you’ll be able to optimize your back workout machine routine and ensure you’re consistently working toward your muscle-building goals.
Adjusting weight and seat position for your body type
One of the biggest advantages of using back workout machines is their customizability — but only if you use them correctly. Whether you’re tall, short, broad-shouldered, or slim, fine-tuning seat height and weight settings ensures that your muscles are properly targeted, your range of motion is optimal, and you’re training safely and effectively.
1. Why Proper Seat Position Matters
Each back machine is designed with biomechanics in mind. If your seat height or pad placement is off, you could be engaging the wrong muscles — or worse, risking injury.
Here’s what to consider:
- Lat Pulldown Machine: Your thighs should be snug under the pads, feet flat on the ground. The bar should reach just above your chest when pulled. Too high or too low, and you’ll lose tension in your lats.
- Seated Row Machine: Your chest should stay firmly against the pad with a slight bend in the knees. Make sure the handles align with your midsection to fully engage your rhomboids and traps.
- Assisted Pull-Up Machine: Adjust the knee pad height so that it provides just enough assistance while still challenging your body. A lower setting makes it easier; higher requires more strength.
Pro Tip: Your joints (shoulders, elbows) should move in a natural arc — not be forced into awkward angles. If you feel tension in your neck or lower back, your seat likely needs adjusting.
2. Setting the Right Weight for Your Level
Choosing the correct resistance is key to stimulating growth without compromising form. The goal is to challenge the muscle, not to simply move heavy weight.
- Beginner: Start light to learn proper form — you should be able to perform 10–12 reps with good technique and mild fatigue by the end.
- Intermediate/Advanced: Gradually increase weight while maintaining proper form. Use progressive overload to build strength over time.
- Avoid Ego Lifting: Lifting too heavy can shift tension away from your back muscles and onto your arms or joints.
Tip: Use a “2-second up, 3-second down” tempo for controlled movement and better muscle engagement.
3. Tailoring the Machine to Fit You
Everyone’s body is different. Adjusting machines to your frame ensures muscle isolation and joint safety. Follow these general guidelines:
- Shorter Individuals: May need to raise the seat to ensure arms or legs are at the correct angle during movement.
- Taller Individuals: Lower the seat or extend machine settings to avoid cramped movements and restricted range.
- Broader Shoulders: Make sure handle width doesn’t cause internal shoulder rotation or discomfort. Use neutral-grip options when available.
- Longer Arms/Torso: Ensure full range of motion without leaning or overextending — maintain core engagement and posture throughout.
Final Thoughts
Taking a few minutes to properly adjust the seat position and weight on back machines isn’t just about comfort — it’s critical for maximizing muscle engagement, reducing the risk of injury, and ensuring consistent progress. If you’re unsure about machine setup, don’t hesitate to ask a trainer for help, or use the diagrams often found on the machine itself.
Tips for Building a Stronger Back With Machines
Incorporating machines into your weekly training split
Back workout machines aren’t just for beginners — when used correctly, they can play a vital role in all levels of strength training programs. The key lies in understanding how to integrate them strategically into your weekly training split to optimize back development while balancing recovery, intensity, and variety.
1. Complementing Free Weights for a Balanced Program
Machines are excellent tools for isolation and consistency, especially when you’re trying to target specific areas of the back like the lats, traps, or rhomboids. In a well-rounded weekly split, machines can:
- Serve as accessory movements following heavy compound lifts like deadlifts or bent-over rows.
- Be the primary focus on days where you want to minimize joint strain or fatigue.
- Help reinforce mind-muscle connection through controlled, guided range of motion.
Example Split Integration:
- Day 1 (Pull Day): Start with barbell rows → finish with seated row machine and lat pulldown
- Day 4 (Back Focused Day): Start with deadlifts → incorporate assisted pull-ups and straight-arm pulldown machine
2. Machines for Recovery or Deload Weeks
During lighter training weeks (aka deloads) or post-injury recovery, machines allow you to stay active without overloading your joints or central nervous system. They offer a predictable, stable environment to train safely while maintaining volume.
Benefits include:
- Reducing risk of improper form during fatigue
- Maintaining muscle activation with lower overall intensity
- Allowing you to focus on high reps, light weight for blood flow and recovery
3. Creating Machine-Focused Days
If you train 4–6 times a week, consider programming machine-only days for isolation and pump work. These are great for hypertrophy-focused splits where the goal is to increase muscle size through time under tension and controlled volume.
Sample Machine-Focused Back Day:
- Lat Pulldown – 4 sets of 12 reps
- Seated Cable Row – 3 sets of 10–12 reps
- Assisted Pull-Ups – 3 sets to near failure
- Straight-Arm Pulldown – 3 sets of 15 reps

- Machine Shrugs – 3 sets of 12 reps
Tip: Machines allow you to reach muscle failure more safely, so they’re ideal for drop sets, supersets, and high-rep burnout sets at the end of your workout.
Final Word
Incorporating machines into your weekly training split is about more than convenience — it’s about training smarter. Machines offer consistent resistance, reduce injury risk, and allow precise muscle targeting, making them perfect for both beginners and advanced lifters. Whether used as primary movements, accessories, or recovery tools, back machines can elevate your results when integrated strategically into your program.
Progressive overload and tracking progress
One of the core principles of building strength and muscle is progressive overload — the gradual increase of stress placed on the body during training. Without it, your muscles won’t be challenged enough to grow. Pairing progressive overload with proper tracking allows you to measure improvements, stay motivated, and break through plateaus.
1. What Is Progressive Overload?
Progressive overload involves consistently increasing the demands on your muscles. This can be done in several ways:
- Adding more weight to your exercises
- Increasing reps or sets
- Reducing rest time between sets
- Slowing down tempo for more time under tension
- Improving form or range of motion
In machine-based back training, for example, you might start by using the Lat Pulldown machine at 60 lbs for 10 reps. Over time, you aim to perform more reps with the same weight or increase the weight to 70 lbs while maintaining good form.
2. Tracking Progress Effectively
Tracking your workouts helps you stay accountable and focused. Here’s how to do it efficiently:
- Workout Logbook or App: Write down sets, reps, weights, and notes on form or fatigue. Apps like Strong, Jefit, or Fitbod make this easy.
- Photos and Measurements: Take progress pictures and body measurements (e.g., waist, arms, back width) every few weeks.
- Performance Benchmarks: Track how many pull-ups you can do, your row weights, or how long you hold a plank.
Tracking allows you to spot patterns, celebrate small wins, and adjust when progress stalls.
3. When to Increase Weight or Volume
If you’re consistently hitting your rep target with ease, it’s time to increase the challenge. Here’s a basic rule:
When you can complete all sets at the top end of your rep range with proper form for two sessions in a row — increase the weight by 5–10%.
Avoid the trap of ego lifting. Progression should be gradual and safe, especially with machines, where it’s tempting to load more plates than your body can handle efficiently.
Don’t rely on memory alone — tracking your workouts helps ensure you’re not just going through the motions. Combined with progressive overload, it creates a powerful cycle of adaptation and growth, ensuring that each week, you’re getting closer to your strength and physique goals.
Combining machine exercises with cable and bodyweight work
While machine exercises provide structure, safety, and targeted isolation, combining them with cable and bodyweight movements can elevate your back training to a more complete and functional level. This hybrid approach helps to engage stabilizing muscles, improve mobility, and build strength through various ranges of motion.
1. Why Combine These Training Modalities?
Each training tool serves a unique purpose:
- Machines: Ideal for beginners or focused isolation (e.g., Lat Pulldown for lats, Seated Row for rhomboids).
- Cables: Offer continuous tension and freedom of movement, perfect for dynamic range and mind-muscle connection.
- Bodyweight Exercises: Build raw functional strength and train core stabilization (e.g., Pull-ups, Inverted Rows).
By blending these approaches, you create a more balanced and comprehensive back workout that stimulates muscle fibers in varied ways, leading to improved hypertrophy and performance.
2. Sample Combo Pairings
Here are examples of how to pair machine, cable, and bodyweight movements for optimal back development:
- Lat Pulldown (Machine) + Cable Straight Arm Pulldown + Assisted Pull-ups
- Focus: Vertical pulling, lat activation, scapular control.
- Seated Row Machine + Cable Face Pulls + Bodyweight Inverted Rows
- Focus: Mid-back, rear delts, posture muscles.
- Glute Kickback Machine (for lower posterior chain) + Cable Reverse Flys + Superman Holds (bodyweight)
- Focus: Erector spinae, glutes, and shoulder stability.
This mix allows you to target your back from multiple angles, improving both aesthetics and function.
3. Programming Tips
- Start with machine exercises to activate major muscle groups.
- Use cables for detail work and improved control in smaller muscles.
- Incorporate bodyweight movements at the end for endurance and core stability.
Aim to balance your workout with 2–3 machines, 1–2 cable movements, and 1–2 bodyweight exercises per session. Adjust based on your goals — more isolation if you’re chasing hypertrophy, more compound bodyweight if you’re after strength and athleticism.
A diversified back workout routine that includes machines, cables, and bodyweight movements creates a synergy that boosts muscle development, joint health, and real-world strength. It’s a smart strategy for both beginners and seasoned lifters who want long-term progress.
Back workout machines are powerful tools for developing a stronger, more balanced physique—especially when used with proper form and consistency. From the lat pulldown to the seated row, each machine targets specific areas of your back, allowing you to train effectively and safely. By incorporating these machines into your routine, progressively increasing resistance, and combining your workouts with smart recovery and nutrition strategies, you’ll be well on your way to building the strong, functional back you’ve always wanted.