Chest Machines:Building a bigger, stronger chest doesn’t always require free weights or barbell bench presses. Chest machines offer a controlled, beginner-friendly way to target the pectoral muscles with precision and safety. Whether you’re just starting your fitness journey or looking to refine your chest routine, machine-based training can help you isolate the chest, reduce injury risk, and ensure consistent muscle engagement. In this guide, we’ll walk you through the best chest machines, how to use them properly, and how to structure your workouts for maximum muscle growth and definition.
Best Chest Machines for Muscle Growth
Seated Chest Press – Foundation of Machine-Based Chest Training
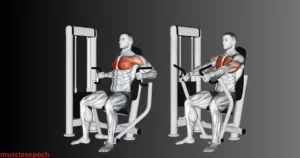
The seated chest press machine is a staple in many strength-training programs—especially for beginners, bodybuilders, or those recovering from injury—because it allows you to safely target the chest muscles without the need for a spotter. As one of the foundational machine-based movements for chest development, it mimics the barbell bench press but with added stability and control.
Primary Muscle Focus
The seated chest press primarily targets the pectoralis major, the large muscle in the front of the chest. It also engages the anterior deltoids (front shoulders) and triceps as secondary movers, making it an effective compound movement for upper-body strength.
Why It’s Great for Chest Training
- Controlled Motion: Machines offer a fixed range of motion, reducing the risk of improper form and making it easier to focus on muscle contraction.
- Ideal for Beginners: Those new to strength training benefit from the guidance machines provide, helping build foundational strength without requiring stabilization.
- Muscle Isolation: Unlike free weights, the seated chest press minimizes the involvement of stabilizer muscles, allowing you to hone in on the pecs.
- Progressive Overload Friendly: It’s easy to track your progress and gradually increase the resistance in small increments, essential for hypertrophy (muscle growth).
- Joint Support: For those with shoulder or wrist issues, machine presses often feel more comfortable and controlled than free-weight alternatives.
Tips for Optimal Performance
- Adjust the Seat Height: Ensure the handles are aligned with mid-chest level to target the pecs effectively.
- Keep Your Back Flat: Maintain contact with the seat and backrest throughout the movement to prevent lower back strain.
- Slow and Controlled Reps: Focus on both the pressing and eccentric (lowering) phases for maximum muscle activation.
- Avoid Locking Out: Stop just short of fully locking your elbows to keep tension on the chest and protect the joints.
How to Incorporate It
The seated chest press can be used early in a chest workout as a primary strength-building movement or later in the session for hypertrophy after heavier lifts. A typical recommendation is 3–4 sets of 8–12 reps, adjusting the weight to match your training goal (strength vs. size).
Pec Deck Machine – Precision Chest Isolation

The pec deck machine—also known as the chest fly machine—is a go-to exercise for bodybuilders and fitness enthusiasts aiming to isolate the chest muscles with laser-like precision. Unlike pressing movements, which engage multiple muscle groups, the pec deck is designed specifically to target the pectoralis major with minimal assistance from secondary muscles.
Why It’s Excellent for Isolation
The unique movement pattern of the pec deck mimics the motion of a dumbbell fly but with added stability and control. By eliminating the need to stabilize the weights, the pec deck allows you to focus entirely on the stretch and contraction of the chest, making it ideal for building the inner chest and enhancing muscular definition.
Key Benefits
- Superior Isolation: Unlike compound lifts, the pec deck limits shoulder and triceps involvement, placing nearly all the tension directly on the chest.
- Controlled Range of Motion: The machine’s design ensures a safe and consistent range of motion, which is especially beneficial for beginners or those recovering from injury.
- Enhanced Mind-Muscle Connection: Because of its simplicity and fixed path, the pec deck is perfect for focusing on the squeeze and stretch of the chest muscles during each rep.
- Great Finisher: It’s often used at the end of a chest workout to fully exhaust the pectorals and promote muscle hypertrophy.
Tips for Maximum Effectiveness
- Adjust the Seat Correctly: Your hands should be at chest level when gripping the handles, with a slight bend in your elbows.
- Slow, Controlled Reps: Focus on the contraction—pause briefly when your hands are close together to fully engage the chest.
- Don’t Overstretch: Avoid letting your elbows go too far back, which can stress the shoulder joints.
- Keep Shoulders Down: Prevent your traps from taking over by keeping your shoulders relaxed and down throughout the movement.
How to Incorporate It
The pec deck is typically used later in a chest workout as a finishing move after compound lifts like the bench press or seated chest press. A standard prescription would be 3–4 sets of 10–15 reps, focusing on form and contraction over heavy weight.
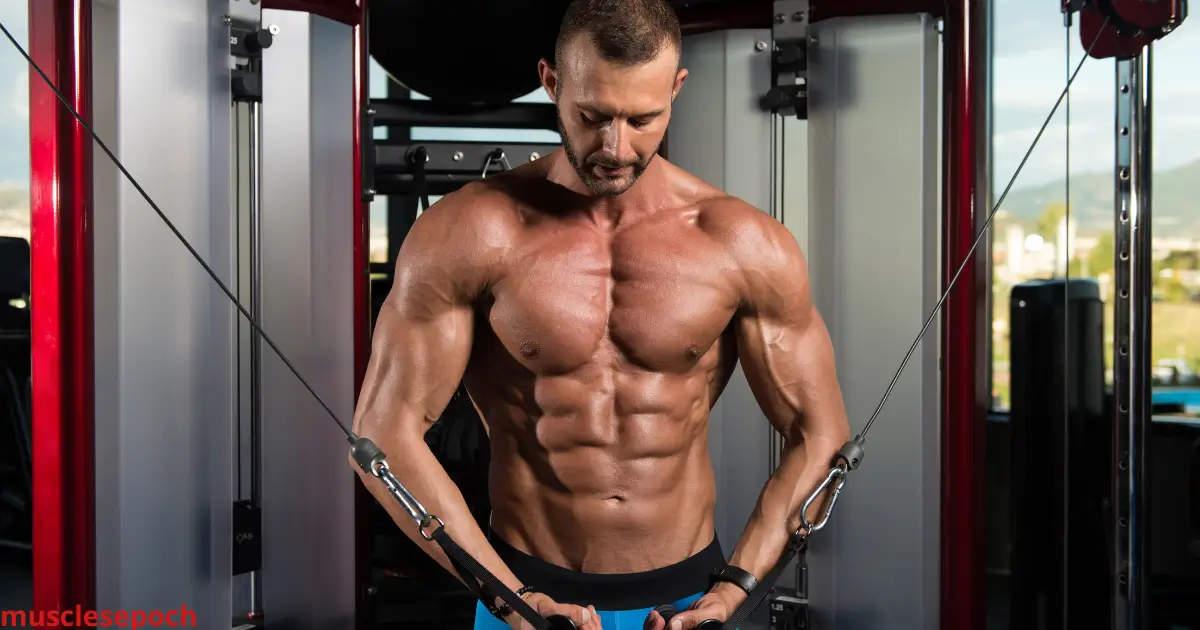
Cable Crossover – Versatile and Adjustable
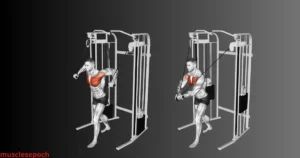
The cable crossover is one of the most effective and versatile isolation exercises for the chest, allowing for a continuous tension that’s hard to replicate with free weights. It’s a favorite among bodybuilders looking to sculpt the pectorals, especially the inner chest, and create that signature deep line down the middle of the chest.
Why It Stands Out
Unlike machines that follow a fixed path, the cable crossover uses adjustable pulleys that allow for multiple angles of motion—low-to-high, high-to-low, or straight across—making it suitable for targeting different portions of the chest (upper, middle, and lower). This versatility makes it an essential component in any comprehensive chest training program.
Key Benefits
- Constant Tension: Cables maintain resistance throughout the entire movement, including both concentric (lifting) and eccentric (lowering) phases.
- Customizable Angles: Adjusting the pulley height allows you to emphasize various parts of the chest, from the upper clavicular fibers to the lower sternal region.
- Improves Symmetry and Balance: Because each arm works independently, cable crossovers help correct muscle imbalances and promote even development.
- Enhances Muscle Definition: Ideal for cutting phases or hypertrophy-focused training, this movement sharpens muscle separation and enhances chest shape.
Technique Tips
- Posture Matters: Stand upright or with a slight lean forward, core engaged, and shoulders down.
- Elbows Slightly Bent: Maintain a slight bend throughout the motion to protect the joints and keep focus on the chest.
- Cross at the Bottom: For added contraction, try crossing your hands slightly at the bottom of the rep.
- Control the Eccentric Phase: Slowly return to the starting position to maximize time under tension.
How to Program It
Cable crossovers work great as a finishing movement after heavier pressing or compound lifts, or as part of a superset to pump the chest. Aim for 3–4 sets of 12–15 reps, emphasizing controlled, focused reps over heavy weight.
How to Use Chest Machines Correctly
Adjusting the Seat and Handles for Optimal Form
Proper setup on chest machines—such as the seated chest press or pec deck—is essential not just for safety, but for maximizing muscle engagement and workout effectiveness. Small tweaks in seat height and handle positioning can significantly impact which muscles are activated, how much tension is placed on the chest, and how well you maintain proper form throughout the movement.
Why Setup Matters
When the equipment is adjusted to fit your body mechanics, you’re able to:
- Target the right muscle groups more effectively.
- Reduce the risk of injury, especially to the shoulders and lower back.
- Promote better posture and joint alignment throughout the movement.
- Ensure balanced development on both sides of the chest.
Seat Height Tips
- For chest press machines, the seat should be adjusted so that the handles are at mid-chest level (roughly aligned with your nipples or lower sternum).
- On the pec deck, the seat should allow your upper arms to be parallel to the floor when gripping the handles, with elbows slightly bent.
- Avoid setting the seat too high or too low, as this can shift tension away from the pecs and onto the shoulders or triceps.
Handle Positioning
- On adjustable machines (especially cable machines), choose a handle width that allows for a full range of motion without overextending your shoulders.
- When doing exercises like the pec deck fly, position the handles so your arms form a wide arc at the start of the motion—enough for a good stretch, but not so far back that it causes shoulder discomfort.
- For cable crossovers, pulley height determines the part of the chest emphasized:
- High-to-low: targets the lower chest.
- Low-to-high: emphasizes the upper chest.
- Mid-level: focuses on the middle portion.
Form Checkpoints
- Keep your back flat against the pad (for seated machines).
- Maintain a neutral wrist position—don’t let your wrists bend backward or forward during the press or fly.
- Engage your core to stabilize your torso and avoid unnecessary momentum.
Always do a few warm-up reps with light weight after adjusting your machine settings. This helps you test comfort, range of motion, and alignment before your working sets.
Understanding Weight Selection and Progressive Overload
Selecting the right weight and applying progressive overload are fundamental to maximizing results in any resistance training program—especially when it comes to building strong, well-defined shoulders. Whether you’re performing compound lifts like the overhead press or isolation exercises like lateral raises, understanding how to choose your weights and when to increase them is key to consistent progress.
Why Weight Selection Matters
Choosing the correct weight isn’t just about lifting heavy—it’s about challenging your muscles without compromising form. The right load allows you to:
- Complete your target number of reps with proper technique.
- Reach near failure within your rep range (typically 8–12 reps for hypertrophy).
- Engage the intended muscle group without compensating with momentum or secondary muscles.
Lifting too light may not provide enough stimulus for growth, while lifting too heavy can lead to poor form, injury, or over-recruitment of other muscle groups like traps or arms.
Principles of Progressive Overload
Progressive overload refers to the gradual increase in stress placed on the muscles during training. Without it, your muscles adapt and progress stalls. Here are the primary ways to apply it:
- Increase Weight: The most straightforward method. Add small increments (e.g., 2.5–5 lbs) once you can perform your target reps with ease.
- Increase Repetitions: Aim for more reps with the same weight before increasing the load.
- Increase Sets: Add an additional set to your exercise to increase volume.
- Improve Form and Control: Slow down your tempo or focus on a deeper stretch or tighter contraction.
- Reduce Rest Time: Shorter rest periods can intensify the challenge and boost endurance.
The key is to only adjust one variable at a time and to do so gradually to avoid overtraining or plateaus.
How to Apply It in Shoulder Training
For shoulders, progressive overload should be applied cautiously. The shoulder joint is more delicate and prone to injury, so it’s important to:
- Focus on perfect form before increasing weight.
- Use smaller increments, especially in isolation movements like front or lateral raises.
- Track progress over time to ensure you’re gradually challenging your deltoids without risking joint strain.
Keep a training log to monitor how much weight you use for each exercise, how many reps and sets you complete, and how you feel after the session. This makes it easier to plan your next overload step and avoid guesswork.
Breathing and Tempo for Maximum Activation
Proper breathing and tempo control are two often-overlooked elements that can dramatically enhance muscle activation, especially during shoulder workouts. When executed correctly, they help you lift more efficiently, engage the target muscles more effectively, and reduce the risk of injury.
Why Breathing Matters in Resistance Training
Breathing supports your body’s ability to stabilize, generate power, and maintain proper form during a lift. Poor breathing technique can lead to energy leaks, less core stability, and early fatigue.
Here’s how to breathe during most shoulder exercises:
- Inhale during the eccentric phase (lowering or returning phase).
- Exhale during the concentric phase (lifting or pressing phase).
For example:
- During a seated dumbbell shoulder press, inhale as you lower the weights down, and exhale as you press them overhead.
- For lateral raises, inhale as you lower the dumbbells and exhale while raising them to shoulder level.
Correct breathing helps:
- Increase core stability and intra-abdominal pressure.
- Improve focus and control during each repetition.
- Prevent holding your breath excessively (which can spike blood pressure).
Tempo: Control Over Speed
Tempo refers to the speed at which you perform each part of a lift. A well-controlled tempo keeps the muscles under tension longer, which is a proven way to promote hypertrophy (muscle growth).
A common tempo notation looks like this: 2-1-1-0
- 2 seconds eccentric (lowering phase)
- 1 second pause at the bottom
- 1 second concentric (lifting phase)
- 0 second pause at the top
Benefits of tempo control:
- Enhances mind-muscle connection, particularly important for targeting small or stubborn shoulder heads like the rear deltoid.
- Reduces momentum-based cheating, ensuring the delts—not your traps or arms—do the work.
- Helps prevent injury by emphasizing proper form and joint stability.
Shoulder-Specific Tempo Strategies
- Lateral Raises: Slow and deliberate (2-1-2 tempo) to avoid swinging and maximize side delt activation.
- Overhead Presses: Controlled descent (eccentric phase) builds strength and muscle stability.
- Rear Delt Flyes: Pause at peak contraction to improve isolation of the rear delts.
Combine breathing and tempo cues mentally by syncing your exhale with the lift and staying mindful of timing throughout the set. Use a metronome or count in your head if necessary to build rhythm and consistency.
Machine Chest Workout Plan for Beginners to Intermediates
Full Chest Machine Routine Example
A machine-based chest workout is an excellent option for beginners, those recovering from injuries, or lifters seeking to isolate the chest muscles with greater control. Machines provide stability, guided motion, and consistent resistance—making them perfect for targeting the chest without the need for a spotter.
Below is a sample full chest machine routine designed to hit all areas of the chest (upper, middle, and lower) while integrating principles of hypertrophy (muscle growth), such as time under tension and progressive overload.
1. Seated Chest Press (3–4 sets x 8–12 reps)
- Primary Focus: Middle chest, overall mass
- Why It Works: The seated chest press simulates a traditional barbell bench press but allows for more control and less shoulder strain. It targets the pectoralis major while engaging the triceps and front deltoids.
- Form Tips: Adjust the seat so the handles align with the mid-chest. Keep your back flat and drive the weight forward with a controlled tempo—exhale as you press, inhale as you return.
2. Pec Deck Machine (3 sets x 10–15 reps)
- Primary Focus: Chest isolation and inner chest contraction
- Why It Works: This fly movement places the chest under constant tension, helping to develop a fuller appearance and improve the mind-muscle connection.
- Form Tips: Sit tall with shoulder blades retracted. Bring the handles together in a wide arc, squeezing the chest at the top. Avoid letting the weights rest at the bottom of the motion to maintain tension.
3. Incline Chest Press Machine (3–4 sets x 8–12 reps)
- Primary Focus: Upper chest development
- Why It Works: Emphasizes the clavicular head of the pectorals, which is crucial for creating a well-rounded chest and improving aesthetic balance.
- Form Tips: Adjust the seat so the handles are level with your upper chest or collarbone. Keep elbows slightly tucked and press with control.
4. Cable Crossover or Standing Chest Fly (3 sets x 12–15 reps)
- Primary Focus: Chest definition and detail
- Why It Works: This movement offers versatility in targeting different areas of the chest depending on pulley height and angle.
- Form Tips: Use a moderate weight to focus on form and full range of motion. Perform slow, deliberate reps and squeeze your chest at the peak of contraction.
5. Chest Dip Machine (Optional Finisher – 2–3 sets to near failure)
- Primary Focus: Lower chest and triceps
- Why It Works: A great finisher to flush the chest and push muscle fibers to fatigue, enhancing hypertrophy and blood flow.
- Form Tips: Lean forward slightly to activate more chest than triceps, and use a controlled tempo to avoid momentum.
Training Notes
- Rest 60–90 seconds between sets for hypertrophy, 30–45 seconds if you’re focusing on muscle endurance.
- Focus on progressive overload each week by increasing weight, reps, or improving technique.
- Combine this machine routine with free-weight or dumbbell work in later phases of your training for more variety and functional strength.
Superset Ideas for Intensity and Fat Burn
Supersets are a powerful training technique where two exercises are performed back-to-back with minimal to no rest in between. This method ramps up training intensity, elevates heart rate, and significantly boosts caloric burn—making it ideal for body recomposition goals, such as building muscle while burning fat.
When applied to a chest machine routine, supersets can help:
- Maximize time efficiency in the gym.
- Enhance muscular endurance and conditioning.
- Increase metabolic rate, leading to greater post-workout calorie burn (EPOC effect).
- Intensify muscle pump, pushing more blood and nutrients into the chest.
Below are superset ideas you can implement in a machine-based chest workout.
1. Seated Chest Press + Pec Deck Machine
- Goal: Combine compound and isolation for overall mass and detail.
- How to Do It: Perform 10–12 reps on the seated chest press. Without resting, immediately move to the pec deck machine for 12–15 reps.
- Why It Works: The press activates multiple muscle groups, while the fly isolates and finishes the pecs. This combination improves chest fullness and shape.
2. Incline Chest Press + Low-to-High Cable Crossover
- Goal: Upper chest emphasis with a finishing stretch and contraction.
- How to Do It: Begin with 8–10 reps on the incline chest press machine, then switch to a cable crossover (with pulleys set low) and perform 12 slow, controlled reps.
- Why It Works: The incline press builds the clavicular head of the chest, and the crossover enhances definition and time under tension.
3. Cable Fly + Push-Up on Machine Platform
- Goal: Fatigue the chest with a mechanical drop set-style superset.
- How to Do It: Execute 12–15 reps of cable flys. Immediately drop to the floor and do push-ups (elevated on the machine’s footplate if needed) to failure.
- Why It Works: This superset completely exhausts the chest with both isolation and bodyweight resistance, making it a powerful fat-burning finisher.
Pro Tips for Superset Execution
- Keep rest between supersets short (30–45 seconds) to maintain heart rate and metabolic intensity.
- Focus on form over weight—especially during isolation or burnout movements.
- Don’t be afraid to reduce load slightly if your performance drops due to fatigue—that’s normal and part of the challenge.
- Include 1–2 supersets per workout to prevent overtraining or sacrificing recovery.
By incorporating these supersets, you’ll not only increase the effectiveness of your chest workouts but also improve workout density and fat loss potential—all while maintaining muscle mass.
Tips for Adding Variety and Progressing
One of the biggest threats to long-term progress in any workout routine is adaptation—when your body becomes accustomed to a specific stimulus and stops responding with noticeable gains. In a chest machine workout, this can happen if you repeat the same exercises, sets, and reps every week. To continue building strength, size, and definition, it’s essential to strategically introduce variety and apply progressive overload.
Below are effective tips to keep your chest training fresh, challenging, and effective:
1. Change Rep Ranges and Tempo
- Why It Matters: Manipulating rep ranges and tempo targets different muscle fibers and energy systems, leading to more complete development.
- How to Do It:
- Use lower reps (6–8) with heavier weight to build strength.
- Incorporate moderate reps (8–12) for hypertrophy.
- Occasionally add high reps (15–20) to improve endurance and create a deep muscle burn.
- Adjust tempo by slowing down the eccentric (lowering) phase to increase time under tension and stimulate growth.
2. Introduce New Machine Variations
- Why It Matters: Slight changes in grip, angle, or machine design can target different areas of the chest and prevent plateaus.
- How to Do It:
- Try different brands or styles of chest machines (e.g., plate-loaded vs. selectorized).
- Use decline press machines or incline fly machines if available.
- Rotate between cable-based and lever-based machines to challenge stabilization and range of motion.
3. Apply Progressive Overload Strategically
- Why It Matters: Progress doesn’t happen unless you increase the demands on your muscles over time.
- How to Do It:
- Add weight when you can complete all your reps with good form.
- Increase sets or reps incrementally each week.
- Shorten rest periods to challenge muscular endurance.
- Focus on improving form and contraction rather than just loading heavier weights.
4. Use Advanced Training Techniques
- Why It Matters: Advanced techniques create new stressors that stimulate muscle adaptation.
- Examples:
- Drop Sets: Immediately reduce weight after reaching failure and continue reps.
- Rest-Pause Sets: Pause for 10–15 seconds mid-set to extend beyond failure.
- Paused Reps: Hold the contraction at the peak of each rep for 2–3 seconds.
- Partial Reps: Use short-range movements at the end of a set to prolong fatigue.
5. Track Progress and Rotate Workouts
- Why It Matters: Tracking keeps you accountable and ensures steady improvement.
- How to Do It:
- Keep a training log to record weights, reps, and rest times.
- Change your routine every 4–6 weeks, but only after fully progressing your current one.
- Create phases with specific focuses: strength, hypertrophy, endurance, or recovery.
By regularly adding variety and implementing progressive techniques, your machine-based chest workouts will remain effective and engaging—ensuring continuous improvement and long-term muscle development.
Common Mistakes and How to Avoid Them
Using Too Much Weight Too Soon
One of the most common mistakes in bodybuilding—especially when starting a new workout or machine routine—is loading the weights too heavy too quickly. While it’s natural to want to push hard and see fast gains, rushing to lift heavy weights without proper preparation can actually hinder your progress and increase your risk of injury.
Why It’s a Problem
- Compromised Form: When the weight is too heavy, your technique often breaks down. Poor form can lead to ineffective workouts where the target muscle isn’t properly engaged, reducing the benefit of the exercise.
- Increased Injury Risk: Heavy weights without adequate control can strain muscles, tendons, and joints. This can lead to acute injuries like muscle strains or chronic issues such as tendonitis.
- Delayed Progress: Overloading too fast may cause excessive muscle soreness or fatigue, resulting in longer recovery times and missed training sessions.
- Mental Burnout: Constantly struggling to lift weights beyond your current capacity can be discouraging and lead to frustration or loss of motivation.
How to Avoid This Mistake
- Start with a Manageable Load: Begin with a weight that allows you to perform all reps with solid form, usually around 60-70% of your one-rep max (1RM). This builds a strong foundation.
- Focus on Form First: Prioritize learning the correct movement pattern on machines. Once you’re confident in your form, gradually increase the weight.
- Use Progressive Overload Wisely: Increase weights in small increments (2.5–5 lbs or 1–2 kg) once you can complete your reps and sets comfortably. Consistent, gradual increases are more effective long term.
- Listen to Your Body: If you feel joint pain or excessive strain, reduce the weight. Discomfort is normal with effort, but sharp pain is a warning sign.
- Include Warm-Ups and Mobility Work: Properly warming up prepares your muscles and joints for heavier loads, reducing injury risk.
Benefits of Proper Weight Progression
- Better Muscle Activation: Controlled, moderate weights help you target the chest muscles more effectively.
- Sustained Progress: Gradual increases support continuous strength and size gains without setbacks.
- Improved Confidence: Mastering form at lighter weights builds confidence and readiness to handle heavier loads.
- Long-Term Health: Avoiding injuries helps maintain a consistent workout routine and overall well-being.
By resisting the urge to lift too heavy too soon and focusing on steady progression with perfect form, you’ll create a safer, more effective path toward building a strong, well-defined chest.
Ignoring the Upper and Lower Chest
A common mistake many lifters make in their chest workouts is focusing predominantly on the middle chest while neglecting the upper and lower portions of the pectoral muscles. The chest is a complex muscle group made up primarily of the pectoralis major, which has distinct sections: the upper (clavicular head), middle, and lower (sternal head). For balanced development, strength, and aesthetics, it’s crucial to target all these areas.
Why Targeting the Upper and Lower Chest Matters
- Balanced Chest Appearance: Overdeveloping the middle chest while ignoring upper and lower regions leads to a disproportionate look, sometimes described as a “shelf chest” or a flat, blocky appearance.
- Improved Strength and Functionality: The upper chest contributes to pushing movements overhead and forward, while the lower chest assists in movements like dips and decline presses. Strengthening all parts supports overall upper body function.
- Injury Prevention: Balanced muscle development helps maintain proper shoulder mechanics and reduces the risk of imbalances that can cause injuries.
- Better Muscle Activation: Different angles and exercises emphasize different fibers in the chest. Neglecting any portion means missing out on full muscular engagement.
How to Effectively Train the Upper and Lower Chest
- Upper Chest Focus:
- Use incline chest press machines or incline dumbbell presses.
- Incorporate incline cable flyes or incline pec deck variations.
- Set the bench or machine angle between 30–45 degrees for optimal upper chest recruitment.
- Lower Chest Focus:
- Include decline chest press machines or decline push-ups.
- Perform dips with a forward lean to target the lower pecs.
- Use low-to-high cable flyes to emphasize the lower chest fibers.
- Vary Angles and Equipment: Rotate between machines, cables, and free weights to stimulate different parts of the chest and prevent adaptation.
Common Signs You’re Neglecting Upper or Lower Chest
- Lack of upper chest fullness or roundness, especially noticeable in tank tops or tight shirts.
- A flat or sagging lower chest area that doesn’t respond well to standard flat presses.
- Persistent muscle imbalances or uneven strength between pushing motions at different angles.
Tips to Incorporate Upper and Lower Chest Work
- Include at least one upper chest focused and one lower chest focused exercise in every chest workout.
- Use progressive overload on these variations just like with flat presses.
- Pay attention to form and mind-muscle connection, especially during incline and decline movements.
- Consider consulting a trainer to ensure you’re using proper angles and techniques for full chest engagement.
By ensuring you train your upper and lower chest as diligently as your mid-chest, you’ll build a fuller, stronger, and more balanced chest that enhances both performance and physique aesthetics.
Not Tracking Progress or Using Proper Form
Failing to track your progress and maintain proper form are two of the most critical mistakes that can stall your gains and increase the risk of injury during chest workouts—or any resistance training routine. Both elements are foundational for consistent muscle growth, strength improvement, and overall safety.
Why Tracking Progress is Essential
- Measures Improvement: Tracking your workouts—weights, reps, sets, and rest times—helps you see tangible progress over time. Without records, it’s hard to know if you’re improving or need to adjust your training.
- Encourages Progressive Overload: One of the key principles for muscle growth is progressively increasing the challenge. By monitoring progress, you can ensure you’re gradually lifting heavier or performing more reps.
- Identifies Plateaus: Keeping logs helps you spot when progress stalls, signaling it’s time to change your routine or focus on recovery.
- Builds Motivation: Seeing clear progress motivates you to keep pushing and stay consistent.
The Importance of Proper Form
- Maximizes Muscle Activation: Correct technique ensures the target muscles (in this case, the chest) are fully engaged during each repetition, optimizing the benefits of every set.
- Prevents Injuries: Poor form can lead to joint stress, muscle strains, and long-term damage, especially in complex joints like the shoulders.
- Improves Efficiency: When form breaks down, other muscles compensate, reducing workout effectiveness and limiting gains.
- Establishes Good Habits: Proper form practiced early helps create safe, effective movement patterns that carry over to other exercises.
Common Consequences of Neglecting These Two Factors
- Stagnation or Regression: Without tracking, you might unknowingly repeat the same weight and reps, missing opportunities for growth.
- Injuries: Bad form, especially under heavy loads, often results in shoulder impingements, rotator cuff tears, or lower back pain.
- Wasted Effort: Training with poor technique or inconsistent progression can mean you’re not fully stimulating your muscles, leading to slow or no progress.
- Frustration: Lack of results or injuries can demotivate and cause you to quit or skip workouts.
How to Track Progress and Maintain Proper Form
- Keep a Workout Journal or Use Apps: Record details like weights, reps, rest time, and notes about form or difficulty each session.
- Set Specific Goals: Aim for incremental improvements weekly or monthly.
- Use Mirrors or Record Yourself: Visual feedback helps correct posture and technique.
- Ask for Feedback: Trainers, workout partners, or experienced lifters can spot form errors and suggest corrections.
- Prioritize Warm-Ups and Mobility: Proper preparation supports maintaining form under load.
- Start with Manageable Weights: Master technique before increasing resistance.
By consistently tracking your workouts and focusing on perfect form, you’ll build strength safely, maximize muscle activation, and ensure steady progress toward your fitness goals.
Conclusion
Chest machines are an underrated but highly effective tool for sculpting a well-developed upper body. By mastering proper form, adjusting settings to fit your body, and applying progressive overload, you can achieve consistent results while reducing your risk of injury. Whether you’re training at home or in a gym, incorporating these machines into your routine can help you build the bigger, stronger chest you’re aiming for. Stay consistent, lift smart, and let the machines do the heavy lifting—safely and efficiently.