
Lats Workouts :When most beginners start training, chest and arms often steal the spotlight — but if you want that wide, V-shaped upper body, your lats (latissimus dorsi) need just as much attention. The lats are the largest muscles in your back and play a key role in pulling strength, posture, and overall aesthetics.
In this guide, we’ll break down the most effective lats exercises for beginners—no complicated moves, no advanced equipment. Whether you’re hitting the gym or training at home, these easy exercises will help you build serious back strength and size from day one.
What Are the Lats Workouts and Why Should Beginners Train Them?
What are lats?
The lats, short for latissimus dorsi, are the large, flat muscles that span the width of your middle and lower back. These are among the most powerful muscles in the upper body and play a key role in creating that desirable V-shaped physique—broad shoulders tapering down to a narrow waist.
1. Anatomy & Location
The latissimus dorsi muscles originate from several areas:
- The lower six thoracic vertebrae (T7–T12)
- The lumbar vertebrae and thoracolumbar fascia
- The iliac crest of the pelvis
- The lower three to four ribs
They insert into the upper arm bone (humerus), which is why they play such an important role in arm movement.
2. Function of the Lats
The lats are involved in several essential upper body movements:
- Shoulder adduction (pulling the arm down and toward the body)
- Shoulder extension (moving the arm behind the body)
- Internal rotation of the shoulder joint
- Pulling motions like pull-ups, rows, and lat pulldowns
These muscles work in tandem with the traps, rhomboids, teres major, and other back muscles to support upper body strength, posture, and mobility.
3. Why Lats Matter in Training
Developing strong, well-defined lats provides more than just visual appeal:
- Enhances postural support by stabilizing the spine and shoulders
- Improves performance in compound lifts like deadlifts, bench presses, and squats
- Increases pulling strength in exercises such as pull-ups, chin-ups, and rows
- Contributes to athletic performance in swimming, climbing, wrestling, and other sports
Benefits of strong lats
Building strong latissimus dorsi (lats) goes far beyond aesthetics. While well-developed lats help create the coveted V-tapered physique, their benefits also extend into performance, posture, and injury prevention. Here’s why strengthening your lats should be a top priority in any balanced training program:
1. Enhanced Upper Body Strength
Strong lats are crucial for performing pulling movements, such as:
- Pull-ups and chin-ups
- Rows (barbell, dumbbell, or machine)
- Deadlifts and pulldowns
Because the lats attach from the lower spine and pelvis to the upper arm, they play a key role in transferring force during compound lifts. Strengthening your lats increases your ability to lift heavier and perform better across a wide range of upper and lower body exercises.
2. Improved Posture and Spinal Support
Weak or underdeveloped lats can contribute to rounded shoulders, poor spinal alignment, and chronic back tension. Strong lats:
- Pull the shoulders back and down
- Support the thoracic spine
- Promote a more upright, confident posture
This is especially important for anyone with a sedentary lifestyle or desk job, where postural muscles are often neglected.
3. Injury Prevention and Joint Stability
Lats play a major role in stabilizing the shoulder joint, especially during overhead movements or heavy lifting. Strong lats help:
- Reduce strain on the rotator cuff
- Minimize risk of shoulder impingement
- Protect the spine and lower back during dynamic movement
Athletes and lifters who train their lats effectively often experience fewer upper-body injuries and better long-term joint health.
4. Better Athletic and Functional Performance
From swimming and climbing to martial arts and gymnastics, strong lats:
- Drive explosive pulling power
- Improve coordination in full-body movements
- Aid in core engagement and trunk rotation
Even daily tasks—like lifting groceries, carrying kids, or pulling heavy doors—become easier when your lats are well-trained.
5. Aesthetics: The V-Taper Physique
Lastly, the lats play a huge role in your body’s shape. Well-developed lats give you:
- A broader upper back
- The appearance of a smaller waist
- The signature V-taper look that enhances symmetry and visual impact
This is a cornerstone for bodybuilders and physique athletes, but it also boosts confidence for anyone focused on body composition.
In summary: Whether you’re lifting for strength, functionality, or looks, your lat muscles are foundational. Investing in lat development enhances performance, reduces injury risk, and helps sculpt a powerful, athletic upper body.
Lats Workout :Common beginner mistakes
When training the lats—or starting any structured back workout—beginners often make avoidable mistakes that limit progress, increase injury risk, or lead to muscular imbalances. Understanding and correcting these early on can set the foundation for smarter, more effective training. Here are some of the most common missteps:
1. Neglecting Mind-Muscle Connection
One of the biggest challenges in lat training is actually feeling the lats working. Many beginners rely on momentum or use their arms and traps too much during exercises like pull-ups or rows, failing to engage the lats properly.
Fix it: Focus on squeezing your lats through the full range of motion. Use slower, controlled reps and visualize pulling with your elbows—not your hands or biceps.
2. Using Too Much Weight Too Soon
Chasing heavy weights without mastering form is a recipe for stalled progress or injury. In lat exercises especially, this often leads to jerky movements and reduced time under tension.
Fix it: Start with a manageable load and prioritize form over ego. Once you can perform 8–12 quality reps with perfect technique, then gradually increase resistance.
3. Ignoring Full Range of Motion
Many new lifters perform partial reps, especially on pull-ups or pulldowns, cutting off the stretch at the bottom or not fully contracting at the top.
Fix it: Use a full stretch and full contraction. Allow the arms to extend and the shoulders to stretch at the bottom of each movement, and fully pull the elbows down and back on the contraction.
4. Poor Posture During Exercises
Rounded shoulders, over-arching the lower back, or flaring the elbows outward can reduce the effectiveness of lat-focused exercises and cause strain in the wrong areas.
Fix it: Maintain a neutral spine, engage your core, and keep your chest proud. During rows and pulldowns, keep elbows close to your body to better target the lats.
5. Lack of Exercise Variety
Doing only one or two lat exercises (like just lat pulldowns) limits muscle development and adaptation. Lats respond best to a variety of angles and resistance types.
Fix it: Include a mix of vertical and horizontal pulls, such as:
- Pull-ups or lat pulldowns (vertical)
- Seated rows or bent-over dumbbell rows (horizontal)
- Single-arm cable pulls for unilateral control and stretch
6. Skipping Warm-ups and Mobility Work
Cold muscles and stiff shoulders reduce range of motion and increase the risk of injury, especially in pulling exercises.
Fix it: Do a brief dynamic warm-up, including shoulder rolls, band pull-aparts, and light lat activation drills (e.g., scapular pull-ups) to prep your muscles for heavier lifts.
By avoiding these common beginner mistakes, you’ll build a strong foundation for proper lat engagement, avoid plateaus, and make faster, safer gains.
Best Lats Exercises for Beginners at the Gym
Lat Pulldown
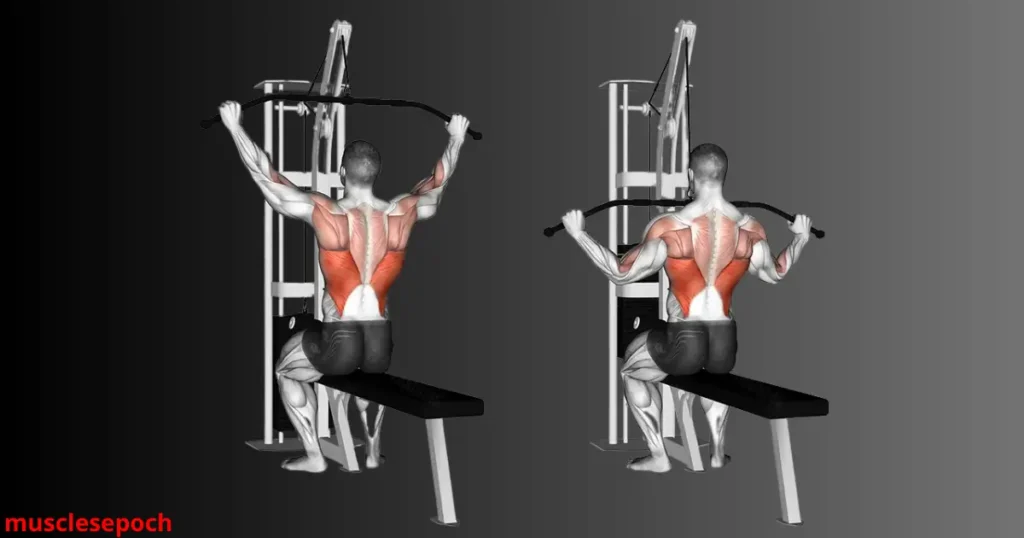
The lat pulldown is one of the most popular and accessible exercises for targeting the latissimus dorsi, especially for beginners who may not yet have the strength to perform full pull-ups. Performed using a cable machine with an overhead pulley, the lat pulldown mimics the motion of a pull-up in a more controlled and adjustable way—making it ideal for building foundational lat strength and muscle.
1. Muscles Worked
While the lat pulldown is primarily designed to target the latissimus dorsi, it also engages several other supporting muscles, including:
- Biceps brachii
- Rhomboids
- Trapezius (lower and middle fibers)
- Rear deltoids
- Teres major
- Core (stabilization during movement)
This makes the lat pulldown a compound pulling movement that contributes to both back thickness and width.
2. How to Perform the Lat Pulldown Correctly
Proper form is key to ensuring the lats are fully engaged and to prevent the arms or traps from taking over.
Step-by-Step Instructions:
- Set the machine: Adjust the thigh pad to hold your legs securely in place. Select an appropriate weight.
- Grip the bar: Use a wide overhand grip (slightly wider than shoulder-width) to emphasize lat engagement.
- Start position: Sit up tall with your chest lifted and shoulders pulled slightly back. Look forward.
- Pull the bar down: Drive your elbows down and back, aiming to bring the bar to your upper chest—not behind the neck. Focus on pulling with your lats, not your arms.
- Control the return: Slowly return the bar to the top position, maintaining tension and avoiding letting the weight stack slam.
Pro Tip: Lean back just slightly to create a natural pulling angle, but avoid excessive arching or using momentum.
3. Lat Pulldown Variations
To keep your lat training well-rounded and stimulate different fibers, consider mixing in these variations:
- Close-Grip Lat Pulldown: Emphasizes the lower lats and biceps
- Reverse-Grip Lat Pulldown: Places more load on the biceps and lower lats
- Single-Arm Lat Pulldown: Improves unilateral strength and corrects muscular imbalances
- Behind-the-Neck Pulldown: Not recommended due to higher risk of shoulder strain and limited range
4. Common Mistakes to Avoid
- Using momentum or swinging the torso
- Pulling the bar behind the neck, which can strain the rotator cuff
- Letting the shoulders shrug up at the top (indicates poor lat activation)
- Over-gripping or pulling with the biceps, reducing lat focus
5. Why It’s Essential for Lat Development
The lat pulldown allows for:
- Progressive overload with adjustable weight
- Controlled movement, perfect for learning mind-muscle connection
- Scalable training for all levels—from beginners to advanced lifters
- Excellent lat isolation without the need for bodyweight mastery
Conclusion:
The lat pulldown is a cornerstone lat exercise that should be included in almost every back workout, especially for those building strength and structure in the early phases of training. With proper form and smart programming, it lays the groundwork for bigger lifts like pull-ups, rows, and deadlifts.
Seated Cable Row
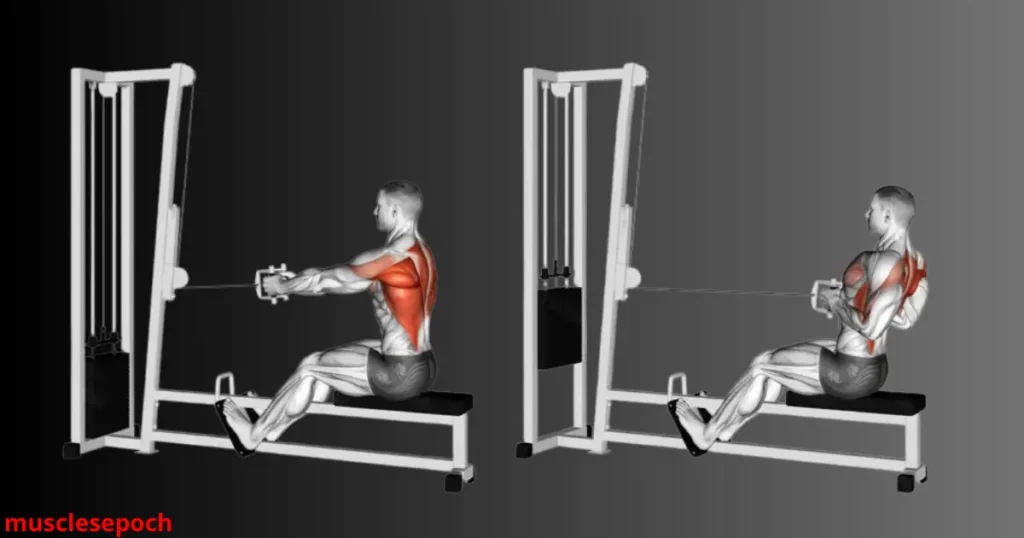
The seated cable row is a foundational horizontal pulling exercise that effectively targets the latissimus dorsi, along with several other key muscles in the upper and middle back. Performed on a cable machine with a low pulley, it offers controlled resistance and a stable body position, making it ideal for isolating the lats and improving posture, back thickness, and pulling strength.
1. Muscles Worked
While the seated cable row is often thought of as a back-thickening movement, its benefits go beyond the lats. This exercise primarily works:
- Latissimus dorsi (lats)
- Rhomboids
- Middle and lower trapezius
- Erector spinae (lower back stabilizers)
- Posterior deltoids
- Biceps and brachialis
- Forearms and grip strength
Because it involves elbow flexion and scapular retraction, it activates a broad range of upper body muscles, especially when performed with proper form.
2. How to Perform the Seated Cable Row Correctly
Step-by-Step Instructions:
- Set up: Sit on the cable row machine, placing your feet firmly on the footplates with knees slightly bent. Grab the handle (V-bar or straight bar) with both hands.
- Starting position: Sit tall with a neutral spine, chest up, and shoulders pulled slightly back. Extend your arms fully while keeping a slight lean forward from the hips—not the lower back.
- Pull the handle: Engage your lats and pull the handle toward your lower abdomen, leading with your elbows, not your hands. Focus on retracting your shoulder blades (squeezing them together) as you row.
- Control the return: Slowly extend your arms back to the start position, keeping your torso stable and your lats under tension. Do not allow the weights to crash or your shoulders to roll forward.
3. Seated Cable Row Variations
To challenge your muscles from different angles or emphasize specific areas of your back, try these variations:
- Wide-Grip Cable Row: Emphasizes rear delts and upper lats
- Underhand (Supinated) Grip: Places more focus on the lower lats and biceps
- Single-Arm Cable Row: Great for isolating one side at a time and correcting muscular imbalances
- Rope Attachment: Allows for a greater range of motion and more natural elbow movement
4. Common Mistakes to Avoid
Avoid these common errors to get the most from your seated rows:
- Rounding the back — Keep a neutral spine and avoid hunching forward
- Using momentum — Don’t jerk the weight or swing your torso to move it
- Overusing arms — Focus on initiating the movement with your back muscles, not just your biceps
- Shrugging shoulders — This reduces lat involvement and strains the traps
5. Benefits of the Seated Cable Row
- Builds a thicker, stronger back
- Improves posture and spinal alignment
- Strengthens scapular stabilizers and lower traps
- Transfers well to other compound lifts (e.g., deadlifts, pull-ups, rows)
- Safe for beginners and advanced lifters due to its fixed and supported setup
Conclusion:
The seated cable row is a versatile and effective exercise that belongs in nearly every back training program. Whether you’re looking to add thickness to your lats, improve posture, or increase pulling strength, mastering this movement can deliver impressive results when performed with proper form and progressive overload.
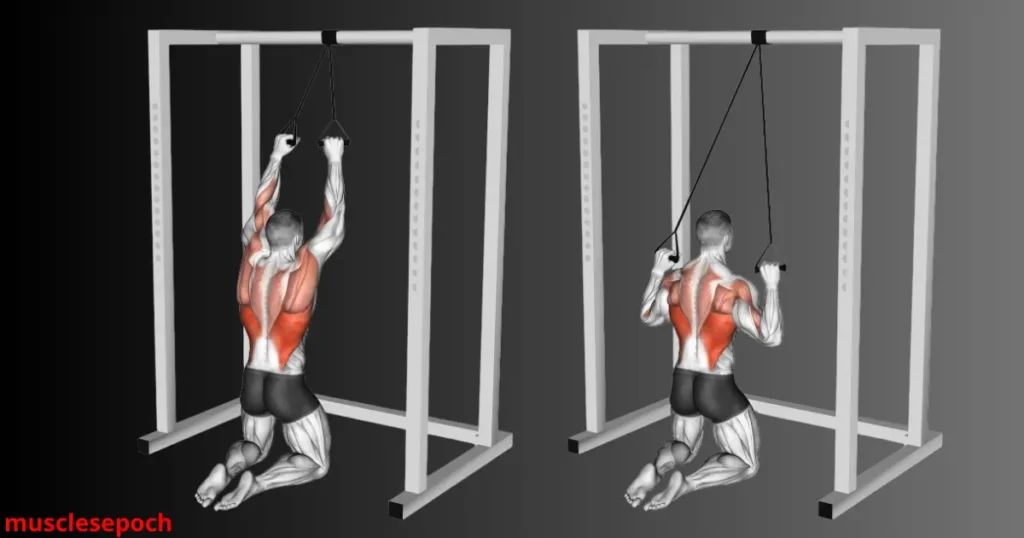
Assisted Pull-Ups
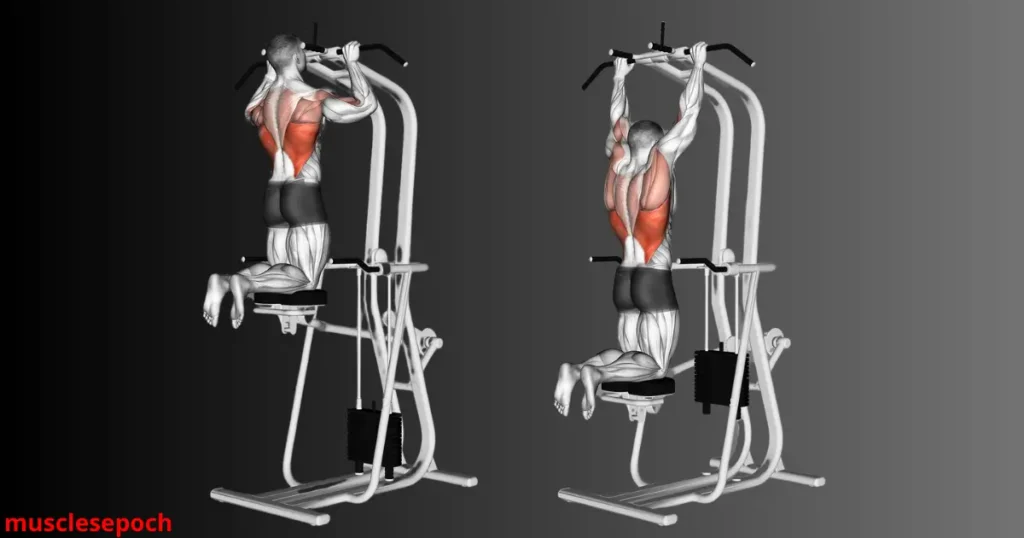
Assisted pull-ups are a powerful progression tool for developing upper-body pulling strength—especially in the latissimus dorsi (lats)—for those who are not yet able to perform unassisted pull-ups. This variation allows beginners and even intermediate lifters to master the movement pattern, build strength, and increase confidence without compromising form or overexerting other muscle groups.
1. What Are Assisted Pull-Ups?
Assisted pull-ups mimic the same range of motion as regular pull-ups but use external support to reduce the amount of body weight lifted. They can be performed using:
- Assisted pull-up machines (with a counterweight platform)
- Resistance bands looped around a pull-up bar and your knees or feet
- Partner assistance (someone helping push you up slightly during the movement)
By reducing the resistance, you’re able to focus on proper technique and lat engagement, which is crucial for long-term progression.
2. Muscles Worked
Like standard pull-ups, assisted pull-ups are a compound upper-body exercise that work:
- Latissimus dorsi (primary target)
- Biceps
- Rhomboids
- Trapezius (especially lower and middle fibers)
- Rear deltoids
- Core muscles (to stabilize the torso)
This makes them an excellent choice for building upper-body strength and improving posture.
3. How to Perform Assisted Pull-Ups Correctly
Using a Band:
- Loop the band around a sturdy pull-up bar and secure it.
- Place your foot or knee into the band, depending on your strength and flexibility.
- Grip the bar with a shoulder-width overhand grip.
- Engage your lats and pull yourself up until your chin is above the bar, leading with your chest.
- Lower yourself slowly with control to maximize lat engagement and build eccentric strength.
Using a Machine:
- Adjust the weight stack—the more weight you add, the more assistance you’ll get.
- Step onto the platform and take a shoulder-width grip.
- Lower your body fully, then pull yourself upward with controlled movement.
- Avoid bouncing or jerking to maintain strict form.
4. Benefits of Assisted Pull-Ups
- Builds strength and technique for full pull-ups
- Allows for more volume and reps without form breakdown
- Improves mind-muscle connection in the lats
- Reduces injury risk by easing joint stress, especially for beginners
- Customizable resistance through band tension or weight selection
Assisted pull-ups also help improve core stability, grip strength, and confidence in your pulling ability.
5. Common Mistakes to Avoid
- Using momentum or kipping instead of controlled form
- Letting the shoulders shrug up, reducing lat activation
- Neglecting the negative (eccentric) phase by dropping too fast
- Incorrect band placement, which can throw off body balance or cause injury
Pro Tip: Even if you can’t do a single strict pull-up yet, assisted pull-ups allow you to train the same muscles in a scalable way—making them one of the most effective tools for back development at all fitness levels.
Conclusion:
Assisted pull-ups are a must-have in any lat-focused workout routine, particularly for beginners or anyone working toward full unassisted pull-ups. When performed correctly, they help build the necessary strength, control, and muscle activation needed to eventually master the full movement—while still delivering excellent hypertrophy and endurance benefits.
Easy Lats Exercises You Can Do at Home
Resistance Band Lat Pulldown
The resistance band lat pulldown is an excellent alternative to traditional cable or machine lat pulldowns, especially for those who train at home or lack access to gym equipment. This exercise replicates the motion and benefits of the classic lat pulldown but uses resistance bands to provide variable tension throughout the movement, making it a versatile and effective tool for lat development.
1. Why Choose Resistance Band Lat Pulldowns?
Resistance bands offer several unique benefits:
- Portability: Bands are lightweight and easy to carry, allowing for effective lat workouts anywhere—at home, outdoors, or while traveling.
- Variable Resistance: Unlike free weights, bands provide increasing tension as you stretch them, challenging the lats more at the peak contraction.
- Joint-Friendly: Bands reduce stress on the shoulder joints and allow for smooth, controlled movement patterns, lowering injury risk.
- Cost-Effective: Compared to machines and cables, resistance bands are affordable and accessible to all fitness levels.
2. Muscles Worked
Like traditional lat pulldowns, resistance band lat pulldowns primarily target the:
- Latissimus dorsi (lats)
- Biceps brachii
- Rhomboids
- Trapezius (middle and lower fibers)
- Posterior deltoids
- Core muscles (engaged for stability)
This makes it a comprehensive upper-body pulling exercise for back strength and size.
3. How to Perform Resistance Band Lat Pulldowns
Step-by-Step Guide:
- Anchor the band: Secure your resistance band to a sturdy, high anchor point—such as a pull-up bar, door anchor, or a beam.
- Grab the handles or band ends: Use a wide grip, similar to a traditional lat pulldown, holding the band with palms facing forward or slightly outward.
- Position yourself: Kneel or sit down so the band is taut but not overly stretched at the start. Engage your core and maintain a tall, upright posture.
- Pull the band down: Lead the movement with your elbows, pulling the band down toward your upper chest while squeezing your lats. Keep your shoulder blades retracted throughout the motion.
- Control the return: Slowly allow your arms to extend back to the starting position, maintaining tension in the band and avoiding a sudden release.
4. Tips for Maximizing Effectiveness
- Choose the right band resistance: Start with a band that challenges you but allows you to complete 8-12 controlled reps with good form.
- Maintain consistent tension: Avoid letting the band go slack at any point during the exercise.
- Control your tempo: Slow, deliberate reps maximize muscle activation and build strength.
- Focus on form: Keep your chest up, shoulders down, and elbows driving down and back to fully engage the lats.
5. Common Mistakes to Avoid
- Using momentum: Jerky or fast movements reduce lat activation and increase injury risk.
- Shrugging shoulders: Keep your shoulders down and away from your ears to target the lats effectively.
- Partial range of motion: Perform a full stretch at the top and a full contraction at the bottom for maximum benefit.
- Incorrect band anchoring: Ensure the band is securely anchored to avoid slipping or loss of resistance during the exercise.
6. Incorporating Resistance Band Lat Pulldowns Into Your Routine
Resistance band lat pulldowns are a great addition to:
- Home workouts when machines aren’t available
- Warm-ups or activation drills before heavier pulling exercises
- Rehabilitation protocols due to their low-impact nature
- Travel or outdoor training sessions
Pair them with other back exercises like rows, pull-ups, or deadlifts for a well-rounded lat and upper-back development.
Conclusion:
The resistance band lat pulldown is a simple yet highly effective exercise to strengthen and tone your lats without the need for bulky gym equipment. Its versatility, joint-friendly resistance, and portability make it an ideal choice for beginners and experienced lifters alike, helping you build a strong, wide back wherever you train.
Superman Hold
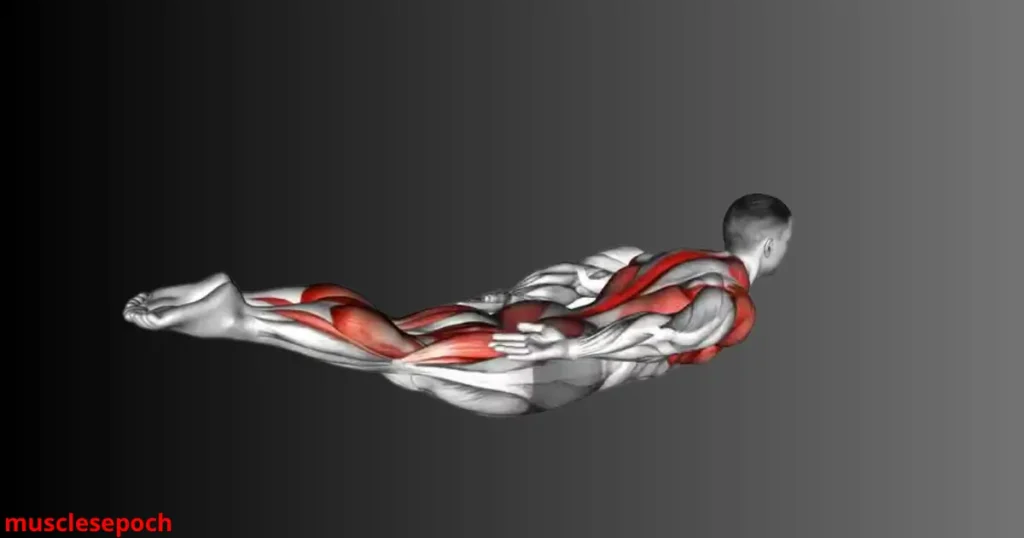
The Superman Hold is a highly effective isometric exercise that targets the lower back, glutes, and core muscles, playing a crucial role in improving overall posture, spinal stability, and posterior chain strength. Though it might seem simple, this bodyweight move is essential for balancing out your back training, particularly when focusing on strengthening the lats and upper back with pulling exercises.
1. What is the Superman Hold?
The Superman Hold involves lying face down and simultaneously lifting your arms, chest, and legs off the ground, mimicking the flying position of the superhero “Superman.” This static hold engages the erector spinae muscles along the spine, gluteus maximus, and hamstrings, helping to build endurance and strength in these often neglected areas.
2. Muscles Worked
The Superman Hold primarily activates:
- Erector spinae (lower back muscles)
- Gluteus maximus and medius
- Hamstrings
- Shoulders and upper back (to a lesser extent)
- Core muscles (including the deep stabilizers like the transverse abdominis)
This combination makes it a great exercise for improving spinal stability and preventing imbalances between the front and back of the body.
3. How to Perform the Superman Hold
Step-by-Step Instructions:
- Start position: Lie flat on your stomach with your arms extended straight ahead and legs fully extended. Keep your neck neutral by looking down at the floor.
- Lift off: Simultaneously raise your arms, chest, and legs off the ground as high as comfortably possible. Aim to engage your lower back and glutes to hold this lifted position.
- Hold: Maintain this position, focusing on squeezing your glutes and keeping your back muscles engaged. Avoid hyperextending the neck or lower back.
- Breath control: Breathe steadily throughout the hold, avoiding breath-holding.
- Duration: Hold for 15-30 seconds to start, gradually increasing the duration as your endurance improves.
4. Benefits of the Superman Hold
- Strengthens the posterior chain, which is critical for posture and injury prevention
- Enhances spinal stability and reduces lower back pain by building endurance in supportive muscles
- Improves core balance by activating deep stabilizing muscles alongside superficial back muscles
- Balances out anterior chain exercises like crunches or sit-ups, promoting muscular symmetry
- Can be performed anywhere, requiring no equipment
5. Common Mistakes to Avoid
- Lifting too high and hyperextending the lower back, which can cause strain
- Holding your breath, which can increase tension and reduce endurance
- Allowing the head to crane upward, potentially straining the neck
- Using momentum or bouncing instead of a steady, controlled hold
6. Variations to Increase Challenge
- Superman Pulses: Small up-and-down pulses while holding the elevated position
- Alternating Superman: Lift opposite arm and leg instead of both simultaneously, engaging more balance and coordination
- Weighted Superman Hold: Hold light ankle weights or wrist weights to add resistance once bodyweight becomes easy
Conclusion:
The Superman Hold is a simple but powerful exercise for strengthening the lower back and supporting muscles critical to a strong, injury-resistant physique. Incorporating this hold into your workout routine complements lat and upper-back training by promoting full posterior chain strength and better posture.
Doorway Rows
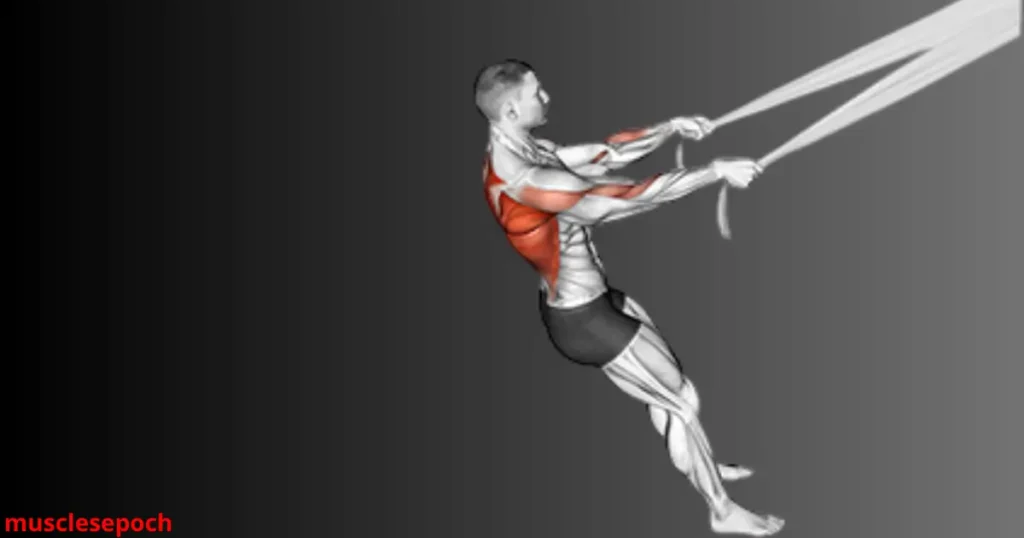
Doorway rows are a practical and effective bodyweight exercise that targets the upper back muscles, including the latissimus dorsi, rhomboids, and trapezius, while requiring minimal equipment. This movement is especially beneficial for beginners or anyone looking for a simple, home-friendly way to improve upper-body pulling strength and posture without needing weights or machines.
1. What Are Doorway Rows?
Doorway rows utilize a sturdy doorframe or a similar fixed structure to provide resistance for a rowing movement. By pulling your body toward the doorframe, you engage the muscles responsible for scapular retraction and upper-back strength. This exercise mimics traditional rows but uses your body weight as resistance, making it accessible and convenient for home workouts or travel.
2. Muscles Worked
Doorway rows primarily work:
- Latissimus dorsi (lats)
- Rhomboids
- Middle and lower trapezius
- Posterior deltoids
- Biceps brachii
- Core muscles (engaged for stability during the movement)
This makes doorway rows a comprehensive pulling exercise that promotes better posture and back strength.
3. How to Perform Doorway Rows Correctly
Step-by-Step Guide:
- Find a sturdy doorway: Ensure the doorframe or a similar stable structure can safely support your body weight.
- Grip the doorframe: Stand facing the doorway and grasp both sides of the frame at about waist to chest height with your palms facing inward or slightly forward.
- Lean back: Walk your feet forward, leaning back so your arms are extended and your body forms a straight line from head to heels.
- Engage your back and core: Keep your core tight and your shoulders down and back.
- Row your body: Pull your chest toward the doorframe by bending your elbows and squeezing your shoulder blades together. Focus on activating your lats and rhomboids.
- Lower with control: Slowly extend your arms to return to the starting position while maintaining tension in your back muscles.
4. Benefits of Doorway Rows
- Builds upper back strength without the need for weights or gym equipment
- Improves posture by strengthening muscles responsible for scapular retraction
- Enhances grip and arm strength through bodyweight resistance
- Accessible and convenient—ideal for home workouts, travel, or quick exercise breaks
- Scalable intensity by adjusting your body angle; the more horizontal your body, the harder the exercise
5. Common Mistakes to Avoid
- Rounding the back: Maintain a straight spine to avoid strain and ensure proper muscle activation
- Using momentum: Perform slow, controlled reps rather than quick jerks to maximize effectiveness
- Shrugging shoulders: Keep your shoulders down to target the correct muscles
- Not engaging the core: A weak core can lead to sagging hips and reduced exercise efficiency
6. Variations and Progressions
- Elevated Doorway Rows: Place your feet on an elevated surface to increase difficulty
- Single-Arm Doorway Rows: Use one arm at a time to correct muscular imbalances and increase challenge
- Weighted Doorway Rows: Hold a light weight or resistance band for added resistance
- Tempo Variations: Slow down the eccentric (lowering) phase to increase time under tension
Conclusion:
Doorway rows are an excellent bodyweight exercise to strengthen the upper back and improve posture without needing specialized equipment. Their accessibility and scalability make them perfect for all fitness levels, allowing you to build a strong, balanced back anywhere.
Tips to Maximize Lats Growth for Beginners
Prioritize Compound Pulling Movements
When it comes to building a strong, wide, and defined back—especially your latissimus dorsi (lats)—compound pulling movements should be the foundation of your training. These multi-joint exercises engage multiple muscle groups at once, allowing beginners to stimulate more muscle fibers, lift heavier loads, and see results faster.
1. What Are Compound Pulling Movements?
Compound pulling movements are exercises that involve more than one joint and activate a range of upper-body muscles in one fluid motion. Unlike isolation exercises that target a single muscle, compound pulls work your:
- Lats
- Rhomboids
- Trapezius
- Rear deltoids
- Biceps
- Forearms
- Core (for stability)
Examples include:
- Pull-Ups and Chin-Ups
- Lat Pulldowns
- Seated Cable Rows
- Bent-Over Barbell Rows
- T-Bar Rows
- Dumbbell Rows
2. Why They’re Essential for Lat Growth
For beginners looking to grow their lats, compound movements offer several benefits:
- Maximize muscle engagement: These lifts force your lats to work in coordination with other back muscles, leading to more comprehensive development.
- Efficient for strength and size: Compound exercises allow you to use heavier weights, which promote both muscular hypertrophy and strength gains.
- Improve overall upper-body posture and performance: Strong lats enhance spinal support and shoulder mechanics.
- Foundation for progression: Mastering compound lifts builds the strength base you need before incorporating isolation exercises.
3. Beginner Tips for Compound Pulls
- Start with assisted versions: If you can’t perform a full pull-up yet, use resistance bands or an assisted pull-up machine.
- Focus on form, not ego lifting: It’s better to perform clean reps with moderate weight than to go too heavy and compromise technique.
- Use a full range of motion: Fully stretch at the bottom and squeeze at the top of each rep to activate the lats completely.
- Pull with your elbows, not your hands: Visualize driving your elbows down and back—this cue helps emphasize lat activation over biceps involvement.
Conclusion:
For beginners aiming to grow wider, stronger lats, prioritizing compound pulling movements is non-negotiable. These exercises form the backbone of any effective back routine, providing the muscle stimulus, strength foundation, and neuromuscular control you need for long-term gains.
Slow Down Your Reps for Better Activation
One of the most overlooked techniques for maximizing lat growth—especially for beginners—is slowing down the tempo of your repetitions. While it might feel satisfying to move heavy weight quickly, slowing your reps increases time under tension (TUT), which is a key factor in stimulating muscle hypertrophy, improving mind-muscle connection, and reinforcing proper form.
1. What Does Slowing Down Your Reps Mean?
Slowing your reps refers to controlling the speed at which you perform each phase of an exercise, particularly the:
- Concentric phase (the lifting or pulling motion)
- Eccentric phase (the lowering or returning motion)
For example, in a lat pulldown, the concentric phase is when you pull the bar down toward your chest, and the eccentric phase is when you slowly return the bar to the top.
A common tempo recommendation for lat exercises is 2–3 seconds concentric / 2–4 seconds eccentric. This increases time under tension, allowing more muscular engagement per rep.
2. Why Slower Reps Improve Lat Activation
- Enhances the mind-muscle connection: By slowing down, you can focus more intensely on squeezing and stretching your lats during each part of the movement.
- Reduces momentum: Fast reps often rely on swinging or jerking, which reduces tension on the lats and shifts it to secondary muscles or joints.
- Promotes full range of motion: Slower reps force you to be intentional with each inch of movement, ensuring you stretch and contract the lats effectively.
- Builds muscle control and endurance: Especially important for beginners, controlled reps teach you how to feel your lats working and develop motor control.
3. How to Implement This Strategy Effectively
- Use a lighter weight: To maintain proper control, reduce the weight slightly from what you’d normally lift quickly. The added time under tension will still challenge your muscles.
- Count your tempo: For example, count “1-2” while pulling the bar down, and “1-2-3” while releasing it.
- Pause at peak contraction: At the bottom of a lat pulldown or row, hold for 1–2 seconds and squeeze your lats to intensify the contraction.
- Stay smooth and fluid: Avoid jerky or mechanical motions—smooth, controlled reps are more effective for muscle growth.
4. Exercises Where Slower Tempo Shines
While slowing down reps is beneficial for most exercises, it works particularly well for:
- Lat Pulldowns
- Seated Cable Rows
- Resistance Band Lat Pulldowns
- Dumbbell Rows
- Doorway Rows (for bodyweight training)
Conclusion:
For beginners serious about maximizing lat activation and building a strong, aesthetic back, slowing down your reps is a simple yet powerful strategy. It reinforces proper form, builds a stronger mind-muscle connection, and amplifies the training stimulus—making every rep count.
Train Lats at Least Twice a Week
To effectively grow your lats—especially if you’re a beginner—it’s important to train them at least twice per week. This frequency gives your muscles enough stimulation to trigger growth while allowing time for recovery. Unlike training a muscle group once a week (a traditional “bro split”), twice-a-week training helps reinforce movement patterns, improve neuromuscular coordination, and increase overall training volume, which are all essential for hypertrophy.
1. Why Frequency Matters for Lat Development
- Greater Muscle Activation Over Time: Training your lats twice weekly increases total weekly volume, one of the most important factors in muscle growth.
- Reinforces Technique: Beginners benefit from repetition. Frequent exposure to exercises like rows and pulldowns helps you refine form and build a stronger mind-muscle connection.
- Accelerates Progression: With two sessions, you have more opportunities to progressively overload the lats through more reps, more sets, or slightly heavier weights.
- Prevents Detraining: Muscles begin to detrain after several days of inactivity. Hitting your lats every 3–4 days ensures consistent progress and maintenance of neural adaptations.
2. Example Weekly Lat Training Schedule
Here’s how you might structure your week:
- Day 1 – Pull or Back Day A:
- Focus on compound lat exercises like lat pulldowns, pull-ups, or barbell rows.
- Emphasize heavier weights and lower-to-moderate reps (6–10 reps).
- Day 4 or 5 – Pull or Back Day B:
- Include more variety with cable rows, resistance band lat pulldowns, or dumbbell one-arm rows.
- Use moderate weights with higher reps (10–15 reps) and slower tempo for activation.
This approach helps you hit both strength and hypertrophy targets across the week.
3. Tips for Optimizing Twice-Weekly Lat Training
- Avoid back-to-back sessions: Give your muscles at least 48 hours of recovery between lat sessions to prevent overtraining.
- Vary your angles and equipment: Different grips (overhand, underhand, neutral) and tools (cables, machines, dumbbells) target the lats from multiple angles for fuller development.
- Monitor volume and intensity: As a beginner, start with 9–12 total sets per week for lats, divided between two sessions. Gradually increase as you adapt.
- Track your recovery: If your lats are still very sore by the second session, reduce volume slightly or improve your recovery strategies (sleep, protein intake, etc.).
Conclusion:
Training your lats at least twice per week gives your body consistent, optimized stimulus for building a stronger, wider back. It supports better technique, greater muscle growth, and faster progress—especially when paired with good form, recovery, and progressive overload.
Conclusion
Training your lats doesn’t have to be complicated. With the right beginner-friendly exercises, proper form, and consistency, you can start building a strong, well-defined back that forms the foundation for future progress.
Remember: focus on the stretch and contraction, increase the challenge gradually, and stay consistent. Your V-tapered back starts with these simple yet powerful moves.
Ready to take your back workouts to the next level? Bookmark this guide and explore more at MuscleEpoch for complete workout plans and muscle-building tips!