If you’re looking to carve out a well-defined chest and hit the often-neglected lower pecs, the low cable chest fly deserves a spot in your routine. Unlike dumbbell flys or machine presses, this variation keeps constant tension on your muscles throughout the movement, helping to improve mind-muscle connection and drive serious chest hypertrophy.
In this guide, you’ll learn exactly how to perform the low cable chest fly with proper form, discover the key benefits of the exercise, and avoid the common mistakes that sabotage results. Whether you’re a beginner or a seasoned lifter, mastering this movement can elevate your chest workouts and overall upper body aesthetics.
What Is the Low Cable Chest Fly?
Overview of the Exercise
The low cable chest fly is a powerful isolation movement that targets the lower portion of the pectoralis major, the broad chest muscle responsible for horizontal adduction and internal rotation of the arm. This variation is performed using a cable machine with the pulleys set at a low position—typically near ankle level—allowing you to lift the handles in an upward arc.
Unlike traditional dumbbell flys that rely heavily on gravity and can lose tension at the top of the movement, the low cable fly provides constant resistance throughout the entire range of motion. This makes it highly effective for building size and definition in the inner and lower chest regions.
It’s especially popular among bodybuilders and physique athletes who want to sculpt the sternal head of the pecs (the lower part that connects to the sternum), helping to create that full, striated chest look. The exercise also engages secondary muscles such as the anterior deltoids and triceps, though to a lesser degree, making it an ideal finishing or accessory movement in a chest-focused workout.
Whether you’re training for size, shape, or symmetry, the low cable chest fly is a smart addition to your upper body routine—especially when executed with strict form and control.
Low Cable Chest Fly:Muscles Worked
The low cable chest fly primarily targets the pectoralis major, with a specific focus on the sternal (lower) head. This muscle plays a crucial role in moving the arms across the body, and the upward sweeping motion of the low cable fly is ideal for activating the lower chest fibers that are often under-stimulated in flat or incline pressing movements.
Here’s a breakdown of the muscles involved:
Primary Muscle: Pectoralis Major (Sternal Head)
The main focus of this exercise is the lower portion of the pectoralis major, which is best activated by movements that bring the arms from low to high across the body. The constant tension of the cable system ensures this region is worked thoroughly throughout the movement, helping develop the lower chest shelf and contributing to a more balanced, full chest.
Secondary Muscles
- Anterior Deltoid (front shoulder):
Assists in the upward motion of the arms, especially as the arms move forward and upward during the fly. It helps stabilize the shoulder joint throughout the movement. - Triceps Brachii (long head):
While not a primary mover, the triceps help stabilize the elbow joint during the lift, especially when resisting the pull of the cables during the eccentric (lowering) phase.
Stabilizers & Supporting Muscles
- Serratus Anterior: Helps with scapular stability during the upward motion.
- Core Muscles: Engaged to maintain upright posture and prevent torso rotation.
- Biceps (minor role): Assist slightly with arm movement control but are minimally activated.
By understanding which muscles are working during the low cable chest fly, you can better focus your mind-muscle connection, reduce the risk of injury, and make each rep more effective. For maximum activation of the lower pecs, keep your arms slightly bent, maintain a strong posture, and use a controlled tempo.
Cable Machine Setup
Setting up the cable machine correctly is crucial for targeting the lower chest effectively and avoiding unnecessary strain on your shoulders or arms. A poor setup can limit your range of motion, reduce muscle activation, and even lead to form breakdown—especially when using heavier loads. Here’s how to dial in your cable machine setup for maximum gains:
1. Pulley Position: Set to the Lowest Point
To perform a low cable chest fly, start by adjusting both pulleys to the lowest setting on the cable machine—typically near ankle level. This low starting point creates the upward arc necessary to engage the sternal head of the pectoralis major, directing the resistance through the lower portion of your chest.
Pro Tip: Use D-handle attachments for better control and grip comfort.
2. Handle Distance: Slightly Wider Than Shoulder Width
Stand in the center of the cable crossover machine, ensuring the pulleys are evenly spaced. The handles should be positioned just outside shoulder width. This setup allows you to fully extend your arms at the bottom and bring them together in a natural arc at the top, mimicking a “hugging” motion.
Avoid standing too far forward or backward, which can change the angle of resistance and shift the load away from the chest.
3. Body Position: Staggered Stance for Stability
Take a small step forward into a staggered stance (one foot slightly ahead of the other) to stabilize your body during the movement. Keep a neutral spine, shoulders back, and a slight lean forward from the waist—not from the neck or shoulders.
- Elbows should stay slightly bent throughout the movement.
- Keep your core braced to prevent swaying.
- Maintain a strong, upright posture to isolate the chest rather than the shoulders or arms.
Setting up properly ensures you engage the target muscles from start to finish. Take the time to check your alignment before each set—this one step can make the difference between a chest-pumping workout and wasted effort.
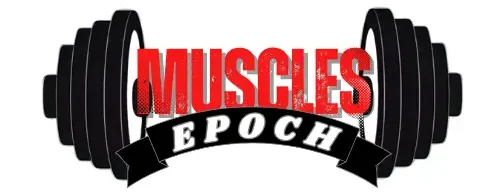
How to Perform the Low Cable Chest Fly (Proper Form Guide)
Step-by-Step Execution
Executing the low cable chest fly with proper form is essential to maximize chest activation, protect your joints, and build well-defined lower pecs. Follow this step-by-step guide to ensure every rep is effective and safe.
Step 1: Set Up Your Position
- Adjust both pulleys to the lowest position on the cable machine.
- Attach D-handles to each side.
- Stand in the center, grab the handles, and take one small step forward into a staggered stance (dominant foot in front).
- Keep a slight lean forward from the waist (about 10–15 degrees).
- Maintain a neutral spine with your chest up and shoulders pulled back.
Tip: This position helps stabilize your body and shifts the tension onto your chest rather than your shoulders or back.
Step 2: Starting Position
- Begin with your arms extended down and out to your sides, elbows slightly bent.
- Your hands should be in line with or just behind your torso.
- Engage your core and brace your glutes for stability.
Think of holding a wide “T” shape at the bottom with slight tension already on the cables.
Step 3: The Concentric (Lifting) Phase
- Exhale as you pull the handles upward and inward in a controlled arc, bringing them together in front of your lower chest or upper abs.
- Focus on squeezing your pecs at the top of the movement.
- Your arms should remain in a fixed arc — do not bend or straighten the elbows as you move.
Mind-Muscle Tip: Visualize your chest fibers contracting and pulling your arms together, not just moving the handles.
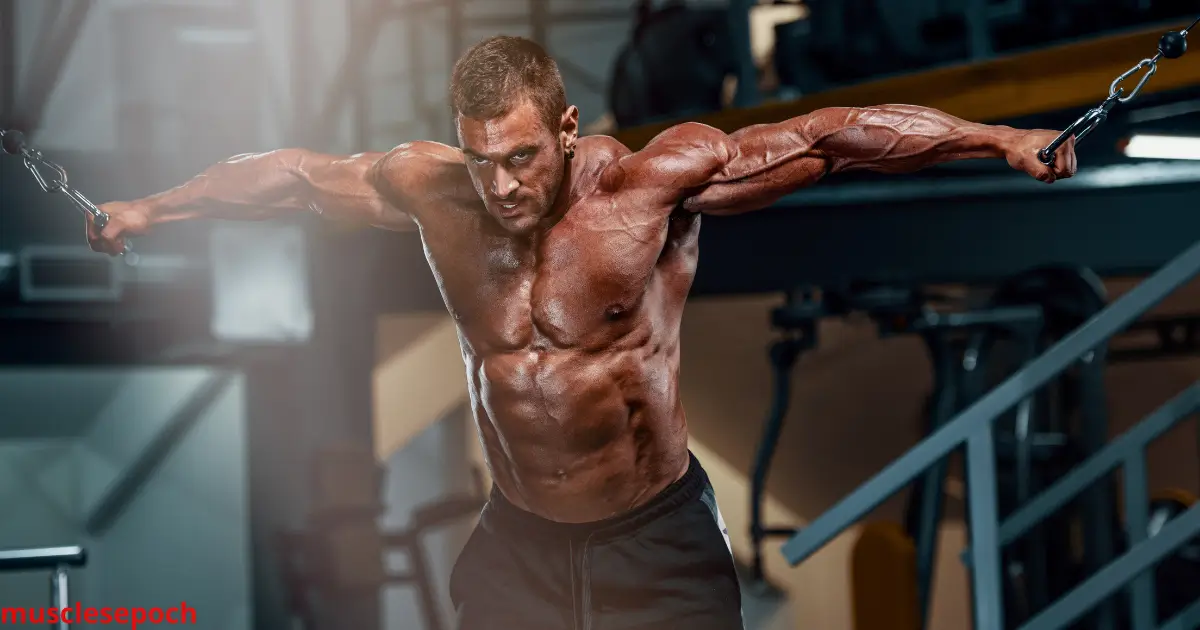
Step 4: Peak Contraction
- Pause briefly (1–2 seconds) at the top when your hands are almost touching or lightly crossing.
- Feel the tension and actively squeeze your chest muscles to maximize contraction.
This is where the mind-muscle connection really matters. Don’t skip the squeeze!
Step 5: The Eccentric (Lowering) Phase
- Slowly reverse the motion, allowing the handles to return to the start position in a wide arc.
- Inhale during this phase and maintain full control — don’t let the weight stack pull your arms back quickly.
- Keep tension on your chest the entire time; avoid letting your arms go completely limp.
Tempo recommendation: 1–2 seconds on the way up, 2–3 seconds on the way down for better muscle control and growth.
Form Reminders
- Keep your elbows slightly bent throughout — no locking out or flaring.
- Do not shrug your shoulders; keep them depressed and retracted.
- Focus on controlled movement — this is not a power exercise.
When performed correctly, the low cable chest fly is a chest-shaping powerhouse that delivers deep muscle fiber activation, especially in the lower and inner pecs. Stick to moderate weight, perfect your form, and progressively increase resistance over time for best results.
Mind-Muscle Connection Tips
The mind-muscle connection (MMC) is a crucial yet often overlooked element of effective training—especially when performing isolation exercises like the low cable chest fly. It refers to your ability to mentally focus on and consciously contract the target muscle during a movement. When done correctly, this technique can significantly increase muscle fiber recruitment, improve form, and lead to better gains in chest hypertrophy.
Here’s how to develop a strong mind-muscle connection during your low cable chest fly:
1. Visualize the Chest Contracting
Before you even begin your set, take a moment to visualize your pecs working—specifically the lower portion of the pectoralis major. Picture your chest fibers pulling your arms upward and inward in a smooth arc. This mental preparation primes your nervous system and reinforces proper muscle recruitment.
Try this: Close your eyes during warm-up sets to enhance focus on the muscle working—not the movement.
2. Slow Down the Tempo
Slowing down each rep is one of the most effective ways to improve MMC. When you perform the exercise too quickly or with momentum, the tension shifts away from the chest and into secondary muscles or joints. Aim for a 2–3 second eccentric (lowering) and a 1–2 second concentric (lifting) phase, with a pause and squeeze at peak contraction.
Rushing through reps? You’re likely missing peak chest activation.
3. Emphasize the Squeeze at the Top
At the top of each rep—when your hands are about to touch or lightly cross—pause and actively contract your chest as hard as possible. This is where the mind-muscle connection becomes most powerful. Imagine you’re trying to “crush” something between your pecs.
Think of it like posing or flexing your chest during the squeeze—don’t just go through the motion.
4. Reduce the Weight to Refine Focus
Many lifters go too heavy on cable flys, sacrificing form and mind-muscle connection. Instead, use a moderate weight that allows for full control and deliberate motion. The goal is not to max out the stack—it’s to maximize tension and control on the chest throughout the entire range.
If you can’t feel your pecs working, drop the weight and perfect your technique.
5. Keep Your Hands in Line with Your Lower Chest
To really emphasize the sternal head of the pecs, ensure your hands finish at or just below chest level (not up near your chin). This angle reinforces the correct muscle activation and helps avoid letting the delts or arms take over the movement.
By mastering the mind-muscle connection, you’ll transform the low cable chest fly from a simple movement into a targeted, high-impact chest-builder. Focused reps beat fast, sloppy ones—every time.
Recommended Sets, Reps & Weight
The low cable chest fly is primarily an isolation exercise, meaning it’s designed to target a specific muscle group—in this case, the pectoralis major, particularly the lower and inner chest fibers. Because of its role in sculpting and defining rather than brute strength building, the ideal sets, reps, and weight scheme focuses on muscle control, hypertrophy, and mind-muscle connection over max loading.
Here’s how to program this exercise for optimal results:
1. Sets: 3–4 Working Sets
Aim for 3 to 4 high-quality sets after your compound lifts (like the bench press or incline press). The low cable fly is best placed in the middle or end of your chest workout, when your chest is already pre-fatigued and more responsive to focused, controlled contractions.
Rest time between sets: 45–60 seconds for hypertrophy and muscle burn.
2. Reps: 10–15 Per Set
The best rep range for the low cable chest fly lies between 10 to 15 reps. This allows for:
- Full control of the weight
- Proper stretch and squeeze at each end of the movement
- Increased time under tension (TUT), a proven driver of hypertrophy
Avoid low-rep, high-weight sets on this movement, as they often compromise form and increase injury risk, especially to the shoulders and elbows.
Choose quality over quantity. If you’re losing chest tension by rep 8, the weight is probably too heavy.
3. Weight Selection: Moderate, Not Maximal
Use a weight that allows you to maintain form and constant tension on the chest throughout the full range of motion. A good guideline:
- You should feel a deep contraction in the chest by rep 5–6
- You should struggle slightly to complete the final 2–3 reps with good form
- You should not feel excessive strain in the shoulders, neck, or arms
If your goal is muscle growth and definition, start with about 50–60% of your one-rep max for fly movements (rough estimate, since isolation exercises aren’t typically max-tested).
When in doubt, go lighter and focus on tempo, contraction, and form.
Sample Low Cable Chest Fly Protocol:
- Set 1: Warm-up set – 15 reps with very light weight
- Set 2–4: Working sets – 10–12 reps with moderate weight
- Optional Finisher Set: 15+ reps with lighter weight for maximum pump
The key takeaway: The low cable chest fly is not about lifting heavy—it’s about feeling the pecs working, getting a strong stretch, and hitting a deep squeeze. Program it smartly, and it can become one of your most effective tools for sculpting and defining your chest.
Benefits of the Low Cable Chest Fly
Superior Chest Isolation
One of the standout benefits of the low cable chest fly is its ability to isolate the chest muscles—particularly the lower portion of the pectoralis major—with exceptional precision and control. Unlike compound pressing movements like the bench press or push-ups, which engage the shoulders and triceps as major contributors, the low cable fly places nearly all the tension on the chest, making it one of the best tools for focused chest development.
Targeted Muscle Activation
Because the low cable chest fly is an isolation exercise, it allows you to work the chest in relative isolation—free from the influence of stronger muscles like the deltoids or triceps that often take over during presses. The arc motion and constant cable tension keep the pecs engaged throughout the entire movement, especially during the peak contraction phase when your hands come together at the top.
This results in greater hypertrophy potential and helps carve out detailed definition in the lower and inner chest.
Constant Tension = Continuous Engagement
Unlike free-weight flys, which lose tension at the top of the movement, cables provide continuous resistance from start to finish. This means your chest muscles are always under tension—no “resting point” where the muscle can relax. The result is more effective muscle fatigue and increased time under tension (TUT), a proven factor in muscle growth.
Think of it like locking your chest into a deep contraction and never letting up until the set ends.
Perfect for Mind-Muscle Connection
Superior isolation also means superior mind-muscle connection. With the shoulders and triceps playing a minimal role, you’re free to concentrate on feeling the chest stretch, contract, and squeeze through each rep. This allows you to train more consciously, improving both the quality of each rep and the overall effectiveness of the workout.
Ideal for Sculpting & Aesthetic Development
Whether you’re aiming to bring up a lagging chest, enhance lower pec definition, or improve symmetry, the low cable fly is your go-to. By honing in on the sternal head, it helps you develop that clean, aesthetic “chest shelf” and pronounced inner chest line that’s especially sought after in bodybuilding and physique sports.
In short, the low cable chest fly offers unrivaled chest isolation, making it an essential addition to any upper body routine focused on muscle shaping, definition, and growth. It’s a high-impact, low-risk movement when performed with proper form—and an effective tool for lifters of all experience levels.
Consistent Tension Through Full Range
One of the most significant advantages of the low cable chest fly over free weight variations like dumbbell flys is its ability to deliver consistent, uninterrupted tension throughout the entire range of motion. This continuous resistance dramatically enhances the quality of each rep, promotes deeper muscle engagement, and leads to more effective chest hypertrophy.
Why Cable Tension Matters
With dumbbells or other gravity-dependent exercises, tension is at its peak during the bottom portion of the fly, and nearly disappears at the top when the weights are aligned vertically with your arms. In contrast, cable machines pull horizontally and diagonally, which means resistance is maintained during both the stretch and squeeze phases of the movement.
This ensures that your chest remains under constant load, maximizing time under tension—a critical factor in stimulating muscle growth.
Increased Time Under Tension (TUT)
Time under tension refers to how long a muscle is actively working during a set. The low cable chest fly naturally extends this because it:
- Begins under load even before you start moving
- Provides resistance throughout the full concentric (lifting) and eccentric (lowering) phases
- Eliminates “dead zones” in the range of motion
A longer TUT translates to greater metabolic stress, increased micro-tearing of muscle fibers (which leads to growth), and improved muscle endurance over time.
Smooth Resistance Curve
Cables offer a fluid, controlled resistance curve that matches the body’s natural strength profile. That means:
- The movement feels even and balanced from start to finish
- There’s less tendency to use momentum or “bounce” through weak points
- You can maintain full control at every inch of the movement
This helps reduce joint stress and allows lifters to stay in the optimal tension zone longer—where real growth happens.
Every rep becomes a full rep—no wasted motion, no lost tension.
Better Muscle Activation and Isolation
The uninterrupted tension ensures that your pectorals are the prime movers throughout the entire exercise. This minimizes the involvement of secondary muscles like the shoulders or biceps and enhances activation of the lower and inner chest, where stubborn growth often lags behind.
Final Thought
The low cable chest fly’s constant resistance is what sets it apart as a precision sculpting tool. When your goal is to carve detail into your chest, create lasting fatigue, and maximize hypertrophy through smart mechanics—not just brute force—this is the move that delivers.
Improves Chest Symmetry & Shape
A well-developed chest isn’t just about size—it’s about symmetry, proportion, and aesthetics. The low cable chest fly is one of the most effective exercises for sculpting a balanced, symmetrical chest, helping to eliminate muscular imbalances and create a more defined, polished upper body appearance.
Unilateral Focus for Balanced Development
Unlike barbell presses or machine presses that often allow the dominant side to take over, cable flys require each side of your chest to work independently. You hold an individual handle in each hand, ensuring both pecs contribute equally to the movement.
This reduces the risk of overtraining one side, a common issue in lifters with imbalanced muscle activation or posture-related asymmetries. Over time, this helps even out muscle tone and size between the left and right pec.
Perfect for correcting dominant-arm bias or post-injury recovery where one side has lagged.
Refines Lower and Inner Chest Definition
The unique movement path of the low cable fly, where the arms arc upward and inward, places special emphasis on the sternal (lower) head of the pectoralis major. This is the area that contributes to that sought-after “chest shelf” or square lower chest look.
By regularly training this region, you develop the lower and inner portions of your chest, areas that often lack full development from pressing alone. This leads to a more aesthetic and proportioned chest, especially in the center where the pecs meet.
Adding low cable flys to your routine enhances chest fullness from all angles—top, bottom, and centerline.
Better Shaping vs. Size Alone
While compound exercises are great for mass, isolation movements like cable flys allow you to shape the muscle. Think of it as sculpting the details after building the foundation. With proper form and consistent training, you can:
- Accentuate chest lines and striations
- Improve pectoral tapering
- Create a more defined upper body silhouette
This is especially beneficial for bodybuilders, physique competitors, or anyone aiming for a lean, aesthetic chest.
Mind-Muscle Symmetry Awareness
The fly movement also strengthens your ability to feel each pec working independently, allowing you to notice and correct any imbalance in form or contraction. This heightened awareness reinforces symmetrical training patterns, reducing future asymmetries.
Symmetry isn’t just about looks—it improves joint health, posture, and long-term performance.
Final Thought
If your goal is a balanced, well-shaped, and proportionate chest, the low cable chest fly is a non-negotiable addition to your routine. By targeting the chest from a lower angle and allowing equal loading on both sides, it helps create a chest that’s not only strong—but symmetrical and sculpted to perfection.
Common Mistakes to Avoid
Using Too Much Weight
One of the most common and detrimental mistakes lifters make with the low cable chest fly is using excessive weight. While lifting heavy has its place—especially in compound movements—fly variations like this are isolation exercises designed to target a single muscle group (in this case, the pectorals) with control, precision, and mind-muscle connection.
Overloading the movement not only compromises form but also reduces effectiveness and increases the risk of injury.
Why Heavy Loads Hurt Performance
When you use a weight that’s too heavy on the low cable chest fly, your body instinctively compensates by:
- Engaging secondary muscles like the shoulders, biceps, or traps
- Using momentum to swing the arms rather than control them
- Shortening the range of motion, preventing a full stretch and contraction
This completely defeats the purpose of the exercise. The tension shifts away from the chest, especially the lower and inner pec fibers, and you end up “going through the motion” without stimulating meaningful growth.
Heavy doesn’t mean effective—especially when precision is the goal.
Increased Risk of Injury
Too much weight on a cable fly puts excessive strain on the:
- Anterior deltoids (front shoulders)
- Elbow joints
- Shoulder girdle, especially during the stretched portion of the rep
These areas are vulnerable when your arms are abducted (extended out), and loading them improperly can result in rotator cuff injuries, joint inflammation, or muscle tears. Isolation movements require joint-friendly control, not brute force.
It Kills Mind-Muscle Connection
Heavy weights make it much harder to focus on the contraction of the chest. Instead of feeling your pecs work through the entire motion, you’re likely more focused on just finishing the rep. That undermines one of the most important hypertrophy tools: the mind-muscle connection.
Remember: flys are about feel, not just force.
What to Do Instead
- Choose a moderate weight that allows for 12–15 smooth, controlled reps
- Make sure you can fully stretch and squeeze without discomfort or cheating
- Prioritize technique, tempo, and tension over how much weight you’re pulling
Use this mental checklist:
- Are you feeling your chest contract from start to finish?
- Is your movement controlled, not jerky?
- Are you maintaining full range of motion?
If not, drop the weight and reset your form.
Key Takeaway
In the low cable chest fly, heavier isn’t better—smarter is. Proper isolation, consistent tension, and deliberate control will always beat heavy swinging when it comes to building a well-shaped, defined chest. Don’t let ego lift more than your chest can handle—lift with intention.
Incorrect Arm Angle & Range of Motion
Proper arm positioning and controlling your range of motion are essential to maximize the effectiveness of the low cable chest fly and to protect your joints from unnecessary strain. Mistakes in either of these aspects can significantly reduce chest activation, shift the work to unintended muscles, and increase the risk of injury.
Why Arm Angle Matters
The low cable chest fly is designed to target the lower and inner portions of the pectoralis major by having your arms move in an upward and inward arc. If your arms are not aligned properly—too high, too low, or too wide—you can end up:
- Overusing the anterior deltoids (front shoulders) rather than the chest
- Failing to fully engage the sternal head of the pecs
- Placing unnecessary stress on your shoulder joint capsule
Optimal arm positioning means keeping your elbows slightly bent and your hands moving in a controlled, smooth arc at or just below chest level. This angle ensures that the lower chest fibers are being effectively isolated and stimulated.
Common Arm Angle Errors
- Too High: Bringing your hands up near or above shoulder level shifts emphasis to the shoulders, reducing chest involvement and increasing risk of shoulder impingement.
- Too Wide: Flared elbows or overly wide arms increase tension on the shoulder joint and decrease the effectiveness of the fly to isolate the chest.
- Locked Elbows: Fully straight arms reduce control and increase joint stress; maintaining a slight bend keeps tension on the pecs and protects your elbows.
Range of Motion (ROM) Considerations
A full, controlled range of motion is necessary to stretch and contract the chest muscles completely, which promotes better muscle growth. However, both under- and over-extending can be problematic.
- Under-Extension: Stopping short of a full stretch limits the activation of chest fibers, especially the lower pecs, and decreases time under tension.
- Over-Extension: Going too far back in the eccentric phase can place excessive strain on the shoulder joint, increasing injury risk without adding training benefit.
Aim for a comfortable but deep stretch at the start of the movement and a strong, deliberate squeeze at the top, without hyperextending the shoulder.
Tips to Maintain Correct Form
- Keep your elbows slightly bent throughout the movement—think of a “soft hinge” rather than a locked arm.
- Position your hands in line with your lower chest or slightly below to maximize lower pec activation.
- Focus on moving your arms in a smooth, controlled arc from a deep stretch to a full contraction.
- Avoid shrugging your shoulders or letting them roll forward—keep your chest proud and shoulders down.
Final Thought
Mastering the correct arm angle and range of motion ensures the low cable chest fly effectively isolates the chest muscles while minimizing shoulder strain. This precision is what transforms the exercise from a simple fly movement into a powerful chest sculpting tool that promotes both muscle growth and joint health.
Rushing the Movement
One of the most frequent errors when performing the low cable chest fly is rushing through the reps. In the pursuit of finishing sets quickly or lifting heavier weights, many lifters sacrifice control, form, and muscle engagement. This undermines the very purpose of the exercise, which is to isolate the chest muscles effectively and stimulate growth through precise tension and contraction.
Why Tempo Matters
The effectiveness of any isolation exercise, especially the cable chest fly, heavily relies on tempo—the speed at which you perform the concentric (lifting) and eccentric (lowering) phases of the movement. A rushed tempo:
- Reduces time under tension (TUT), limiting muscle fatigue and hypertrophy
- Encourages the use of momentum instead of muscle control
- Increases the likelihood of compensatory movements involving the shoulders or arms
Taking your time ensures that the pectorals remain engaged throughout the entire range of motion, maximizing muscle fiber recruitment and growth potential.
Controlled, Mindful Movement
The goal of the low cable chest fly is to feel a deep stretch during the eccentric phase and a strong contraction during the concentric phase. This requires slow, deliberate movement with focus on the mind-muscle connection.
A common recommended tempo for the fly is:
- 2–3 seconds lowering the cables (eccentric phase) to maximize stretch
- 1–2 seconds squeezing the chest as you bring the handles together (concentric phase)
- A brief pause at the peak contraction for maximum muscle engagement
This tempo promotes muscle damage and metabolic stress, two key drivers of hypertrophy.
Risks of Moving Too Fast
- Loss of form and poor posture, increasing injury risk
- Decreased effectiveness as muscles don’t stay under tension
- Reliance on momentum, which shifts work away from the chest to other muscle groups
- Reduced ability to isolate the lower chest fibers targeted by the exercise
How to Slow Down and Improve
- Focus on the quality of each rep, not the quantity or speed
- Use a weight that allows you to maintain control throughout the movement
- Count seconds in your head or use a metronome app to pace your reps
- Visualize squeezing your chest and controlling the cables like you’re “drawing a wide arc” with precision
Key Takeaway
Slowing down your low cable chest fly not only prevents injury but also maximizes muscle activation, growth, and definition. In this exercise, patience and control trump speed and weight, helping you build a stronger, more sculpted chest over time.
Conclusion
The low cable chest fly is one of the most effective exercises for isolating and shaping the lower chest. When done correctly, it delivers consistent tension, enhanced muscle activation, and more balanced chest development. But like any exercise, it’s only as effective as your form.
Avoid the common mistakes, focus on controlled reps, and prioritize technique over heavy loads. With time and consistency, you’ll not only see growth — you’ll feel it.
Now it’s your turn: Add the low cable chest fly to your next chest session and experience the difference. Have questions or want to share your results? Drop a comment below!