
The military press is a foundational exercise for building strong, defined shoulders and enhancing overall upper body strength. Whether you’re a beginner just starting your fitness journey or a seasoned pro looking to perfect your technique, mastering the military press can significantly boost your performance and physique. This compound movement not only targets the deltoids but also engages supporting muscles such as the triceps and upper chest, making it a powerful addition to any workout routine. In this guide, we’ll break down the step-by-step technique, common mistakes to avoid, and training tips to help you maximize your gains safely and effectively.
Understanding the Military Press and Its Benefits
What Is the Military Press?
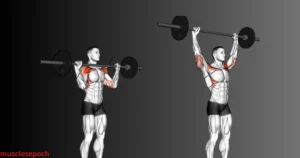
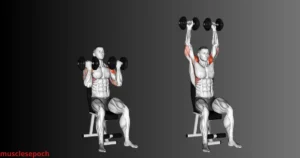
The military press, also known as the overhead barbell press, is a fundamental compound exercise that targets the shoulders (deltoids), with secondary activation of the triceps, upper chest, and core stabilizers. It involves lifting a barbell from shoulder level directly overhead while standing upright, requiring both upper body strength and core stability. Unlike the seated shoulder press, the military press is performed standing with your feet close together, which increases the demand on your postural muscles and balance.
The movement gets its name from its roots in military physical training, where strict form and posture were emphasized—particularly the upright stance and rigid core bracing. It’s considered a gold standard for building shoulder strength and a staple in strength training and bodybuilding programs alike.
There are variations of the military press, including dumbbell versions, seated presses, and push presses (which use leg drive), but the classic standing barbell military press emphasizes pure upper-body pressing strength. Proper form and technique are crucial to prevent shoulder injuries and to ensure you’re targeting the right muscle groups effectively.
Whether you’re a beginner or an advanced lifter, the military press remains one of the most efficient exercises for developing upper body power, improving overhead mobility, and contributing to a well-rounded physique.
Key Benefits of Incorporating the Military Press into Your Routine
The military press is more than just a shoulder exercise—it’s a powerful movement that delivers multiple training benefits when included in a regular fitness routine. Whether your goal is to build muscle, increase strength, or enhance athletic performance, this compound lift can play a vital role.
1. Builds Powerful Shoulders
The military press directly targets the anterior and lateral deltoids, helping to build shoulder mass and definition. Unlike isolation exercises, it recruits multiple heads of the deltoid muscle, resulting in more balanced and functional shoulder development.
2. Improves Upper Body Strength
As a compound lift, the military press also activates the triceps, upper chest, trapezius, and core. By consistently pressing weight overhead, you develop stronger pushing power, which translates to improvements in other exercises like bench press, push-ups, and push jerks.
3. Enhances Core Stability and Postural Control
Since the military press is typically performed standing, your abdominals, obliques, and lower back must engage to stabilize your spine and maintain proper form. Over time, this improves your core strength, balance, and posture, especially in real-life movements that require overhead lifting.
4. Carries Over to Athletic and Daily Activities
The overhead pressing motion mimics many daily tasks and athletic movements—such as lifting objects above your head or performing throwing motions. Incorporating the military press enhances your functional fitness and contributes to better performance in sports, manual labor, and general physical preparedness.
5. Supports Shoulder Mobility and Joint Health
When performed with proper form and full range of motion, the military press can improve shoulder mobility and joint integrity. It reinforces movement patterns that keep your shoulders healthy and resilient against injury, especially if paired with balanced pulling exercises.
In short, the military press is an essential movement for anyone serious about strength training, offering full upper-body engagement, functional strength, and long-term muscular development.
Different Variations of the Military Press
The military press may traditionally refer to a strict standing overhead barbell press, but there are several effective variations that allow you to target your shoulders, triceps, and upper chest from different angles and with varying levels of difficulty. Each variation has unique benefits depending on your training goals, equipment availability, and experience level.
1. Seated Military Press
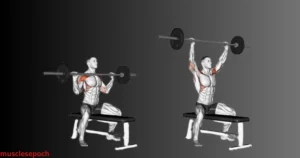
The seated version of the military press eliminates lower-body involvement and places more emphasis on the shoulders and triceps. This variation is ideal for isolating the upper body and minimizing momentum or compensatory movements. It can be done with a barbell, dumbbells, or on a shoulder press machine.
Benefits:
- Greater isolation of shoulder muscles
- More stability due to seated position
- Great for people recovering from lower-body injuries
2. Dumbbell Shoulder Press
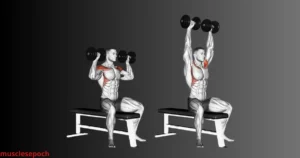
This variation uses dumbbells instead of a barbell, allowing for a greater range of motion and better engagement of stabilizer muscles. Dumbbells also allow each arm to move independently, helping correct muscular imbalances between the left and right side.
Benefits:
- Improves shoulder mobility and control
- Balances strength between arms
- Adds variety to your training routine
3. Push Press
Unlike the strict military press, the push press incorporates leg drive to help lift the weight overhead. This explosive movement recruits the hips, glutes, and quads to assist in the press, allowing you to lift heavier weights and train power.
Benefits:
- Develops total-body explosiveness
- Builds strength in both upper and lower body
- Allows for heavier loading, stimulating growth
4. Behind-the-Neck Press (Advanced)
This variation involves pressing the barbell from behind the head instead of in front. While it targets the shoulders similarly, it places more stress on the rear deltoids and upper traps. However, this variation requires excellent shoulder mobility and should be used with caution.
Benefits:
- Emphasizes rear delts and upper traps
- Useful for advanced lifters focusing on symmetry
- Increases shoulder strength from a unique angle
5. Arnold Press
Named after Arnold Schwarzenegger, this dumbbell variation starts with the palms facing the body and rotates outward during the press. The Arnold Press recruits all three heads of the deltoid (anterior, medial, posterior), offering one of the most comprehensive shoulder workouts.
Benefits:
- Trains full shoulder muscle group
- Increases shoulder stability
- Enhances muscular coordination
Tip: Incorporating different variations into your routine prevents plateaus, reduces overuse injuries, and helps stimulate growth through new challenges.
Step-by-Step Military Press Technique
Proper Setup and Starting Position
Before executing the military press, getting into the right setup and starting position is crucial for safety, efficiency, and optimal performance. Whether you’re using a barbell, dumbbells, or a Smith machine, maintaining proper alignment and positioning reduces the risk of injury and ensures maximum muscle engagement.
1. Foot Position and Base of Support
Start by standing with your feet shoulder-width apart. This stance provides a stable base and helps maintain balance throughout the lift. Avoid standing too narrow or too wide, as it may compromise your stability.
- Tip: Slightly engage your glutes and core to create a solid foundation. Imagine screwing your feet into the ground to generate tension from the ground up.
2. Grip Width and Hand Placement
Your grip should be just outside shoulder-width. A grip that is too narrow will place excessive strain on the wrists and elbows, while too wide a grip will reduce the range of motion and shoulder involvement.
- Barbell: Wrists should be stacked directly over the elbows, with forearms vertical.
- Dumbbells: Start with the dumbbells at shoulder height, palms facing forward (or rotated inward for neutral grip variations).
- Pro Tip: Use a full grip (thumbs wrapped around the bar or dumbbells) to ensure better control and reduce injury risk.
3. Elbow and Wrist Alignment
From the front view, the elbows should be slightly in front of the barbell, not flared out to the sides. This positioning keeps the bar path vertical and efficient. Wrists should remain neutral or slightly extended, not excessively bent backward.
- Keep elbows close to your torso at the bottom of the lift.
- As you press, allow elbows to move naturally into a stronger pushing position without flaring too far out.
4. Torso and Core Engagement
Engage your core muscles (abs and lower back) to avoid excessive arching in the lumbar spine. The torso should be upright, with only a very slight lean back if necessary to clear the bar path. Excessive leaning often indicates lack of shoulder mobility or core stability.
- Think of bracing as if you’re about to be punched in the stomach—this keeps the spine protected and body tension high.
- Avoid overarching your lower back, which can lead to strain or injury over time.
5. Shoulder Positioning and Bar Placement
The barbell (or dumbbells) should rest at collarbone or upper chest level before initiating the press. Shoulders should be down and slightly retracted (pulled back), not shrugged upward.
- Focus on keeping tension in the upper traps and delts without elevating the shoulders prematurely.
- Ensure you’re not excessively pushing your head forward during setup, which can disrupt the press path.
Summary Setup Checklist:
- Feet shoulder-width apart
- Hands just outside shoulder width
- Elbows slightly forward, forearms vertical
- Core tight and glutes engaged
- Neutral spine, chin tucked
- Bar or dumbbells at upper chest level
Proper setup sets the stage for a safe, powerful, and effective military press. Taking a few extra seconds to get into the correct position can significantly improve performance and reduce the risk of injury over time.
The Press Movement: Execution and Form Tips
Mastering the military press requires more than just brute strength — it’s about precision, posture, and controlled movement. Once your setup and starting position are solid, you’re ready to execute the lift with proper form to maximize shoulder activation and minimize injury risk.
1. Initiating the Press
Start by taking a deep breath and bracing your core. This creates intra-abdominal pressure, which stabilizes your spine and helps transfer force efficiently.
- Barbell: Begin pressing the barbell straight up in a vertical path from your upper chest or collarbone.
- Dumbbells: Press both dumbbells simultaneously in a straight line over your head, or alternate reps depending on your routine.
Key Tip: As the bar (or dumbbells) clears your face, slightly move your head backward, creating space for the bar to pass, then move your head forward (“through the window”) once the bar is overhead. This keeps the lift vertical and reduces shoulder strain.
2. Overhead Lockout Position
At the top of the press, the arms should be fully extended but not hyperextended, with the barbell or dumbbells directly over the middle of your head, forming a straight line down through your shoulders, hips, and feet.
- Elbows: Lock them out with control, keeping them close to your ears.
- Wrists: Stay neutral and aligned above your elbows.
- Core: Maintain tightness to avoid overarching the lower back.
Form Reminder: Avoid leaning too far back or shifting weight onto your heels. This not only disrupts balance but places undue stress on your spine.
3. Controlled Descent (Negative Phase)
Don’t just drop the weight. Lower the bar or dumbbells slowly and with control back to the starting position.
- Barbell: Bring it back to your upper chest or collarbone level.
- Dumbbells: Lower to shoulder height with elbows slightly tucked in.
Tempo Tip: Use a 2-3 second negative (lowering) phase to increase time under tension, which helps with strength and hypertrophy.
Additional Execution Tips:
- Use Full Range of Motion: Don’t short-change your press. Fully lock out at the top and return to the chest at the bottom.
- Mind-Muscle Connection: Focus on activating the deltoids, upper traps, and triceps throughout the lift.
- Breathing Pattern: Inhale at the bottom before the press, exhale as you complete the lift, then inhale again on the way down.
Common Mistakes to Avoid:
- Excessive Leaning: Overarching the lower back places stress on your spine and reduces shoulder engagement.
- Partial Range of Motion: Not bringing the bar or dumbbells down far enough reduces effectiveness.
- Flaring Elbows: Keep elbows slightly in front of the bar rather than directly under or behind it.
- Shrugging Shoulders Mid-Rep: Let the delts do the work — don’t let your traps take over.
Summary:
The military press is a cornerstone movement for upper body strength — but only when done with flawless form. Focus on a vertical bar path, tight core engagement, full range of motion, and smooth, controlled reps. Proper execution not only enhances gains in shoulder and triceps development but also reinforces your posture and total-body strength foundation.
Common Mistakes to Avoid During the Military Press
The military press is a highly effective compound lift, but it demands precision and awareness. Mistakes in form can lead to poor muscle activation, hindered progress, and even serious injuries. By understanding the common pitfalls, you can train smarter, safer, and more efficiently.
1. Overarching the Lower Back
One of the most frequent issues during the military press is excessive arching of the lower spine. This typically happens when the weight is too heavy or the core isn’t properly engaged.
- Why it matters: Overarching puts unnecessary stress on the lumbar spine and shifts the focus away from your shoulders.
- Fix it: Engage your core and glutes, and slightly tuck your pelvis to maintain a neutral spine. Avoid leaning back to “cheat” the bar overhead.
2. Flaring the Elbows Too Far Out
Improper elbow position during the press can place excessive strain on the shoulder joints and reduce pressing efficiency.
- Why it matters: Flared elbows can increase the risk of shoulder impingement and destabilize the lift.
- Fix it: Keep your elbows slightly in front of the bar and pointed down toward the floor at the start. This promotes a safer and stronger movement path.
3. Poor Head and Neck Position
Many lifters either crane their necks forward or look up excessively while pressing, disrupting alignment and balance.
- Why it matters: Improper neck alignment strains the cervical spine and affects the bar path.
- Fix it: Keep your chin tucked during the press. When the bar passes your forehead, move your head slightly back, then forward again (“through the window”) once the bar clears.
4. Pressing in an Arc Instead of a Straight Line
A curved or diagonal press path often results from poor shoulder mobility or an incorrect setup.
- Why it matters: An inefficient path makes the lift harder and places the bar away from your center of gravity.
- Fix it: Focus on pressing the bar vertically in a straight line, keeping it close to your face and over your midfoot when locked out.
5. Using Momentum or Leg Drive (Cheating)
The military press is a strict movement, meaning your legs should not contribute. Using momentum by bouncing the bar or dipping the knees turns it into a push press.
- Why it matters: It removes isolation from the shoulders and triceps, defeating the purpose of the strict press.
- Fix it: Keep your knees locked and perform the lift with controlled movement. If you need to use momentum, reduce the weight.
6. Not Lowering the Bar Fully or Rushing Reps
Some lifters perform partial reps or drop the bar too quickly, limiting range of motion and time under tension.
- Why it matters: Partial reps reduce muscle engagement and increase injury risk due to uncontrolled movement.
- Fix it: Lower the bar to your upper chest or clavicle, and use a 2–3 second tempo on the way down to increase muscle activation.
7. Neglecting Warm-Up and Mobility
Diving into heavy pressing without warming up the shoulders and thoracic spine is a recipe for strain or injury.
- Why it matters: Cold, stiff joints are more prone to damage, especially under overhead load.
- Fix it: Include dynamic shoulder warm-ups (e.g., arm circles, band pull-aparts) and mobility drills before pressing.
Summary
Avoiding these common mistakes can dramatically improve your military press results. The key is quality over quantity: prioritize form, alignment, control, and muscle engagement over ego lifting. As your technique improves, so will your strength, size, and confidence under the bar.
Training Tips and Progression Strategies
How to Incorporate Progressive Overload in the Military Press
Progressive overload is the cornerstone of strength and muscle development. If you want to get stronger and build muscle using the military press, you must consistently challenge your body to adapt by gradually increasing the workload over time. But unlike isolation movements, progressing on compound lifts like the military press requires strategy, patience, and proper technique.
Below are several practical and effective ways to apply progressive overload to the military press.
1. Increase the Load Gradually
The most straightforward way to apply progressive overload is by adding weight to the bar. However, because the military press uses smaller muscle groups like the deltoids and triceps, progression can be slower compared to other compound lifts like squats or deadlifts.
- How to do it: Add small increments—typically 2.5 to 5 lbs (1–2.5 kg)—each week or every other week.
- Pro Tip: Use microplates (1.25 lbs) if you’re struggling to add standard weight jumps. Small progress is still progress.
2. Increase Repetitions Within a Given Weight Range
If adding weight feels too taxing or stalls your progress, increasing reps within a given rep range can stimulate hypertrophy and strength gains.
- How to do it: Aim to perform 8–10 reps at a given weight. Once you can complete 10 reps with solid form, increase the weight slightly and start back at 6–8 reps.
- Example:
- Week 1: 3 sets x 8 reps @ 65 lbs
- Week 2: 3 sets x 10 reps @ 65 lbs
- Week 3: Increase weight to 70 lbs and repeat the cycle
3. Increase the Number of Sets
Volume is a key factor in hypertrophy. Adding another set can increase total time under tension and allow more practice of the lift.
- How to do it: Add a fourth or fifth set to your regular workout every few weeks.
- Note: Make sure recovery (sleep and nutrition) is dialed in when increasing total volume.
4. Use Slower Tempo or Paused Reps
Modifying tempo increases time under tension and forces muscles to work harder, which can lead to better strength and size gains—even without increasing weight.
- How to do it: Try a 3-second eccentric (lowering phase) and/or 1–2 second pause at the bottom of the lift.
- Bonus: Controlled reps help improve motor control, reduce injury risk, and correct imbalances.
5. Improve Frequency and Consistency
Practicing the military press more often can accelerate progress, especially if you’re still learning the movement.
- How to do it: Train the lift twice a week, using different rep ranges or variations (e.g., standing military press one day, seated press the other).
- Variation Example:
- Day 1: 4×6 heavy standing press
- Day 2: 3×10 lighter seated dumbbell press
6. Incorporate Accessory Movements
Strengthening supporting muscles can directly enhance your military press performance.
- Examples of accessory exercises:
- Lateral raises (medial delts)
- Overhead triceps extensions (lockout strength)
- Face pulls and rear delt flys (shoulder stability)
- Core work (planks, ab rollouts)
Final Tips
- Track your lifts weekly to spot trends and plateaus.
- Don’t rush progression—good form > heavier weight.
- Prioritize recovery and nutrition, as under-recovering will halt overload benefits.
- Expect slower progress on overhead pressing compared to lower-body lifts.
In short, progressive overload in the military press doesn’t just mean stacking more plates—it’s about consistently making your training more challenging through smart, measurable adjustments. With discipline and attention to detail, your shoulders and upper body strength will noticeably improve.
Accessory Exercises to Support Your Military Press
The military press is a powerful compound movement for building upper body strength, but if you want to break plateaus and develop pressing power faster, accessory work is essential. Supporting muscles like the triceps, deltoids, upper back, and core all contribute to successful overhead pressing. Incorporating strategic accessory exercises into your training helps address weak points, improve stability, and refine technique.
Below are key accessory exercises categorized by their primary support function for the military press:
1. Triceps Builders for Lockout Strength
The triceps play a crucial role in the final phase of the military press—locking out at the top. If you struggle with finishing your reps, it may be due to weak triceps.
Recommended accessory lifts:
- Close-Grip Bench Press – Emphasizes triceps while maintaining pressing mechanics.
- Overhead Dumbbell Triceps Extensions – Directly strengthens the long head of the triceps.
- Cable Triceps Pushdowns – Great for high-rep isolation and endurance building.
Tip: Include 2–3 sets of 10–12 reps at the end of your workout to target your triceps without over-fatiguing.
2. Shoulder Isolation for Deltoid Development
Strong, well-developed deltoids (especially anterior and lateral heads) are essential for pressing power and stability. These movements help build mass and muscle control.
Recommended accessory lifts:
- Lateral Raises – Target the side delts to improve balance and symmetry.
- Front Dumbbell Raises – Strengthen the anterior delts, a key muscle in the press.
- Arnold Press – Offers a deeper range of motion and hits multiple shoulder angles.
Tip: Keep the weights light to moderate and focus on strict form to avoid using momentum.
3. Upper Back and Core Stability Work
A strong upper back and core provides the stability needed to maintain proper posture and prevent excessive arching or wobbling during the press.
Recommended accessory lifts:
- Face Pulls – Build rear deltoid and trap strength to stabilize your shoulders.
- Plank Variations (Side Planks, Weighted Planks) – Enhance core bracing ability.
- Pendlay Rows or Chest-Supported Rows – Improve upper back support for the press.
Tip: Perform core work at the end of your session or on off-days to build functional strength without interfering with your main lift.
Bonus Tip: Programming Accessory Movements
- Pair pressing days with triceps and deltoid work.
- Include upper back and core movements 2–3 times per week.
- Aim for 2–4 accessory movements per workout, depending on your recovery and goals.
Summary
Accessory exercises are the missing link between a good military press and a great one. By strengthening the muscle groups that support the lift, you’ll not only increase your pressing numbers but also reduce the risk of injury and imbalances. Make these exercises a regular part of your routine, and your shoulder strength and stability will skyrocket.
Safety Tips and Injury Prevention
The military press is a highly effective compound lift for building upper body strength, but it also places significant stress on the shoulders, neck, and lower back. Without proper form and precaution, it’s easy to experience strains or long-term joint issues. Whether you’re a beginner or an advanced lifter, safety should always be your top priority when performing this movement.
Here are essential safety tips and injury prevention strategies to keep your overhead pressing both effective and risk-free:
1. Warm Up Your Shoulders and Upper Back
Jumping straight into heavy sets without warming up is one of the most common causes of injury. Cold, stiff muscles are more prone to tears and strains.
- How to do it: Spend 5–10 minutes warming up the rotator cuff and shoulder girdle with dynamic movements.
- Recommended warm-up drills:
- Arm circles and band pull-aparts
- Shoulder dislocations with a resistance band
- Scapular push-ups or wall slides
- Light overhead presses with an empty barbell or dumbbells
2. Use Proper Form and Core Engagement
Poor form increases the risk of spinal compression and shoulder impingement. One of the most dangerous mistakes is excessive leaning back during the lift, which puts stress on the lumbar spine.
- Key cues to remember:
- Stand tall with your core tight and glutes engaged
- Keep a neutral spine—don’t hyperextend your lower back
- Press the bar in a straight line overhead, not in front of or behind your body
- Form check: If you’re arching excessively, the weight is likely too heavy—scale back until you can press with control.
3. Grip Width and Wrist Position Matter
A grip that’s too wide or poor wrist positioning can strain the shoulders and wrists unnecessarily.
- How to do it:
- Use a slightly wider than shoulder-width grip for balance and joint alignment
- Keep your wrists stacked over your elbows, not bent backward
- Wrap your thumbs around the bar for a secure, safe grip
4. Don’t Lock Out Aggressively at the Top
While a controlled lockout at the top is fine, snapping your elbows into full extension at speed can damage the joints over time.
- Best practice: Press until your arms are straight but don’t hyperextend or slam your elbows—maintain tension.
5. Train Within Your Limits and Avoid Ego Lifting
Trying to lift more than you can handle—especially with the military press—often leads to form breakdown and injury.
- Stick to a manageable weight where you can perform all reps with good form
- If you’re struggling with reps, reduce the load instead of forcing through it
6. Use a Spotter or Perform Inside a Power Rack
If you’re lifting close to your 1RM (one-rep max) or attempting new weights, having a safety setup is essential.
- Options for safety:
- Have a spotter stand behind you (if using dumbbells or barbell)
- Use safety pins or straps in a power rack to catch the bar if you fail a rep
7. Listen to Your Body and Respect Pain Signals
Sharp pain, clicking, or grinding in your shoulders is a red flag. Don’t ignore discomfort, especially when lifting overhead.
- If pain persists, stop the movement and consult a physical therapist or coach. It’s better to miss one session than be sidelined for weeks.
Summary
To get the most out of the military press without setbacks, always prioritize safe lifting habits. A proper warm-up, sound technique, gradual progression, and smart training environment are key to preventing injuries. Remember—safety isn’t optional; it’s foundational to long-term strength and performance.
Military Press Workouts for Beginners and Pros
Beginner-Friendly Military Press Workout Plan
Starting your military press journey can feel overwhelming, especially if you’re new to strength training or overhead lifts. But with the right structure, you can safely build strength, master technique, and make consistent progress. This beginner-friendly workout plan is designed to help you develop shoulder power, reinforce proper form, and create a solid foundation for future gains.
Goals of This Workout Plan
- Develop proper form and mind-muscle connection
- Build baseline strength and endurance in the shoulders, triceps, and upper back
- Prevent injury by incorporating stability and mobility exercises
1. Warm-Up Routine (5–10 Minutes)
Warming up is crucial before doing the military press, especially for beginners. It helps prepare your joints, improve range of motion, and activate key muscle groups.
Warm-up components:
- Arm Circles (30 seconds each direction) – Loosen shoulder joints.
- Resistance Band Pull-Aparts (2 sets of 15 reps) – Activate upper back muscles.
- Scapular Wall Slides (2 sets of 10 reps) – Improve shoulder mobility and posture.
Tip: Always warm up with light weights before starting your working sets.
2. Main Lift: Barbell or Dumbbell Military Press
Start with either dumbbells (for better control and safety) or a barbell (if comfortable with technique). Begin with light to moderate weight.
Workout Prescription:
- 3–4 sets of 8–10 reps
- Rest 60–90 seconds between sets
- Focus on controlled tempo and proper bracing
Form Tip: Keep your core tight, glutes engaged, and press in a straight line overhead. Don’t flare your elbows too wide.
3. Supportive Accessory Exercises
These moves build strength in the muscles that support the military press, such as the triceps, deltoids, and upper back.
Example Accessories:
- Dumbbell Lateral Raises – 3 sets of 12–15 reps (side delts)
- Overhead Triceps Extensions – 3 sets of 10–12 reps (triceps strength)
- Face Pulls (using bands or cables) – 3 sets of 12–15 reps (rear delts and traps)
These moves also help improve shoulder stability and prevent injury.
4. Core and Mobility Finisher
Finish your session by strengthening your core and maintaining healthy shoulder mobility.
Recommended Finishers:
- Plank Holds (30–60 seconds) – Builds overhead pressing stability
- Shoulder Dislocates with a Band (2 sets of 15 reps) – Enhances shoulder mobility
Weekly Frequency:
Start with 2 sessions per week of military press-focused training, with at least 48 hours of rest in between to allow for proper recovery and adaptation.
Final Note
This beginner plan ensures you’re not just lifting, but learning the proper mechanics while building strength. As you grow more confident and your form becomes consistent, you can gradually increase weights, reduce reps, and add more volume to match your progress.
Intermediate and Advanced Military Press Routines
Once you’ve built a solid foundation with proper form, strength, and control in the military press, it’s time to level up your training. Intermediate and advanced routines are designed to increase volume, intensity, and complexity, helping you break through plateaus and enhance overhead pressing power.
These routines incorporate advanced programming strategies, progressive overload techniques, and accessory work that targets weak points and improves overall performance.
1. Intermediate Routine: Volume & Frequency Focus
At the intermediate stage, your goal should be to increase training frequency and overall workload while refining technique. This routine focuses on developing work capacity and building muscle endurance.
Weekly Structure (2 sessions per week):
Day 1 – Strength Focus
- Military Press: 4 sets of 5–6 reps @ 75–85% of 1RM
- Push Press: 3 sets of 5 reps
- Dumbbell Arnold Press: 3 sets of 10 reps
- Lateral Raises: 3 sets of 15 reps
- Close-Grip Push-Ups: 2 sets to failure
Day 2 – Hypertrophy Focus
- Seated Dumbbell Military Press: 4 sets of 8–10 reps
- Incline Dumbbell Front Raises: 3 sets of 12–15 reps
- Face Pulls (band or cable): 3 sets of 15–20 reps
- Overhead Triceps Extension: 3 sets of 12 reps
- Plank Shoulder Taps: 2 sets of 30 seconds
Focus: High-quality reps, strict form, and gradually increasing volume.
2. Advanced Routine: Strength + Power Split
Advanced lifters benefit from incorporating power and intensity techniques like low-rep max-effort work, paused reps, and explosive movement. This routine blends strength and speed for maximum progression.
Weekly Structure (3 sessions per week):
Day 1 – Max Effort Pressing
- Military Press: 5 sets of 3–5 reps @ 85–90% 1RM
- Paused Military Press (2-sec hold at bottom): 3 sets of 3 reps
- Weighted Dips: 3 sets of 6–8 reps
- Upright Rows: 3 sets of 12 reps
Day 2 – Speed & Volume
- Push Press (dynamic effort): 6 sets of 3 reps @ 60% 1RM (explosive tempo)
- Dumbbell Z-Press: 4 sets of 8 reps
- Banded Lateral Raises: 3 sets of 15–20 reps
- Cable External Rotations: 3 sets of 12 reps
Day 3 – Weak Point Targeting + Core Stability
- Incline Dumbbell Press: 3 sets of 10–12 reps
- Bottom-Up Kettlebell Press: 3 sets of 6–8 reps
- Overhead Farmer’s Carries: 3 sets of 30 seconds
- Weighted Planks: 2 sets of 45 seconds
Advanced athletes can experiment with variations like the behind-the-neck press, landmine press, or tempo work.
3. Progress Tracking and Recovery Integration
As you advance, tracking becomes even more important. Use a log to monitor:
- Weekly volume (sets x reps x load)
- Rep quality (range of motion, control)
- Recovery metrics (sleep, soreness, readiness)
You’ll also need to prioritize recovery—especially after heavy overhead work—to prevent overuse injuries:
- Deload every 4–6 weeks
- Incorporate soft tissue work (foam rolling, massage)
- Optimize protein intake and sleep quality
Remember: Intensity without recovery is a recipe for stagnation—or worse, injury.
Final Thoughts
Intermediate and advanced military press routines push your strength ceiling and demand smart programming. Whether you’re chasing a personal record or looking to improve shoulder hypertrophy, combining heavy work with smart accessories and recovery practices is key. Rotate intensity, track your progress, and be consistent—your overhead pressing power will soar.
Combining Military Press with Full-Body and Shoulder Workouts
The military press is a powerful, compound upper-body movement that naturally integrates well with both full-body and dedicated shoulder routines. By combining it strategically with other exercises, you can amplify muscle growth, improve shoulder strength and stability, and promote overall athletic development.
1. Integrating the Military Press into Full-Body Workouts
Full-body workouts are efficient and ideal for those training 2–4 times per week. Including the military press in these sessions ensures that your shoulders and triceps get adequate stimulus without compromising recovery for other muscle groups.
Sample Full-Body Workout with Military Press:
- Military Press – 4 sets of 5–8 reps (primary push movement)
- Barbell Back Squat – 3 sets of 6 reps (lower body strength)
- Pull-Ups or Lat Pulldown – 3 sets of 8–10 reps (vertical pull)
- Dumbbell Bench Press – 3 sets of 10 reps (horizontal push)
- Plank or Hanging Leg Raises – 3 sets for core stability
Pro Tip: Place the military press early in the workout when energy levels are highest, especially if strength progression is a goal.
2. Building Shoulder-Centric Workouts Around the Military Press
When doing a dedicated shoulder day, the military press should be your cornerstone lift. It’s a great way to activate all three deltoid heads—especially the front (anterior) and side (lateral) delts—while also engaging the traps, triceps, and core.
Sample Shoulder Workout Featuring the Military Press:
- Military Press (Barbell or Dumbbell) – 5 sets of 5–6 reps
- Lateral Raises – 4 sets of 12–15 reps (targeting the lateral delts)
- Rear Delt Flys (Dumbbell or Machine) – 3 sets of 15 reps (posterior delts)
- Arnold Press – 3 sets of 10 reps (dynamic shoulder engagement)
- Face Pulls – 3 sets of 15–20 reps (shoulder health and stability)
Optional: Add shrugs, upright rows, or band pull-aparts to boost trap activation and shoulder girdle support.
3. Balancing Push/Pull for Shoulder and Postural Health
One common mistake in upper-body training is overemphasizing pressing movements without balancing them with adequate pulling exercises. Pairing military press with pulling moves like rows and face pulls helps maintain shoulder integrity and prevents injury.
Push/Pull Pairing Example:
- Military Press + Seated Cable Row (superset)
- Lateral Raise + Face Pulls (superset)
- Overhead Dumbbell Press + Inverted Rows (superset or alternating sets)
This approach not only saves time but also keeps your shoulder joint balanced and strong.
Final Tip:
Whether your goal is hypertrophy, strength, or functional fitness, combining the military press with complementary movements in a full-body or shoulder-specific workout provides structure, efficiency, and long-term progress. Ensure you’re varying your rep ranges, tracking your lifts, and recovering adequately to make the most of each session.
Conclusion
Mastering the military press is essential for anyone serious about developing strong, muscular shoulders and improving overall upper body strength. By focusing on proper form, gradually increasing your load through progressive overload, and incorporating supportive accessory exercises, you can make consistent progress while minimizing the risk of injury. Whether you’re new to the exercise or looking to refine your technique, following the step-by-step guidance outlined in this post will help you unlock the full potential of the military press and elevate your training to the next level.