The trap bar deadlift, also known as the hex bar deadlift, is one of the most beginner-friendly and joint-safe exercises you can add to your strength training routine. Unlike the traditional barbell deadlift, the trap bar design allows for a more upright torso, placing less stress on your lower back while still activating your legs, glutes, and traps. Whether you’re just starting your fitness journey or looking for a safer alternative to heavy pulling movements, this exercise delivers full-body strength with minimal risk.
In this guide, you’ll learn exactly what the trap bar deadlift is, how to do it with proper form, its top benefits, and how to integrate it into your workouts for the best results.
What Is the Trap Bar Deadlift?
Understanding the Trap Bar (aka Hex Bar)
The trap bar, often referred to as a hex bar, is a uniquely shaped piece of gym equipment designed to make certain strength exercises—like deadlifts, shrugs, and farmer’s carries—safer and more accessible. Unlike a traditional straight barbell, the trap bar has a hexagonal or diamond-shaped frame that allows you to stand inside the bar rather than behind it. This subtle change in positioning offers a significant advantage, especially for beginners or lifters with mobility limitations.
Most trap bars come with two sets of handles: a lower set (level with the bar) and a raised set (elevated for easier gripping). The raised handles are particularly helpful for beginners, as they reduce the range of motion required, making it easier to lift the weight from the ground without compromising form.
One of the main reasons the trap bar is favored by trainers and physical therapists is because it allows for a more neutral grip (palms facing inward), which reduces strain on the wrists and shoulders. It also naturally encourages a more upright torso position, minimizing shear stress on the lower back—a common issue with barbell deadlifts.
In short, the trap bar’s ergonomic design is what makes the trap bar deadlift so beginner-friendly. It combines the strength benefits of a deadlift with reduced injury risk, helping you build muscle and confidence without the steep learning curve of more technical lifts.
How the Trap Bar Deadlift Differs From Conventional Deadlifts
While both the trap bar deadlift and the conventional barbell deadlift are foundational strength movements that target many of the same muscles—like the glutes, hamstrings, quads, lower back, and traps—their mechanics, positioning, and muscle emphasis are quite different. Understanding these key differences will help you choose the right variation based on your goals, experience level, and physical needs.
Body Position and Bar Path
In a conventional deadlift, the barbell starts on the floor in front of your shins. This position forces you to hinge more at the hips, lean your torso forward, and pull the bar vertically along your body. This places more demand on the posterior chain, particularly the hamstrings, glutes, and spinal erectors.
In contrast, the trap bar deadlift allows you to stand inside the bar. This changes the bar path to be more centered with your body’s midline, which reduces the amount of forward lean. As a result, your torso stays more upright, and your knees bend more, making it a hybrid movement between a squat and a deadlift.
Grip and Shoulder Position
The neutral grip (palms facing inward) used with a trap bar is easier on the shoulders and wrists compared to the overhand or mixed grip typically used with a straight barbell. This ergonomic hand position also helps maintain better posture throughout the lift, making the trap bar deadlift more joint-friendly.
Muscle Activation and Emphasis
- Conventional Deadlift: Heavily targets the posterior chain—especially the hamstrings, glutes, and lower back. It requires more spinal stability and posterior strength to maintain proper form.
- Trap Bar Deadlift: Still works the posterior chain but shifts some of the load to the quads and upper traps due to the more upright stance. It engages a more balanced mix of anterior and posterior muscles.
Injury Risk and Learning Curve
The conventional deadlift is highly effective but comes with a steeper learning curve and a higher risk of lower back strain, especially for beginners with poor mobility or body mechanics.
The trap bar deadlift, on the other hand, is often seen as a safer and more forgiving variation. The design naturally encourages better form, reducing the chances of rounding the back or pulling with poor technique.
In summary:
- Choose the trap bar deadlift if you’re new to lifting, want a safer alternative, or are focused on general strength and athletic performance.
- Choose the conventional deadlift if you’re targeting maximum posterior chain development and want to improve technical deadlift strength for powerlifting or advanced training.
Who Should Do the Trap Bar Deadlift?
The trap bar deadlift is one of the most versatile strength training exercises, and it’s suitable for a wide range of individuals—from absolute beginners to experienced athletes. Thanks to its joint-friendly design and balanced muscle activation, this lift can be adapted to many goals and fitness levels. Here’s a closer look at who can benefit most from adding trap bar deadlifts to their training routine:
1. Beginners Learning to Deadlift Safely
If you’re new to strength training, the trap bar deadlift is arguably the best starting point for learning proper deadlifting mechanics. The trap bar’s neutral grip and centered weight distribution allow for a more natural lifting position, reducing the risk of rounding your back. It helps beginners build strength, body awareness, and confidence before progressing to more advanced variations like the barbell deadlift.
2. Lifters with Lower Back Pain or Injury History
For those recovering from or prone to lower back pain, the trap bar deadlift is a smart alternative to conventional deadlifts. Because it promotes a more upright torso and minimizes forward lean, there’s significantly less shear stress on the lumbar spine. This makes it a great choice for maintaining strength while protecting the back.
3. Athletes Focused on Power and Explosiveness
Many sports coaches use trap bar deadlifts to develop explosive power, speed, and force production, especially in athletes who sprint, jump, or change direction quickly. The upright torso and even loading make it easier to train with lighter weights at higher velocities, perfect for improving athletic performance without excessive fatigue or injury risk.
4. Older Adults and General Fitness Clients
The trap bar deadlift can also be highly beneficial for older adults or general population clients focused on functional strength, balance, and injury prevention. The raised handles make it easier to reach the bar without compromising posture, and the movement pattern closely mimics everyday activities like lifting grocery bags or moving furniture.
5. Bodybuilders and Aesthetics-Focused Lifters
Although bodybuilders often favor machines and isolation exercises, the trap bar deadlift offers a compound lift that works the glutes, hamstrings, quads, and traps all at once. It can be used during strength or hypertrophy blocks to add volume and intensity without overloading the lower back or risking injury.
In summary:
If you’re looking for a safe, effective, and accessible way to build full-body strength, the trap bar deadlift is a smart choice—regardless of your age, goal, or experience level. Its ability to adapt to different body types and training needs makes it a valuable tool in almost any strength program.
Benefits of the Trap Bar Deadlift for Beginners
Easier on the Lower Back and Spine
One of the most significant advantages of the trap bar deadlift—and a major reason it’s recommended for beginners and injury-prone lifters—is that it’s much easier on the lower back and spine compared to traditional deadlift variations.
Neutral Spine Made Easy
In conventional barbell deadlifts, the bar starts in front of your body, requiring a deeper hip hinge and forward torso lean. This positioning places a greater load on the lumbar spine (lower back), especially if form breaks down. If you have mobility limitations in the hips or hamstrings, maintaining a flat back during the barbell deadlift can be challenging—and potentially dangerous.
The trap bar, however, changes the game. Since the handles are located at your sides, the load is more centered with your body’s center of gravity. This setup naturally allows for a more upright torso throughout the lift. When your chest stays higher and your hips don’t have to travel as far back, the demand on your lower back muscles and spinal stabilizers is greatly reduced.
Reduced Shear Forces on the Spine
Another key biomechanical benefit is the reduction of shear forces—those sideways, sliding pressures that can place undue stress on spinal discs. In a trap bar deadlift, your body doesn’t need to counterbalance the weight in front of you as aggressively. That means the compressive forces are more vertical, and your spine experiences less torque.
This makes the trap bar deadlift a much safer option for:
- People recovering from back injuries
- Lifters prone to lumbar fatigue or stiffness
- Anyone looking to train hard without compromising spinal health
Beginner-Friendly Positioning Reduces Injury Risk
Because it’s easier to maintain proper alignment with a trap bar, beginners are less likely to make common deadlifting mistakes—like rounding the lower back or jerking the bar off the floor. The more upright posture and neutral grip help reinforce good technique right from the start, building a strong foundation without exposing the spine to unnecessary strain.
In short: If you want to get all the benefits of deadlifting—like increased strength, muscle growth, and power—without placing excessive stress on your lower back, the trap bar deadlift is an ideal choice. It’s one of the smartest ways to train hard and stay healthy, especially if spinal safety is a top priority.
Full-Body Muscle Engagement
The trap bar deadlift is often called a “total-body powerhouse” for good reason—it recruits multiple major muscle groups in a single, efficient movement. Whether your goal is to build strength, increase muscle mass, or boost functional performance, this lift delivers impressive full-body muscle engagement with every rep.
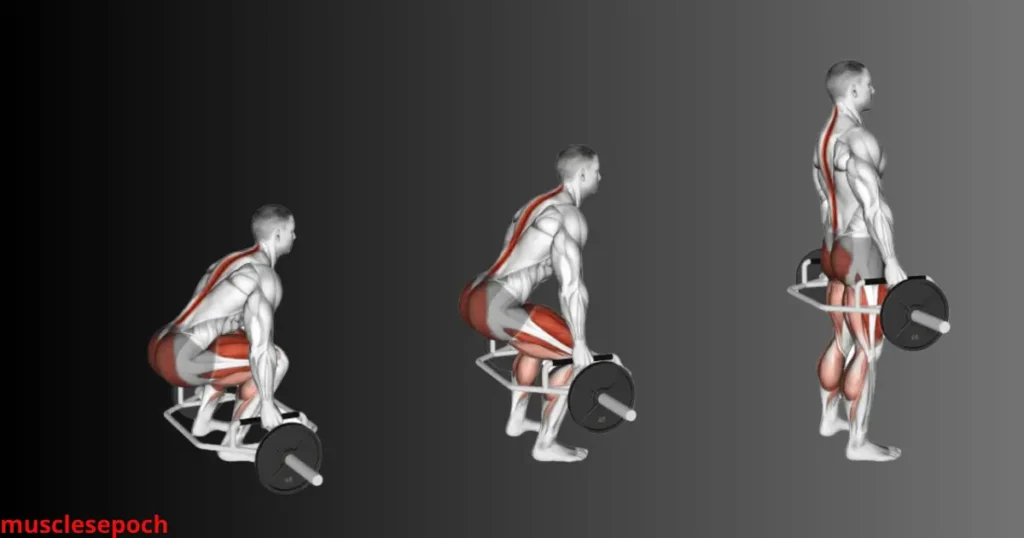
Lower Body: Glutes, Quads, and Hamstrings
At the heart of the trap bar deadlift are the posterior chain muscles—the glutes and hamstrings. These muscles generate the power needed to lift the weight from the ground and drive your hips forward at the top of the movement.
However, unlike the conventional deadlift, the trap bar’s upright position also places more emphasis on the quadriceps. Because your knees bend more and your hips hinge slightly less, your quads work harder to extend the knees and help initiate the lift. This creates a balanced stimulus between the front and back of your legs, making the trap bar deadlift a hybrid between a squat and a deadlift in terms of lower body muscle recruitment.
Core: Abs, Obliques, and Lower Back
To perform a proper trap bar deadlift, your core must remain tight and braced throughout the movement. This includes not just your abs, but also your obliques and lower back stabilizers. A strong, engaged core helps protect your spine, maintain good posture, and transfer power from your legs to the bar.
Even though the trap bar deadlift is easier on the spine than conventional versions, your core still works hard—especially under heavy loads. This helps build functional, anti-rotational core strength that transfers to sports, real-world tasks, and other lifts.
Upper Body: Traps, Lats, Forearms, and Grip
Your upper body isn’t left out, either. The trapezius muscles (especially the upper traps) are heavily engaged as you hold the weight, stabilize the bar, and lock out at the top. The latissimus dorsi (lats) assist in keeping your shoulders back and your spine aligned, while your rhomboids and rear delts work isometrically to control posture.
In addition, the forearms and grip muscles get a serious workout. Holding heavy trap bar loads forces your hands to grip tightly, strengthening your grip endurance and forearm development—both crucial for performance and injury prevention.
Compound Movement Efficiency
Because it targets multiple muscle groups at once, the trap bar deadlift offers maximum return on effort. It builds strength, size, and stability across your entire body in just one exercise, making it ideal for time-efficient training programs. Whether you’re training for aesthetics, strength, or sports performance, full-body engagement makes this lift a cornerstone movement in almost any routine.
Summary: The trap bar deadlift isn’t just a leg or back exercise—it’s a true full-body builder. From your legs and glutes to your core and traps, nearly every major muscle group contributes to moving the weight and stabilizing your body. This makes it one of the most effective compound exercises for total-body strength and muscle development.
Faster Strength Gains With Less Risk
One of the biggest reasons lifters—especially beginners and athletes—choose the trap bar deadlift is because it helps produce faster strength gains while reducing the risk of injury. This unique combination makes it one of the most efficient and sustainable exercises for building full-body power over time.
Beginner-Friendly Mechanics Mean Quicker Progress
The trap bar deadlift’s neutral grip and centered load naturally place your body in a more upright and stable position. This makes it much easier to learn and perform correctly compared to the conventional barbell deadlift, which requires a steeper learning curve and greater mobility.
Because form is easier to master, beginners are able to:
- Lift more weight sooner
- Train more frequently with less fatigue
- Progress week to week without setbacks
This quick mastery of technique and ability to safely load the movement means you’ll build strength faster and more consistently than with more technical lifts.
Reduced Injury Risk Means Fewer Setbacks
Many lifters experience plateaus—or even regress—due to poor form or injuries, especially in lifts that place high stress on the spine and joints. The trap bar deadlift minimizes those risks through:
- A neutral spine position that protects the lower back
- A neutral grip that reduces shoulder and wrist strain
- A shorter range of motion (especially with raised handles), which lowers stress on knees and hips
This safer setup means fewer aches, fewer injuries, and less missed training—allowing you to train harder and longer over time.
Greater Power Output and Load Potential
Studies and strength coaches often report that lifters can lift more total weight with a trap bar than with a barbell. Why? Because the lift is biomechanically more efficient. The centered bar path reduces mechanical disadvantage, allowing you to generate more force through your legs and hips without excessive spinal stress.
This means you can:
- Move heavier loads
- Activate more total muscle
- Trigger greater strength adaptations
All while maintaining better posture and reducing the chance of technique breakdown—especially under fatigue.
Progress Without Plateaus
The combination of safe mechanics, easier recovery, and heavier lifting potential makes the trap bar deadlift an ideal tool for long-term progress. Whether you’re training for general strength, fat loss, muscle growth, or athletic performance, it lets you increase volume and intensity without hitting a wall or burning out.
In summary:
The trap bar deadlift allows you to build strength faster and more safely than many traditional barbell lifts. Its user-friendly design reduces injury risk, supports heavier lifts, and promotes consistent progress—making it one of the best compound exercises for anyone looking to get strong without setbacks.
How to Do the Trap Bar Deadlift With Proper Form
Step-by-Step Trap Bar Deadlift Technique
To get the most out of the trap bar deadlift—and avoid injury—it’s essential to use proper technique. Fortunately, the movement is easier to learn than conventional deadlifts, especially because the trap bar naturally positions your body in a safer, more upright stance. Follow this step-by-step guide to perform the trap bar deadlift with correct form from start to finish.
1. Set Up the Trap Bar
- Place the trap bar on a flat surface, ensuring it won’t roll or shift.
- If your bar has raised handles, start with those to make the movement easier—especially if you’re a beginner or have limited mobility.
- Load the bar with an appropriate weight—start light to focus on form.
2. Step Inside and Position Your Feet
- Stand inside the trap bar’s frame with feet about hip-width apart.
- Your toes should point slightly outward (10–15 degrees), and the middle of your feet should line up with the handles.
- Make sure your weight is distributed evenly across your entire foot—not just your toes or heels.
3. Grip the Handles and Set Your Back
- Reach down and grasp the handles firmly with a neutral grip (palms facing your sides).
- Keep your chest tall and pull your shoulders back and down to engage your lats.
- Brace your core as if you’re preparing to take a punch.
- Your spine should be neutral—not rounded or over-arched—with your head in line with your back.
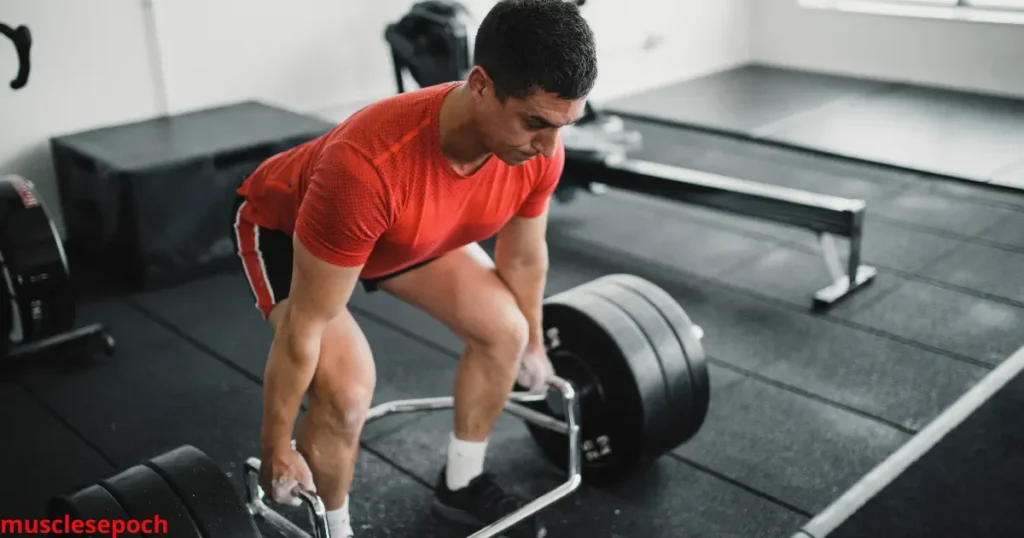
4. Get into the Starting Position
- Bend your hips and knees to lower your body into position.
- Your hips should be slightly higher than your knees and your shoulders directly over or slightly in front of the handles.
- Avoid dropping your hips too low (like a squat) or pushing them too far back (like a stiff-legged deadlift).
- You should feel tension in your glutes, hamstrings, and quads.
5. Lift the Bar with Control
- Drive through your heels and midfoot as you extend your hips and knees simultaneously.
- Keep your chest up and your back flat throughout the lift.
- As you rise, push the floor away and squeeze your glutes at the top of the movement.
- Finish the rep standing tall with your shoulders over your hips and arms fully extended.
6. Lower the Bar Under Control
- Hinge at the hips first by pushing them backward.
- Once the bar passes your knees, begin to bend your knees to return to the starting position.
- Keep the bar path straight and close to your body.
- Gently set the bar back on the floor without letting it crash or bounce.
Pro Tips for Better Form and Safety
- Keep your core braced throughout the lift to protect your lower back.
- Avoid rounding your spine—maintain a straight, neutral back.
- Don’t overextend or lean back at the top of the lift.
- Breathe properly: Inhale before the lift, hold during the pull, and exhale at the top or once you’ve lowered the weight.
- Start with lighter loads and higher reps (e.g., 3–4 sets of 8–10 reps) before progressing to heavier weights.
In short: Mastering the trap bar deadlift technique will help you lift more weight, build total-body strength, and protect your joints. Take your time, focus on quality reps, and you’ll see steady gains with minimal risk.
Common Trap Bar Deadlift Mistakes to Avoid
While the trap bar deadlift is generally easier to perform correctly than a traditional deadlift, beginners and even seasoned lifters can still fall into common pitfalls that reduce effectiveness and increase injury risk. Being aware of these mistakes and knowing how to fix them will help you maximize your gains while staying safe.
1. Rounding the Lower Back
One of the most frequent errors is allowing the lower back to round during the lift. This places excessive stress on your lumbar spine and increases the risk of injury.
How to avoid it:
- Focus on keeping your spine neutral throughout the lift.
- Engage your core and think about bracing your abs like a tight corset before pulling the bar.
- Keep your chest lifted and shoulders back.
2. Using Your Arms to Pull
The trap bar deadlift is a hip and leg-driven movement, not an arm exercise. Trying to pull the bar up with your arms or biceps can lead to poor form and strain.
How to avoid it:
- Keep your arms straight and relaxed, acting as hooks holding the bar.
- Drive the movement by extending your hips and knees rather than pulling with your hands.
3. Starting Too Heavy
Jumping straight into heavy weights without mastering form often causes technique breakdown, fatigue, and injury.
How to avoid it:
- Start with lighter weights or just the bar to practice perfect form.
- Gradually increase weight only after you can confidently perform multiple clean reps.
4. Lifting with the Bar Too Far in Front
If the bar drifts forward away from your body, it increases leverage on your lower back and decreases lifting efficiency.
How to avoid it:
- Keep the bar close to your body, centered over mid-foot.
- Your hands should grip the handles firmly at your sides, maintaining a vertical bar path.
5. Not Using Proper Foot Placement
Feet placed too wide or too narrow can negatively affect your balance and the muscle recruitment pattern.
How to avoid it:
- Position your feet hip-width apart, toes slightly pointed out (about 10–15 degrees).
- Ensure your weight is evenly distributed through your entire foot.
6. Overextending at the Top
Leaning back or hyperextending your lower back at the top of the lift can strain your spine unnecessarily.
How to avoid it:
- Stand tall with your hips fully extended, but avoid leaning backward.
- Maintain a neutral spine, and focus on squeezing your glutes.
7. Neglecting Core Engagement
Failing to brace your core reduces spinal stability and increases the risk of injury.
How to avoid it:
- Before lifting, take a deep breath and brace your abs as if preparing for impact.
- Keep that tension throughout the entire movement.
Summary
Avoiding these common trap bar deadlift mistakes ensures you train safely and effectively. Focus on maintaining neutral spine alignment, proper foot and hand positioning, and controlled movement patterns. When done correctly, the trap bar deadlift is a powerful tool for building full-body strength with minimal risk.
Pro Lifting Cues for Better Form and Power
Even with a user-friendly exercise like the trap bar deadlift, small adjustments can make a big difference in your form, strength output, and injury prevention. These pro lifting cues will help you dial in technique, maximize power, and get the most out of every rep—whether you’re a beginner or an experienced lifter.
1. “Grip the Handles Like a Bear Hug”
A strong, secure grip is essential not only for holding the bar but also for transmitting power through your entire body. Imagine trying to crush a bear hug as you grab the handles—this will engage your forearms, traps, and upper back muscles.
- This tight grip helps stabilize the bar and prevents it from wobbling.
- It activates the upper traps and lats, promoting better posture.
2. “Chest Up, Shoulders Back”
Keeping your chest elevated and shoulders retracted sets your spine in a safe, neutral position and engages your lats to stabilize the torso.
- Think about proud posture or “showing your logo” on your chest.
- This cue prevents rounding of the upper back and keeps the spine aligned.
3. “Brace Your Core Like You’re About to Get Punched”
Before you lift, take a deep breath and tighten your abdominal muscles as if bracing for impact. This increases intra-abdominal pressure, protecting your spine and creating a solid foundation for the lift.
- Avoid simply sucking in your stomach; instead, push your abs outward to create tension.
- Maintain this brace throughout the entire lift.
4. “Drive Through Your Heels”
Powerful hip and leg extension comes from pushing through your heels—not your toes. This helps engage your glutes and hamstrings more effectively and prevents forward knee collapse.
- Feel the ground beneath your heels and midfoot during the lift.
- Keep your weight balanced, but avoid shifting forward onto your toes.
5. “Keep the Bar Close and Pull Yourself to the Bar”
Instead of pulling the bar away from you, think about pulling yourself upward while keeping the bar close to your body. This minimizes shear forces on your spine and improves lifting efficiency.
- Keep your arms straight and avoid “yanking” the bar with your hands.
- Imagine the bar is glued to your legs throughout the lift.
6. “Hips and Knees Extend Simultaneously”
For a smooth, powerful lift, coordinate the extension of your hips and knees at the same time.
- Avoid letting your hips shoot up before your knees straighten or vice versa.
- This balanced movement pattern optimizes force production and reduces injury risk.
7. “Squeeze Your Glutes at the Top”
Locking out the lift with a strong glute contraction stabilizes your pelvis and ensures full hip extension.
- Think about pinching a coin between your glutes at the finish.
- Avoid leaning backward—stand tall with a neutral spine.
Bonus Cue: “Control the Descent Like You Control the Lift”
Many lifters focus on the lifting phase but let the weight drop too quickly on the way down. Lower the trap bar under control by hinging at the hips first, then bending the knees—this maintains tension, reinforces good technique, and prevents injury.
In summary:
Using these pro lifting cues will help you maintain perfect form, generate maximum power, and stay injury-free during your trap bar deadlift sessions. Try integrating one or two cues per workout until they become second nature for consistent progress.
Programming Trap Bar Deadlifts Into Your Routine
Best Sets and Reps for Beginners
When starting out with the trap bar deadlift, it’s crucial to structure your workouts with the right sets and reps to build strength, perfect your form, and avoid injury. The volume and intensity you choose can significantly impact your progress and how your body adapts to the new movement.
Why Sets and Reps Matter for Beginners
Beginners benefit most from a balanced approach that emphasizes technique mastery, muscle endurance, and gradual strength gains. Doing too many reps with poor form can increase injury risk, while too few reps with very heavy weights might lead to fatigue and discourage progress.
Recommended Sets and Reps Range
For most beginners, a moderate rep range with multiple sets is ideal to develop coordination, muscular endurance, and foundational strength:
- Sets: 3 to 4 sets per workout
- Reps: 6 to 10 repetitions per set
This range allows you to:
- Practice proper form with enough repetitions to develop motor patterns
- Build muscle endurance and strength gradually
- Manage fatigue effectively
Choosing the Right Weight
Pick a weight that challenges you but still allows you to complete your reps with clean, controlled form.
- You should feel like you could perform 1-2 more reps at the end of each set.
- If form breaks down, reduce the load.
- Gradually increase weight as you become more comfortable and confident.
Rest Periods for Recovery
Rest is important to maintain quality across sets:
- Beginners should rest 60 to 90 seconds between sets.
- This allows partial recovery without cooling down too much, helping you stay focused on technique.
Frequency and Progression
- Start with trap bar deadlifts 1-2 times per week.
- As you improve, increase volume or weight slowly—aim for about 5-10% increases per week depending on your recovery and form.
- Consider pairing with complementary exercises like squats, lunges, or core work.
Sample Beginner Trap Bar Deadlift Workout
- Warm-up: 5–10 minutes of light cardio and dynamic stretches
- Trap Bar Deadlift: 3 sets of 8 reps with moderate weight
- Rest: 90 seconds between sets
- Follow-up with accessory work (e.g., planks, glute bridges) if desired
In summary:
Starting with 3-4 sets of 6-10 reps at a manageable weight helps beginners build strength safely while mastering technique. Prioritize control and consistency over heavy lifting early on to set the foundation for long-term success with the trap bar deadlift.
Where It Fits in Push-Pull-Legs or Full-Body Workouts
The trap bar deadlift is a versatile and highly effective compound lift that fits perfectly into many workout splits, especially Push-Pull-Legs (PPL) and full-body routines. Understanding how to incorporate this exercise strategically will help you maximize strength gains, improve muscle balance, and optimize recovery.
Trap Bar Deadlift in Push-Pull-Legs (PPL) Programs
The PPL split divides workouts based on movement patterns:
- Push days: Exercises targeting chest, shoulders, and triceps
- Pull days: Exercises focusing on back and biceps
- Leg days: Exercises working the quads, hamstrings, glutes, and calves
Best Placement: Leg Day or Pull Day?
While the trap bar deadlift primarily targets the posterior chain (glutes, hamstrings, lower back) and involves the quads, it also engages your upper back and traps.
- Leg Day: Because it heavily involves hip and knee extension, the trap bar deadlift is often placed on leg day alongside squats and lunges. This allows you to focus on lower-body strength and ensures ample recovery before upper-body sessions.
- Pull Day: Some lifters prefer trap bar deadlifts on pull day since the exercise activates the back muscles and traps significantly, aligning with other pulling movements like rows and pull-ups.
Tip: Experiment with both placements to see which fits best with your overall training volume and recovery.
Trap Bar Deadlift in Full-Body Workouts
In full-body training programs, you hit all major muscle groups in each session. The trap bar deadlift is an excellent choice here because:
- It efficiently recruits multiple muscle groups across your lower and upper body.
- It allows you to develop strength and power in fewer exercises, saving time without sacrificing results.
- It pairs well with pressing and pulling upper-body movements, creating balanced workouts.
Example: A full-body workout might include trap bar deadlifts, dumbbell bench press, and pull-ups in one session.
Programming Considerations
- Frequency: For beginners, performing trap bar deadlifts 1-2 times per week is ideal to allow for recovery and technical practice. More advanced lifters may increase frequency or volume depending on goals.
- Volume: Adjust sets and reps based on your split and goals—higher volume for hypertrophy, lower reps with heavier loads for strength.
- Recovery: Since trap bar deadlifts are taxing on the nervous system and muscles, prioritize rest days and complementary mobility work to avoid overtraining.
Balancing with Other Exercises
Because the trap bar deadlift targets the posterior chain, balance your program with:
- Push exercises: Bench press, overhead press
- Horizontal pulls: Rows, face pulls
- Unilateral leg work: Lunges, step-ups
This balanced approach prevents muscle imbalances and supports overall functional strength.
In summary:
The trap bar deadlift is a flexible and powerful lift that fits well in both Push-Pull-Legs splits—mainly on leg or pull days—and in full-body workouts. Its compound nature makes it a cornerstone movement to develop strength, muscle balance, and athleticism across training styles.
When to Progress or Add Weight Safely
Knowing when and how to add weight to your trap bar deadlift is essential for continuous progress while minimizing the risk of injury. Progressing too quickly can lead to form breakdowns or overtraining, while progressing too slowly can stall your strength and muscle gains. The key is to strike a balance between challenging your body and protecting your joints.
Listen to Your Body First, Not Just the Numbers
Before chasing bigger plates, ask yourself:
- Are you maintaining perfect form throughout all your reps?
- Can you complete all your sets without excessive fatigue or breakdown in technique?
- Do you recover well between sessions—no lingering joint pain, tightness, or discomfort?
If the answer to all of these is yes, it may be time to safely increase the load.
Follow the “2-for-2 Rule”
A simple and effective guideline many lifters use is the “2-for-2 rule”:
If you can perform 2 extra reps over your target rep range in the last set for 2 workouts in a row, it’s a sign you’re ready to increase weight.
For example:
- Your program says 3 sets of 8 reps.
- You complete 10 reps in your last set for two consecutive sessions.
- Time to go heavier (increase weight by 5–10%).
How Much Weight Should You Add?
When it’s time to progress, use gradual increments—especially as a beginner. Adding too much too fast increases the risk of injury or plateaus.
Here’s a general guideline:
- Beginners: Add 5–10 lbs (2.5–5 kg) per side
- Intermediate lifters: Add 10–20 lbs (5–10 kg) per side depending on confidence and form
- Use microplates (1.25–2.5 lbs) if available for smoother, consistent progress
Stay Patient: Strength Progress Isn’t Linear
Everyone wants to lift more, faster. But true strength is built with consistency, not ego. It’s normal to have fluctuations—some days you feel strong, other days you might need to hold back.
- Deload every 4–6 weeks by reducing load or volume to allow your body to recover.
- Take notes after every workout to track performance trends over time.
- Prioritize quality reps over quantity or weight.
Signs You Shouldn’t Increase Weight Yet
Even if you’re eager to go heavier, you may need to hold off if:
- You’re losing form, especially at the bottom or lockout.
- Your lower back feels strained or sore the next day.
- You’re excessively sore or fatigued after every session.
- You’re grinding out every rep with no control.
In these cases, focus on refining your technique or repeating the current weight for another week.
Alternative Progressions (Not Just Adding Weight)
Progress doesn’t always mean more plates. You can also:
- Add more reps (e.g., from 6 to 8)
- Add more sets (e.g., from 3 to 4 sets)
- Slow down the tempo for greater time under tension
- Shorten rest times to increase intensity
- Use pause deadlifts or deficit pulls to challenge yourself without maxing out weight
In summary:
Progressing safely with the trap bar deadlift means paying attention to your form, recovery, and consistency. Use tools like the 2-for-2 rule, track your lifts, and make small, smart increases. Long-term success comes from steady, intelligent growth—not from rushing the process.
Conclusion
The trap bar deadlift is a powerful yet accessible movement for lifters of all levels—especially beginners who want to build strength safely. With its joint-friendly design, full-body muscle activation, and versatility in programming, it’s no surprise this lift is a staple in both athletic and general fitness training. By focusing on proper technique and gradual progression, you’ll not only reduce your injury risk but also maximize your gains.
Ready to take your strength training to the next level? Add the trap bar deadlift to your next workout and feel the difference.
good job .
TINKS MY FREIND